SBE306 Assignment 4 (VTK)
- data : Directory containing Head and Ankle datasets
Description
A 3D medical viewer built with vtk-js
Team
Team Name : team-22-final
Team Members
| Name | Section | BN |
|---|---|---|
| Mustafa Megahed gamil | 2 | 31 |
| Mahmoud Mohamed Mahmoud Ahmed | 2 | 23 |
| Ahmed Hossam Eldeen | 1 | 6 |
| Hamza Jamal ALshaikh | 1 | 27 |
Table of content
1. Task Objectives
2. Description
3. Features in our web app
4. Issues
5. code snippet
6. Conclusion
Task Objectives
The main target of this project is: Loading vtk.js Example
● Surface rendering
● Ray casting rendering
● Interactive widgets
● Preset controlling
● Web GUI application
Description
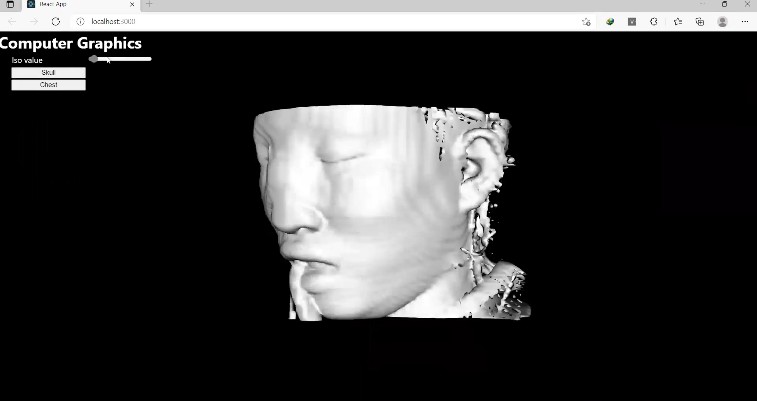
Building volume rendering web app with VTK.js,react & HTML Using datasets provided in vtk examples (head for surface rendering and chest for ray casting)
Features in our web app
● making two button in a (div) to switch between two example,button for skull &button for a chest
● bulding Surface rendering with adjustable iso value with a slidder in skull Example
● Adding Ray casting rendering (with a fixed transfer function) & interactive widget to cut the volume in the three perpendicular planes in a chest Example
Issues
| Issue | Solution |
|---|---|
| faced some problems in running example such as loading data | replace ${BASE_PATH} in reader function with https://kitware.github.io/vtk-js |
| faced problems in all imports | replace vtk.js/Sources with @kitware/vtk.js |
| switching between the two examples was dificult | making two files (one for head and other for chest) , creating a main App and donig two button in a retrun html and linking them with a function that we have import from two files |
code snippet
first We make code snippet in main app we make two button one for chest and on for skull in return HTML
  <button style={{width:"150px"}} onClick={clickhead}>Skull</button>
  <button style={{width:"150px"}} onClick={clickchest}>Chest</button>

      );
import two file (chest.js,head.js)
import head from './head';
import Chest from './chest';
making two click function one for chest and the other for head to caling the in the two buttons
const clickchest =()=>{
    chest()
  }
  const clickhead =()=>{
    head()
  }
using zindex in to overlap the black widget in the return html in main app
  return (
    <div style={{
      zIndex:"2",
      position: "relative"
  }}>
in chest file
we using margin to translate the container of transfer function
widgetContainer.style.marginLeft='1050px';
get transfer function from PiecewiseGaussianWidget example in vtk.js datasets and put it in the ImageCroppingWidget example and linking them
  //----------------transfer function-----------------------///
//////////////////////////////////////////////////////////////////////////////////
const rootContainer = document.querySelector(
  '.vtk-js-example-piecewise-gaussian-widget2'
);
const containerStyle = rootContainer ? { height: '100%' } : null;
const urlToLoad = rootContainer
  ? rootContainer.dataset.url ||
    'https://kitware.github.io/vtk-js/data/volume/LIDC2.vti'
  : `https://kitware.github.io/vtk-js/data/volume/LIDC2.vti`;


// ----------------------------------------------------------------------------
// Example code
// ----------------------------------------------------------------------------

const body = rootContainer || document.querySelector('body');

// Create Widget container
const widgetContainer = document.createElement('div');
widgetContainer.style.position = 'absolute';
widgetContainer.style.top = 'calc(10px + 1em)';
widgetContainer.style.left = '5px';
widgetContainer.style.background = 'rgba(255, 255, 255, 0.3)';
widgetContainer.style.marginLeft='1050px';
body.appendChild(widgetContainer);

// Create Label for preset
const labelContainer = document.createElement('div');
labelContainer.style.position = 'absolute';
labelContainer.style.top = '5px';
labelContainer.style.left = '5px';
labelContainer.style.width = '100%';
labelContainer.style.color = 'white';
labelContainer.style.textAlign = 'center';
labelContainer.style.userSelect = 'none';
labelContainer.style.cursor = 'pointer';
labelContainer.style.marginTop='100px';
body.appendChild(labelContainer);

let presetIndex = 1;
const globalDataRange = [0, 255];
const lookupTable = vtkColorTransferFunction.newInstance();

function changePreset(delta = 1) {
  presetIndex =
    (presetIndex + delta + vtkColorMaps.rgbPresetNames.length) %
    vtkColorMaps.rgbPresetNames.length;
  lookupTable.applyColorMap(
    vtkColorMaps.getPresetByName(vtkColorMaps.rgbPresetNames[presetIndex])
  );
  lookupTable.setMappingRange(...globalDataRange);
  lookupTable.updateRange();
  labelContainer.innerHTML = vtkColorMaps.rgbPresetNames[presetIndex];
}

let intervalID = null;
function stopInterval() {
  if (intervalID !== null) {
    clearInterval(intervalID);
    intervalID = null;
  }
}

labelContainer.addEventListener('click', (event) => {
  if (event.pageX < 200) {
    stopInterval();
    changePreset(-1);
  } else {
    stopInterval();
    changePreset(1);
  }
});

// ----------------------------------------------------------------------------
// Example code
// ----------------------------------------------------------------------------

const widget2 = vtkPiecewiseGaussianWidget.newInstance({
  numberOfBins: 256,
  size: [400, 150],
});
widget2.updateStyle({
  backgroundColor: 'rgba(255, 255, 255, 0.6)',
  histogramColor: 'rgba(100, 100, 100, 0.5)',
  strokeColor: 'rgb(0, 0, 0)',
  activeColor: 'rgb(255, 255, 255)',
  handleColor: 'rgb(50, 150, 50)',
  buttonDisableFillColor: 'rgba(255, 255, 255, 0.5)',
  buttonDisableStrokeColor: 'rgba(0, 0, 0, 0.5)',
  buttonStrokeColor: 'rgba(0, 0, 0, 1)',
  buttonFillColor: 'rgba(255, 255, 255, 1)',
  strokeWidth: 2,
  activeStrokeWidth: 3,
  buttonStrokeWidth: 1.5,
  handleWidth: 3,
  iconSize: 20, // Can be 0 if you want to remove buttons (dblClick for (+) / rightClick for (-))
  padding: 10,

});

fullScreenRenderer.setResizeCallback(({ width, height }) => {
  widget2.setSize(Math.min(450, width - 10), 150);
});

const piecewiseFunction = vtkPiecewiseFunction.newInstance();

// const actor = vtkVolume.newInstance();
// const mapper = vtkVolumeMapper.newInstance({ sampleDistance: 1.1 });
// const reader = vtkHttpDataSetReader.newInstance({ fetchGzip: true });

reader.setUrl(urlToLoad).then(() => {
  reader.loadData().then(() => {
    const imageData = reader.getOutputData();
    const dataArray = imageData.getPointData().getScalars();
    const dataRange = dataArray.getRange();
    globalDataRange[0] = dataRange[0];
    globalDataRange[1] = dataRange[1];

    // Update Lookup table
    changePreset();

    // Automatic switch to next preset every 5s
    if (!rootContainer) {
      intervalID = setInterval(changePreset, 5000);
    }

    widget2.setDataArray(dataArray.getData());
    widget2.applyOpacity(piecewiseFunction);

    widget2.setColorTransferFunction(lookupTable);
    lookupTable.onModified(() => {
      widget2.render();
      renderWindow.render();
    });

    renderer.addVolume(actor);
    renderer.resetCamera();
    renderer.getActiveCamera().elevation(70);
    renderWindow.render();
  });
});

actor.setMapper(mapper);
mapper.setInputConnection(reader.getOutputPort());

actor.getProperty().setRGBTransferFunction(0, lookupTable);
actor.getProperty().setScalarOpacity(0, piecewiseFunction);
actor.getProperty().setInterpolationTypeToFastLinear();

// ----------------------------------------------------------------------------
// Default setting Piecewise function widget
// ----------------------------------------------------------------------------

widget2.addGaussian(0.425, 0.5, 0.2, 0.3, 0.2);
widget2.addGaussian(0.75, 1, 0.3, 0, 0);

widget2.setContainer(widgetContainer);
widget2.bindMouseListeners();

widget2.onAnimation((start) => {
  if (start) {
    renderWindow.getInteractor().requestAnimation(widget2);
  } else {
    renderWindow.getInteractor().cancelAnimation(widget2);
  }
});

widget2.onOpacityChange(() => {
  widget2.applyOpacity(piecewiseFunction);
  if (!renderWindow.getInteractor().isAnimating()) {
    renderWindow.render();
  }
});
Conclusion
develop web app and this video illusrate it


