sidepix
<picture> component with image processing as side-effect.
Features
<picture>, not<img>(we’re not in 2012 anymore…)- Responsively adapt image size and aspect ratio
- Responsively switch between different images
- Focal point-aware cropping
- Arbitrary media queries
- Multiple file formats (whatever sharp supports)
- Fast streaming processing
- Supports third-party image optimization services
- UI library- and framework-agnostic
- React component included
- Works well with next/image
Quick start
$ yarn add sidepix
See the Next.js example.
Create/configure a component
Define the configuration for your component:
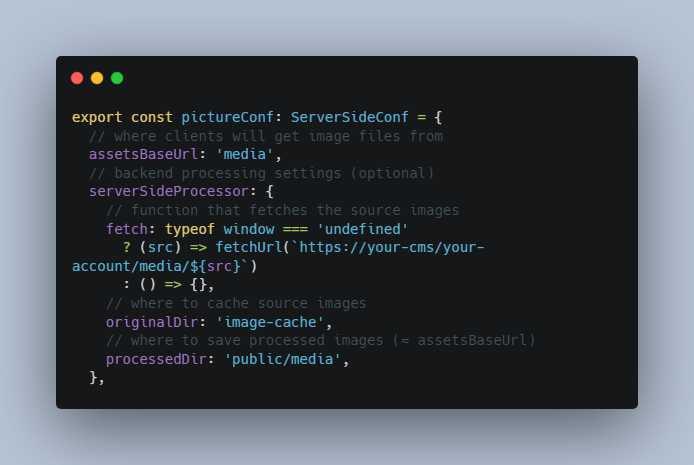
export const pictureConf: ServerSideConf = {
  // where clients will get image files from
  assetsBaseUrl: 'media',
  // backend processing settings (optional)
  serverSideProcessor: {
    // function that fetches the source images
    fetch: typeof window === 'undefined'
      ? (src) => fetchUrl(`https://your-cms/your-account/media/${src}`)
      : () => {},
    // where to cache source images
    originalDir: 'image-cache',
    // where to save processed images (≈ assetsBaseUrl)
    processedDir: 'public/media',
  },
  // specifies how to convert formats
  targetFormats: (format) => {
    switch (format) {
      case ImageFormat.JPEG:
        return [ImageFormat.WEBP, ImageFormat.JPEG];
      case ImageFormat.PNG:
        return [ImageFormat.WEBP, ImageFormat.PNG];
      default:
        return [format];
    }
  },
};
Create your component:
// Points to where pictureConf is defined, so that the processing server can find it.
const pictureConfRef = {
  filePath: resolve(__dirname, '../../../conf/PictureConf'),
  name: 'pictureConf',
};

export const Picture = makePicture(pictureConf, pictureConfRef);
Use it as a normal component
<Picture
  sources={{
    // generates 800w and 1200w (JPEG and WEBP)
    '(min-width: 840px)': {
      aspectRatio: 2,
      widths: [800, 1200],
      sizes: {
        '(min-width: 1240px)': '1200px',
        default: '800px',
      },
    },
    // generates 600w (JPEG and WEBP)
    '(min-width: 640px)': {
      widths: [600],
      aspectRatio: 2 / 3,
      sizes: {
        default: '600px',
      },
    },
    // base for all the above, generates 400w (JPEG and WEBP)
    // also generates the fallback <img>
    default: {
      src: 'example.jpg',
      aspectRatio: 1,
      focalPoint: [0.46, 0.14],
      widths: [400],
      sizes: {
        default: '400px',
      },
    },
  }}
/>
The following HTML will be rendered:
<picture>
  <source
    media="(min-width: 840px)"
    srcset="media/example.jpg_46-14_2_800.webp 800w, media/example.jpg_46-14_2_1200.webp 1200w"
    sizes="(min-width: 1240px) 1200px,800px"
    type="image/webp">
  <source
    media="(min-width: 840px)"
    srcset="media/example.jpg_46-14_2_800.jpeg 800w, media/example.jpg_46-14_2_1200.jpeg 1200w"
    sizes="(min-width: 1240px) 1200px,800px"
    type="image/jpeg">
  <source
    media="(min-width: 640px)"
    srcset="media/example.jpg_46-14_2by3_600.webp 600w"
    sizes="600px" type="image/webp">
  <source
    media="(min-width: 640px)"
    srcset="media/example.jpg_46-14_2by3_600.jpeg 600w"
    sizes="600px"
    type="image/jpeg">
  <source
    srcset="media/example.jpg_46-14_1_400.webp 400w"
    sizes="400px"
    type="image/webp">
  <source
    srcset="media/example.jpg_46-14_1_400.jpeg 400w"
    sizes="400px"
    type="image/jpeg">
  <img src="media/example.jpg_400.jpeg">
</picture>
How it works
A sidepix picture component looks like any regular component, but when rendering in a Node.js environment it downloads, process, and stores all the images that have been rendered. Note that images are processed as the component renders on the backend, not upon request from a client as with image optimization services.
This mechanism has several advantages:
- you describe what images you want only once, where you use them;
- only images that are used are generated;
- the whole thing is pretty isolated and reusable with different UI libraries and frameworks.
But there are also disadvantages:
- if you forget to render an image it won’t be there for users to download – but see below, Processing images without rendering the component;
- care must be taken so as not to leak backend code to the frontend.
All the processing work is done by a separate process that is spawned on the first rendering of a component. The main reasons for this approach are:
- Prevent image processing from being terminated by the rendering process. Since image processing happens in the background as a side effect, React/Next can’t know when it’s completed, and will just quit once they’re done rendering, leaving some processing jobs unfinished.
- Prevent conflicts when different workers attempt to work on the same image (as can happen with Next).
The processing server will keep on running until it’s explicitly stopped. This package provides a sidepix-wait command that will connect to the processing server, wait for all outstanding jobs to finish, and finally quit the server.
Processing images without rendering the component
If you find yourself rendering a sidepix component just for generating images, but then you don’t actually use it, then you should consider using makeGetPictureData:
export const getPictureData = makeGetPictureData(pictureConf, pictureConfRef);
This is also useful to add render time optimization to next/image (see example).
Is this stable?
We’re using a version of this at Neugelb in production, so we can testify to the soundness of the concept. However this is a substantial rewrite and an early release, so expect bugs and API changes.
Troubleshooting
To understand what’s going on with the processing server you can launch it from a separate terminal:
$ yarn sidepix-start
Your app will find this server and connect to it.
