your-first-web3-dapp
Step-by-step guide to setting up and launching a TypeScript/React web app querying Ethereum blockchain data in standard querying language (GraphQL). From a programming perspective, Ethereum is basically just a big database. It contains a huge amount of information - live, valuable, insightful information. In this tutorial, you'll learn how to build (and optionally actually build) a simple Ethereum blockchain data browser. The example data is CryptoPunks. These are 8-bit digital art portraits. Their value is that they are unique digital assets with provable ownership verification. You can see a screenshot of the finished dApp at the bottom of this page.
Why Web3? Permissionless, uncensorable, native payments, Turing-complete. (Learn more)
The guide below will assume you are building along at home, but just skip the commands if you're passing through. This guide is suitable for beginners; everything is explained from familiar terms. If you just want to get to the finished app, you can get there in 10 minutes; but it's recommended to slowly re-type everything and make mistakes so you start to internalize what's going on.
You need meaningful example data so that the operation of your web app becomes intuitive. You will be using CryptoPunks NFTs. Blockchain is useful for digital art because it makes the ownership of a digital asset provable and therefore valuable. NFT stands for Non-Fungible Token; it's the mechanism that proves ownership. This technology is in its early days and the application potential is big. You don't need any ETH cryptocurrency (Ξ) or browser plugins to participate in this tutorial.
The tools you'll be using are all standard, mature, and easy to use. You'll see how to download them later.
- The internet. However you get yours.
- The real Ethereum mainnet. Live data from the entire Ethereum network (soon to be entire ERC20 network). You're just doing Read operations so we don't need any money. [Future tutorial on Write operations]
- Microsoft VS Code. A fancy text editor.
- Node JS. The engine that runs your web client on your local development computer.
- TypeScript. Easy to understand programming language.
- React. This is a library of tools that power a web app.
- The Graph. This is a data indexing tool that simplifies access to data contained on the Ethereum blockchain.
- CryptoPunks. 8-bit digital art potraits. Unique digital assets.
- GraphQL. This is the querying language optimizated for data efficiency. You'll learn the very basics here today.
thegraph-react. This library will allow communication with the The Graph service and the example code forms the basis for your example application. Thanks to author cawfree.
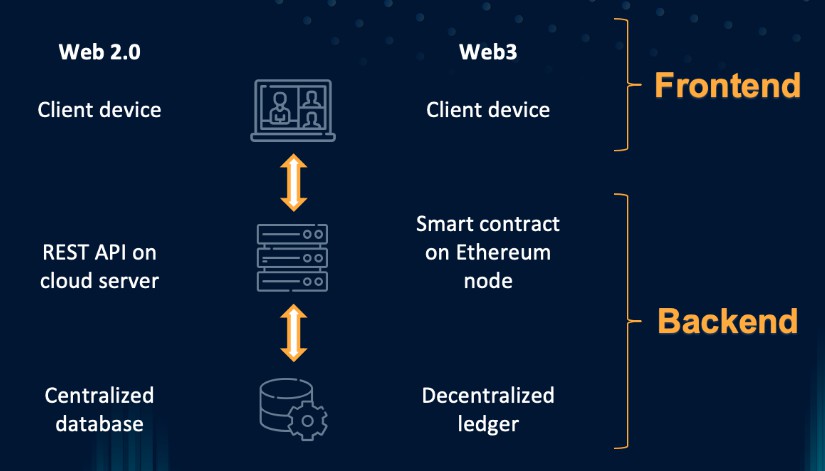
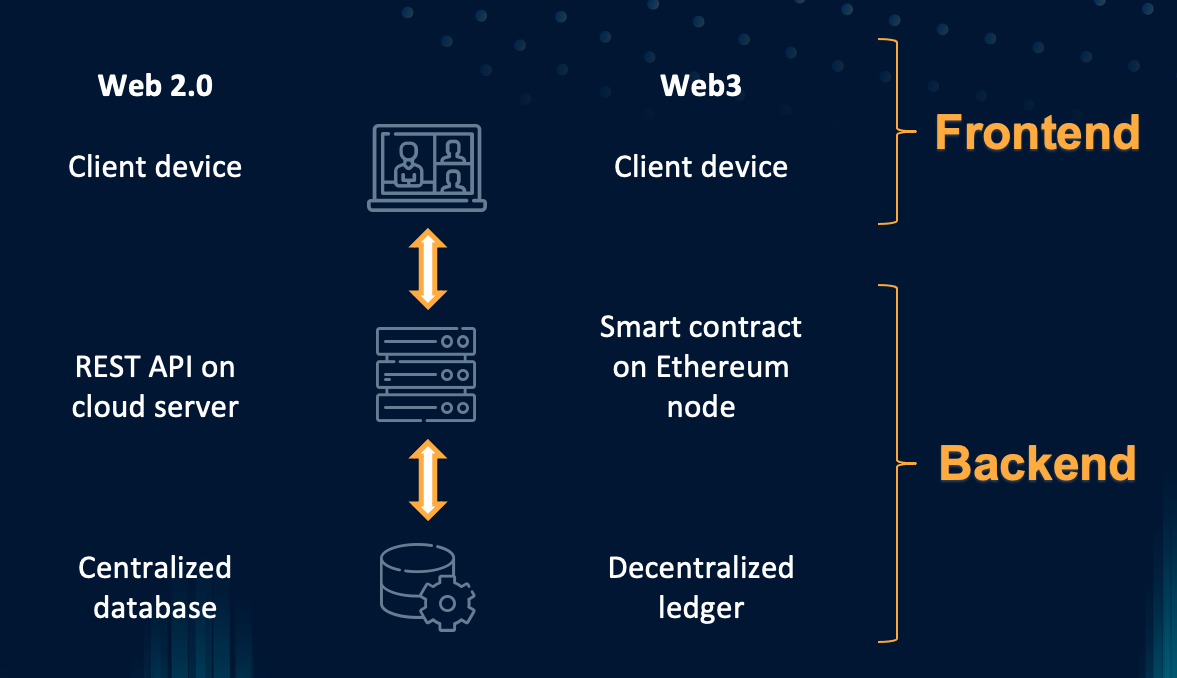
The basic architecture
In the old world (Web 2.0), you had a client (mobile app or web browser) which requests and sends information to and from a server (powerful computer with a database). The server processes the data through the database and returns information to the client (the app/browser user). Lovely.
Web3 architecture, from a programming perspective, looks similar to the Web 2.0 architecture above. Refer to Figure 1 below.
- The client is the almost the same. It is hosted the same way. The only difference is instead of calling a traditional web server with a traditional HTTP library, you use a new, easy-to-use Ethereum library (The Graph).
- In Web3 language, the processor on the server is called a smart contract. In our example, the CryptoPunks NFT smart contract is the 'server' you are asking for information. The CryptoPunks smart contract is already hosted on the public blockchain so we don't need to pay any fees. The gas (Ethereum transaction fee) for the CryptoPunks smart contract was paid for by Larva Labs when they launched the project.
- The database in our Web 2.0 example becomes the Ethereum mainnet blockchain - the real thing itself. (It's immutable so you won't be able to mess it up.) This is hosted globally with ennumerable back ups. Ethereum is an example of one of the many blockchain platforms emerging today. We are using it because that is what the The Graph version currently supports.
Download the tools and code
You need to create a directory/folder on your development computer ('local machine') for this project - your web app. You can do this with a file explorer or command line. Something like Documents/code/web3/the-next-facebook.
Start with Microsoft VS Code. You can download it at this link. Use Ctrl-click/Cmd-click to open link in new tab. Just follow the defaults and turn off tracking. Once downloaded, open it.
In VS Code, open the Terminal/Console panel by hitting Ctrl + ` (or Terminal > New Terminal in the top menu). You need to navigate to the directory you just created. File > Open and browse your file directory until you find the directory you just created.
First you will download curl if you don't already have it. This is a terminal-based web browser. Go to this website and come back here when you're done.
Welcome back. Next you'll install Git (pronounced git). This is a development tool for managing and backing up your code at regular intervals. Follow one of the options on this page and return back when done.
You made it. You will need to install NVM. This manages the installed versions of Node JS. Node JS is the Javascript-based engine that runs the code you write. You will write in TypeScript and it will be automatically transpiled into Javascript. TypeScript makes coding significantly less error prone and more natural to read and write. It was developed by Microsoft. Run this command in the Terminal panel of VS Code.
curl -o- https://raw.githubusercontent.com/nvm-sh/nvm/v0.38.0/install.sh | bash
Now run nvm install stable to get the latest stable version of Node JS.
The installation should include the npm tool. If you encounter errors when running commands later, install tools here.
npm. Node Package Manager. Manage the project's libraries and tools with thenpm ...command.
It's time to get the source code for the application. You will use Git to copy ("clone") the code for this tutorial.
git clone https://github.com/web3rb/your-first-web3-dapp.git
If VS Code doesn't automatically open to the newly cloned project directory, click File > Open and navigate to it. The project root directory contains about 7 files/directories (src, package.json, README.md...). VS Code may ask you if you trust the author of the code in the directory; you do.
Open up package.json and change the name value from your-first-web3-dapp to cryptopunks-demo-dapp. Thoughtfully observe the dependencies. These are the tools and libraries that power your application. You don't need to know how they work but they are open source if you'd like to explore/audit.
Optional: If you would like to back up your tutorial project on your own Git repository, follow these instructions.
Ensure you are using the correct version of npm by running this nvm use to check the project's original build version in .nvmrc:
nvm use
If you get a message saying you need to install, follow the instructions.
To install the dependencies needed for your project, return to the Terminal window and run:
npm install
This will take a moment.
Thoughtfully observe the code
Now it's time to look at the code. The bulk of the application code is in App.tsx (tsx is the language that lets you write HTML5 in TypeScript).
- The first few lines are pulling in the infrastructure and library components needed.
- The CryptoPunks
type(male,female,alien,ape, orzombie) is stored in our React application's "state" using theuseState()function. Thestatestores variables and triggers an update of all components that use the variable whenever the variable changes. - Then the query is constructed in the
useQuery()function. You'll learn more about this query later. - The
console.log()prints information to the web browser console (see Developer Tools) for transparency into your application. - Everything in the
return()block is the user interface (HTML5 code). getFullLengthId()is a simple function to ensure all image ids are 4 characters long. (e.g. 0010 vs 10). This is how they are stored on the image server. (The images are not stored on the blockchain because the file size would make transactions expensive. A unique id is generated from the image content and that id is stored in the blockchain record forever.)- The final
App()function sets up the connection to the CryptoPunks data access service in The Graph. To find other services, visit The Graph's Graph Explorer.
Press Go
It's time to run the application. Return to your Terminal panel and run:
npm run start
This will build (compile) the project code and launch the user interface automatically in a web browser tab. If the web browser tab doesn't open automatically, navigate to http://localhost:3000/. You will see the CryptoPunks Browser user interface.
You can see that the application has pulled the NFT's id number, owner's wallet address (personally identifiable if they choose), and the accessories that the CryptoPunk has. The accessories data is stored in string format in the Ethereum database record. (A block is a collection of verified records).
You can view the raw data that the useQuery() function is returning in your web browser's console (console = terminal). Expand the data object to view its contents. For instructions on opening the console view, go here.
At this point in the tutorial, you have a fully up and running decentralized application (dApp). You are filtering data by type in the user interface and then querying the Ethereum mainnet to get the stored information. Congratulations. You're a rock star. :
balloon:
Some Optional Ideas for Further Exploration
Here are some suggestions to deepen your understanding of your dApp.
- Beginner: Play around with the GraphQL query. The Graph's Graph Explorer has a playground where you can build GraphQL queries on the CryptoPunks mainnet. Go over there, build a query and then copy it to your application code. Then build a user interface to display the new data you've gathered.
- Intermediate: Find another subgraph you want to work with on the The Graph Explorer and build an app around that.
- Advanced: Build a new economy.
web3rb, 05-Aug-2021