Webpack React WebExtension template
Yes, yet another template. But made with love! And some cool features.
Features
TypeScript out of the box
TypeScript automatically compiled into JS and then processed by babel.
SCSS/SASS support
Just create new SASS or SCSS file and import it, no adjustments needed.
Easily inject React components on pages
This templates comes wih inject-react-anywhere which enables you to easily inject your React componts on 3rd-party sites (includes styled-components and emotion support)
Automatic discovery of entry points
Just create new file in contentscripts or pages directory (or sub-directory) and it automatically will be picked up and compiled. No need to update webpack config (but you still need to update manifest). And you don’t need to create html files for each page, webpack will do that for you.
All libraries and shared code in separate file
Webpack configured to move all shared code into two chunks: UI-related and everything else. This way you’re not increasing size of your extension too much. Separating code into UI-related and everything else allows us to not include React in friends into background worker.
Automatic translation of assets imports
All content of assets folder is copied into distribution version without changes. And when you import any file from this folder, webpack automatically translates it to chrome.runtime.getURL(<path>) call, so you can do something like this:
import logo from '@assets/images/icon128.png';

const Popup = () => {
    return (
        <div>
            <img src={logo} />
        </div>
    );
};
Eslint, prettier and git hook
Do not let bad code slip into repo!
How to start
Clone this repository:
git clone [email protected]:OlegWock/webpack-react-web-extension-template.git project-name
cd project-name
Change info in package.json. You want to change name, description, author, repository and other fields.
Install dependencies:
yarn install
Compile extension:
yarn dev
You’ll find compiled version in dist/chrome. You can now load it into Chrome. That’s all. At leas that’s minimal example. Let’s take a closer look on other features.
Development and production
There is two commands to compile extension dev and production. They do mostly same, but slightly adjust webpack config. For example, production version doesn’t have any sourcemaps. You can access this value in code using X_MODE variable (without any imports). It will be either development or production.
if (X_MODE === 'development') {
    // Enable more detailed logging here
}
Watch
yarn watch will run webpack in watch mode, which will compile code as you type and can significatly speedup development. However, note that changes to webpack config (and thus manifest too) aren’t loaded by webpack, you’ll need to restart it.
Manifest
You might noticed that there is no manifest.json in source files. Manifes in generated on the fly by Webpack. You can find related code in webpack.config.ts in generateManifest function. When you need to put any changes to manifest – it’s right place to do so.
Background worker
Background worker doesn’t require any configuration and should work out of the box. In dist there is will be two files background.js with actual background worker code and background-wrapper.js which just imports common chunks and background.js.
Pages
This folder contains scripts each of which will be treated as separate entrypoint (thus, it won’t go into common chunk but to separate output file) and for each script there will be html file created with the same name where script will be included. This is particularly handy to make, well, pages. Good examples are popup and options page. But you might as well want to implement welcome page which will be opened on install or just a separate ‘web app’ inside extension for user to use.
Contentscripts
Contentscripts are discovered automatically (just like pages) and compiled into contentscripts folder in dist. You, however, need to manually adjust manifest to enable your contentscript for desired web-site. Don’t forget to include common chunks there too (see example for example.com site in manifest). If you added contentscript to manifest, but nothing happens on site (no error) – most likely you forgot to include common chunks.
Components and utils
These folders are for shared code. You can organize them in any structure to your liking. Code from components will go into ui common chunk and code from utils into other chunk.
Assets
Content of this folder will be copied without any processing. However, if you import any file from this folder in your code it will be replaced with call to chrome.runtime.getURL, so you can use it in directly as src of image for example. If you need to get asset’s content, you can use fetch to load assets from URL. See examples in components/AnnoyingPopup/index.tsx.
Raw imports
It’s possible to import content of any file directly, without any processing. This way content will be emedded directly into other common chunk. Just add ?raw to any import and
import txtContent from '@assets/test.txt?raw';
Import aliases
There is three import aliases out of the box (but you can add your own): @assets, @components and @utils. They used to avoid cluttered imports like this
import smth from '../../../../../utils/smth';

// Instead you now can do something like
import smth from '@utils/smth';
If you want to add your own alias, you need to include it in webpack.config.ts (used by webpack for JS files), look for alias keyword and in tsconfig.json (used by TS and your code editor), look for paths field.
webextension-polyfill
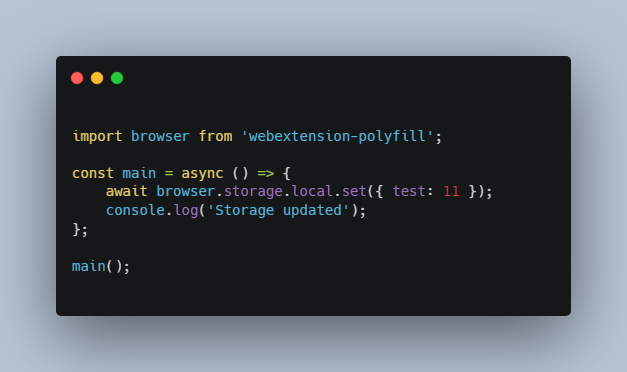
webextension-polyfill provides convenient wrapper for chrome.* API which uses promises instead of callbacks. This in turn allows you to utilize power of async/await and write elegant async code instead of callbacks hell.
import browser from 'webextension-polyfill';

const main = async () => {
    await browser.storage.local.set({ test: 11 });
    console.log('Storage updated');
};

main();
Prettier and eslint
Run yarn format to format files with Prettier and yarn lint to lint them using ESLint.
Adjustments
I don’t need options/popup page
Just remove its folder in src/pages and remove it from manifest in webpack config.


