use-gauge

A headless React hook for building gauge charts. You bring the styles, we bring the math that powers your chart!

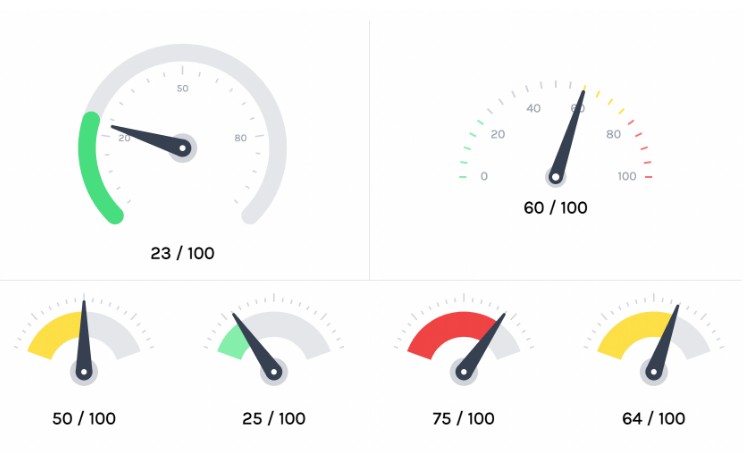
Code for the examples above ?
https://i19w7.csb.app/
Installation
yarn add use-gauge
Usage
? Beware that this API is very much in flux! Breaking changes will occur, but I’ll update these docs and the Codesandbox accordingly ?
In your React project, import the useGauge hook and invoke it with the following parameters.
const {
  ref,
  ticks,
  valueToAngle,
  angleToValue,
  getTickProps,
  getLabelProps,
  getArcProps,
  getNeedleProps,
} = useGauge({
  startAngle: 180, // determines where the gauge starts
  endAngle: 360, // determines where the gauge ends
  numTicks, // the number of ticks to display between the min and max values
  size, // how large the chart should be (TODO: Investigate a better API)
  padding, // Honestly kind of a misnomer, as it really just zooms the chart in and out. (TODO: Investigate a better API)
  domain: [minValue, maxValue], // Min and max values for your gauge. *Please* use a min that's smaller than the max :)
});
If you want to skip ahead and see a fully baked implementation of this hook, check out the example playground.
Otherwise, here’s a brief explanation of how these returned values work.
ref
Please be sure to apply this ref to your SVG component, as it’s responsible for programatically updating the height, width, and viewBox of the element as a function of the size you provide. To be totally honest, I’m not in love with this API and really wish I could get rid of the size prop in earnest but this was the path of least resistance.
<svg ref={ref}></svg>
ticks, getTickProps, getLabelProps, and angleToValue
ticks is an array of evenly spaced angles (represented as numbers) that’s calculated from the numTicks, startAngle, and endAngle argument.
You can create visual tick marks on the SVG by mapping over this array and passing each angle (along with a length argument) to the getTickProps function accordingly.
Additionally, you can render text labels for tick mark by invoking the getLabelProps on the given angle (along wiht an offset argument that determines how far the label sits from the tick).
Note that you’ll need to convert the given angle to its “value” counterpart (as minValue and maxValue are the domain of our dataset) by invoking the angleToValue function with the given angle as an argument.
{
  ticks.map((angle) => {
    return (
      <React.Fragment key={`tick-group-${angle}`}>
        <line
          stroke={tickColor}
          {...getTickProps({ angle, length: tickLength })}
        />
        <text
          className="text-sm fill-gray-500 font-medium"
          {...getLabelProps({ angle, offset: 20 })}
        >
          {angleToValue(angle)}
        </text>
      </React.Fragment>
    );
  });
}
getArcProps
This function allows you to render arcs of arbitrary length, as expressed by a start angle and end angle. A common use-case might be to have two arcs: one as a “background”, and another that represents the progress of the gauge.
You can calculate progress in this scenario by converting your numerical value to its angle counterpart with the valueToAngle function.
// Background
<path
  {...getArcProps({ offset, startAngle: 180, endAngle: 360 })}
  className="stroke-gray-100"
  strokeLinecap="round"
  strokeWidth={24}
/>

// Progress
<path
{...getArcProps({
  offset,
  startAngle,
  endAngle: valueToAngle(value),
})}
className="stroke-blue-600"
strokeLinecap="round"
strokeWidth={24}
/>
getNeedleProps
Last but not least, this function helps you draw a needle shape on your gauge. Specifically, it returns the bits you need to draw: A) the “tip” of the needle (i.e., the small circle at the top), B) the “base” of the needle (i.e., the bigger circle at the bottom), and C) the “body” of the needle (i.e., the polyline that connects these two circles).
Warning: this API is janky. There’s got to be a better way of handling this, but again, this is what worked for my initial use case ??♂️
const { tip, base, points } = getNeedleProps({
  value,
  baseRadius: 12,
  tipRadius: 8,
});

<g id="needle">
  <circle className="fill-gray-300" {...base} r={24} />
  <circle fill={needleColor} {...base} />
  <circle fill={needleColor} {...tip} />
  <polyline fill={needleColor} points={points} />
  <circle className="fill-white" {...base} r={4} />
</g>;
Local Development
From the project root, run yarn start. This will run tsdx in watch mode, and will re-compile the code every time you save.
In a different terminal window, cd into the /example directory and run yarn start. This will boot up Parcel and open a web server at http://localhost:1234. All of your changes to the hook source code will (eventually) propagate to Parcel’s hot-reloading server.