react-acceptjs
A modern React implementation of Authorize.net’s Accept.JS library for easily submitting payments to the Authorize.net platform.

Install
# install with npm
npm install --save react-acceptjs

# install with yarn
yarn add react-acceptjs
Quick Start
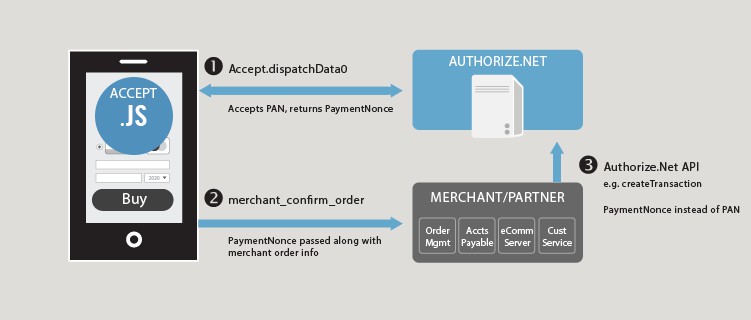
Per Authorize.net’s Accept.js documentation, there are three options for sending secure payment data to the Authorize.net platform (rather than transmitting sensitive credit card data to your server).
- Host your own payment form and use the
dispatchData()function exposed by theuseAcceptJs()hook. This function returns a payment nonce which can be used by your server to process a payment in place of CC or bank account data.
import React from 'react';

import { useAcceptJs } from 'react-acceptjs';

const authData = {
  apiLoginID: 'YOUR AUTHORIZE.NET API LOGIN ID',
  clientKey: 'YOUR AUTHORIZE.NET PUBLIC CLIENT KEY',
};

interface BasicCardInfo {
  cardNumber: string;
  cardCode: string;
  expMonth: string;
  expYear: string;
}

const PaymentForm = () => {
  const { dispatchData, loading, error } = useAcceptJs({ authData });
  const [cardData, setCardData] = React.useState<BasicCardInfo>({
    cardNumber: '',
    expMonth: '',
    expYear: '',
    cardCode: '',
  });

  const handleSubmit = async (event) => {
    event.preventDefault();
    // Dispatch CC data to Authorize.net and receive payment nonce for use on your server
    const response = await dispatchData({ cardData });
    console.log('Received response:', response);
  };

  return (
    <form onSubmit={handleSubmit}>
      <input
        type="text"
        name="cardNumber"
        value={cardData.cardNumber}
        onChange={(event) =>
          setCardData({ ...cardData, cardNumber: event.target.value })
        }
      />
      <input
        type="text"
        name="expMonth"
        value={cardData.expMonth}
        onChange={(event) =>
          setCardData({ ...cardData, expMonth: event.target.value })
        }
      />
      <input
        type="text"
        name="expYear"
        value={cardData.expYear}
        onChange={(event) =>
          setCardData({ ...cardData, expYear: event.target.value })
        }
      />
      <input
        type="text"
        name="cardCode"
        value={cardData.cardCode}
        onChange={(event) =>
          setCardData({ ...cardData, cardCode: event.target.value })
        }
      />
      <button type="submit" disabled={loading || error}>
        Pay
      </button>
    </form>
  );
};
- Embed the hosted, mobile-optimized payment information form provided by Accept.js into your page via the
HostedFormcomponent. This component exposes a button which, when clicked, will trigger a lightbox modal containing the hosted Accept.js form. You’ll still receive the payment nonce for use on your server similar to option #1.
import React from 'react';

import { HostedForm } from 'react-acceptjs';

const authData = {
  apiLoginID: 'YOUR AUTHORIZE.NET API LOGIN ID',
  clientKey: 'YOUR AUTHORIZE.NET PUBLIC CLIENT KEY',
};

const App = () => {
  const handleSubmit = (response) => {
    console.log('Received response:', response);
  };
  return <HostedForm authData={authData} onSubmit={handleSubmit} />;
};
- Use Accept Hosted, Authorize.net’s fully hosted payment solution that you can redirect your customers to or embed as an iFrame within your page.
API Reference
Hook
const { dispatchData, loading, error } = useAcceptJs({ environment, authData });
Arguments:
authData : { clientKey: string; apiLoginId: string; }– Required. Your Authorize.net client key and API login ID.environment : 'SANDBOX' | 'PRODUCTION'– Optional, defaults to'SANDBOX'. Indicates whether you are running a sandbox or a production Authorize.net account.
Return Value:
dispatchData : (paymentData: { PaymentData }) => Promise<DispatchDataResponse>– Sends your payment form’s payment information to Authorize.net in exchange for a payment nonce for use on your server. If you’re transmitting credit card data, thePaymentDatatype will consist of:
type PaymentData = {
  cardData: {
    cardNumber: string;
    expMonth: string;
    expYear: string;
    cardCode: string;
  };
};
If you’re transmitting bank account data, the PaymentData type will instead consist of:
type PaymentData = {
  bankData: {
    accountNumber: string;
    routingNumber: string;
    nameOnAccount: string;
    accountType: 'checking' | 'savings' | 'businessChecking';
  };
};
The dispatchData() function will return a value of type DispatchDataResponse, which will consist of either your payment nonce (referred to as opaqueData) for use in processing the transaction or an error message:
type DispatchDataResponse = {
  opaqueData: {
    dataDescriptor: string;
    dataValue: string;
  };
  messages: {
    resultCode: 'Ok' | 'Error';
    message: ErrorMessage[];
  };
};
loading : boolean– Indicates whether the Accept.js library is currently loading.error : boolean– Indicates whether an error has occured while loading the Accept.js library.
Component
<HostedForm authData={authData} onSubmit={handleSubmit} />
Props
authData : { clientKey: string; apiLoginId: string; }– Required. Your Authorize.net client key and API login ID.onSubmit : (response: HostedFormDispatchDataFnResponse) => void– Required. The function that will receive and handle the response from Authorize.net (which, if successful, will include the payment nonce as well as certain encrypted CC information).environment : 'SANDBOX' | 'PRODUCTION'– Optional, defaults to'SANDBOX'. Indicates whether you’re running a sandbox or production Authorize.net account.billingAddressOptions : { show: boolean; required: boolean }– Optional, defaults to{ show: true, required: true }. Indicates whether the hosted form will display and/or require billing information.formButtonText : string– Optional, defaults to"Pay". The text that the payment button will display.formHeaderText : string– Optional, defaults to"Pay". The text that the hosted form will display as a header.paymentOptions : { showCreditCard: boolean, showBankAccount: boolean }– Optional, defaults to{ showCreditCard: true, showBankAccount: false }. What payment options the hosted form will provide.buttonStyle : React.CSSProperties– Optional, defaults toundefined. A style object for the payment button.errorTextStyle : React.CSSProperties– Optional, defaults toundefined. A style object for the error text that displays under the payment button on error.
License
MIT © brendanbond