NGN
A set of utils built for NextJs to make developers’ job easier.
NextJs is a super powerful framework developed by javascript, but the API part
is too raw comparing to other frameworks built on PHP for example. So I’ve
developed a set of utils for it and called it NGNJs.
Concepts
Milkshake Commander
Milkshake is a cli solution that helps developers to focus on what they
want to develop and reduce their errors. It can do many things such as
- Initiating NGN
- Make Pages, Apis, etc.
- Generate APP_KEY for AES encryption
You will become more familiar with Milkshake in later sections.
Errors
When using NGN, Every problem throws an error. Errors are caught by NGN api
handler, and its message is returned with appropriate status code. You will
learn more about errors and how to set their status codes later.
Facades
Some useful facades is available in NGNJs. Some of them brings new functionality
to NextJs, and some other just make works done easier.
Middlewares
About 10 middlewares are available out of the box, and almost all of them are
used globally.
Services
In-app Caching, Logging, request validation and resources are services
implemented in NGNJs. All of them will be described in details in later
sections.
Request handler
All API requests is handled using NGNJs request handler. This handler uses
next-connect and its powerful
features to handle requests.
Now that you know what NGN is, it’s time to install it!
Install NGNJs package
Simply rum npm i --save ngnjs if you’re using NPM and yarn add ngnjs if you
are a yarn user. After installation, milkshake binary file will be added to
node_modules/.bin directory. So you can use it simply by calling it. NGNJs
needs a set of files and configurations to work properly and let you customize
NGNJs functionality. By calling milkshake init, All of these files will be
created for you. These files are:
- config directory: All NGNJs config files are located in this directory.
You can add or remove middlewares, set middlewares to a group of routes,
change throttling duration and number of requests, add some trusted proxy
ips if you’re proxying your code. - storage directory: All files created by caching systems, all files you
upload and all of your log files are located at this directory. You will
learn how to upload files, log a message and use caching system later. - .env.example and .env.local: Some environment variables need to be set
so NGNJs can read and use them. All these variables are listed in
.env.examplefile. This file is a sample file for you to know what
variables are necessary for NGNJs. In the other side,.env.localis
real.envfile and has real values for variables. So it’s git ignored.
Be careful to back up you.env.localand.env.examplefile before using
milkshake init. Milkshake will override env files - handler.ts: It’s NGNJs request handler for API requests.
- pages/api/storage/[…path].ts: This endpoint is used for pseudo static file
serving. - pages/api/log.ts: Used to log a message in log files from clientSide.
That’s it! You’re all set! now lets check how to use NGNJs features
Milkshake
Milkshake is a cli script for making files from templates and generating APP_KEY
(APP_KEY is used for encryption). Supported commands are described bellow:
init
This command initiates NGNJs for use. What is created during initialization is
described in installation section.
make
This command makes a file from template. For now, templates are:
- api:
milkshake make apiasks you some simple questions and makes an api
endpoint for you. base path of api is/pages/apiand you can give milkshake
a path as api name to make your endpoint file in a sub path. For example if you
choose your api name asusers/index, an api file called index is created in
pages/api/users/directory. - middleware:
milkshake make middlewareasks you the name of your middleware
and creates a middleware file insrc/middlewares/directory. Don’t worry if you
don’t have middlewares directory. It will be created when needed. You can give
a path as name to create this file in a sub directory undersrc/middlewares/. - page:
milkshake make pageasks you some questions and makes a page template
for you underpages/directory. You can give a path as name to create this
file in a sub directory underpages/. - resource:
milkshake make resourcecreates a resource file for you under
src/resources. Resources will be described in later sections - rule:
milkshake make rulewill create a custom validation rule under
src/validationRules. Validation rules will be described in later sections.
keygen
This command creates a new key for your application and sets it in .env.local
file.
Requests and responses
If all NGNJs middlewares are globally applied as default config, You have some
more features than default NextJs:
- req.files: This key is only available if your api endpoint supports
form-data. Supporting form-data is asked from you when creating an endpoint
usingmilkshake make apicommand. All uploaded files using form data is
stored in this key. You can upload these files by simply calling upload
method of one of files. This method has two args:
- path: a string which determines the destination file path under
storage/public/uploads/when private mode is false andstorage/when private
mode is true. - isPrivate: a boolean value which determines private mode. In the other words,
setting isPrivate to true will upload your file in selected path under
storage/and setting it to false will put your file under
storage/public/uploads.
-
req.session: A server-side session storage. You can set value to session by
simply assign a value to a key ofreq.session. For example imagine you want
to set a session key called name with the value of NGN. You can do it in
this way:req.session.name = "NGN". Reading data from session is as simple
as reading the value of that key of session. For example getting name key
will be done this way:const name = req.session.name; -
req.all:
req.query,req.filesandreq.bodyare merged inreq.all.
It’s useful when you don’t know if request parameter is passed in query
string, or body, or it’s a file. -
req.validate: It’s an async function which validates your api inputs
using rules. Using this feature is something like this:Imagine we have an endpoint which has name field as required field.
There is no need to check it in your api logic. All you need to do is:await req.validate({ "name": [new RequiredRule()] });
This code snippet checks if name field is passed to your api. If it’s
not passed, a 422 status code will be returned with the error of invalidated
field. For example if name is not passed to the code above, something
like the bellow response will be returned:{ "message": "The given data is invalid", "errors": { "name": "Field is required" } }You can pass as many rules as you want to a key since value of validate
argument MUST be an array. There are some rules available
out-of-the-box: EmailRule for regex email validation, InRule for
checking if given key exists in an array, NumberRule to check if
input is a number, RequiredRule and StringRule.You can implement your own rule by creating a rule using
milkshake make ruleand implementing your logic in it.Note: Validator can also be used in client-side. You will learn it
in next sections. -
req.ip: returns IP of client. If you’re serving application using a proxy,
You need to set your proxy ip toconfig/trustedProxies.jsonfile in order
to readX-Real-IporX-Forwarded-Forto get ip address, otherwise
remote address will be returned. -
res.setCookie: This function encrypts cookie value and sets it.
Note: Since it’s possible for a website to have cookies which
set from other packages, NGNJs adds a prefix to your cookie name to
find out which cookies need decryption. Don’t worry. This cookie name
prefix will be deleted when cookies are decrypted and passed to
req.cookies. You only need to use prefixed cookie name if you want to
access to a cookie client-side. This method is chainable, and you can use
it as many times as you want. You can customise cookie prefix in .env.local
by changing COOKIE_PREFIX value.
Validation
Form validation can be done in both client and server side using validation
rules. Validation rules are some javascript classes which must have two
methods implemented:
-
public async evaluate(object): Has only one argument which is the value
of the key you mapped to a rule. This value is passed to validation rule
class automatically when it’s called. Your validation logic should be
implemented in this method and returns true on validation success and
false otherwise. -
public getError(fieldName): fieldName mapped to a rule will be passed
automatically to this method. This method should return a message which
contains error information on validation error.
You can also implement the constructor method if you want to pass some data
to your validator class.
There are some rules implemented in NGNJs out-of-the-box:
- EmailRule: Validates an email address using regex.
- InRule: Validates if value under validation is existed in an array.
- NumberRule: Checks if value is a number
- RequiredRule: Checks if value is existed.
- StringRule: Checks if value type is string.
An example of implementing a rule:
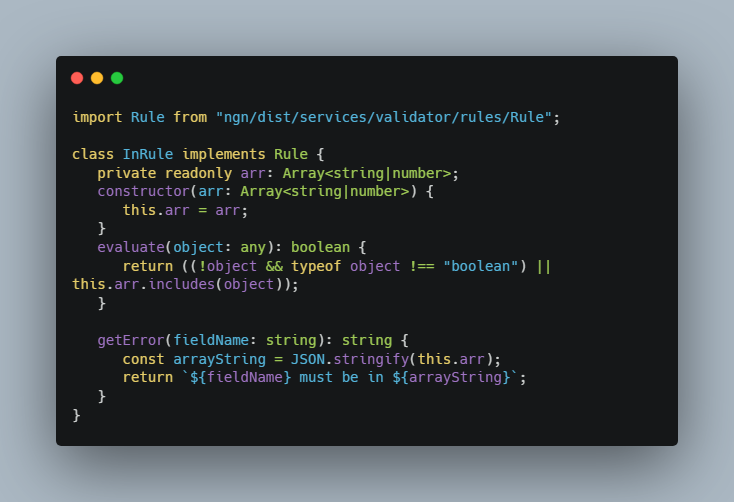
You can create a custom rule using milkshake make rule. the code
bellow is InRule which is implemented in NGNJs:
typescript:
import Rule from "ngn/dist/services/validator/rules/Rule";

class InRule implements Rule {
   private readonly arr: Array<string|number>;
   constructor(arr: Array<string|number>) {
      this.arr = arr;
   }
   evaluate(object: any): boolean {
      return ((!object && typeof object !== "boolean") || this.arr.includes(object));
   }

   getError(fieldName: string): string {
      const arrayString = JSON.stringify(this.arr);
      return `${fieldName} must be in ${arrayString}`;
   }
}

export default InRule;
javascript:
class InRule{
    arr;
    constructor(arr) {
        this.arr = arr;
    }
    evaluate(object) {
        return ((!object && typeof object !== "boolean") || this.arr.includes(object));
    }

    getError(fieldName) {
        const arrayString = JSON.stringify(this.arr);
        return `${fieldName} must be in ${arrayString}`;
    }
}

export default InRule;
Using validators in pages
Using validation in pages (both CSR and SSR) is done using validate function. This function gets two args:
- An object maps field names to an array of rules as the first argument.
- The object you want to validate as the second argument.
validate function returns an object with two keys:
- result: a boolean value which is true on validation success and false otherwise
- errors: an object of errors which maps field names to errors.
For example imagine you have a form which creates a key in a state on input changes:
import {useState} from "react";
import validate from "ngn/dist/services/validator/validate";
import EmailRule from "ngn/dist/services/validator/rules/EmailRule";
import RequiredRule from "ngn/dist/services/validator/rules/RequiredRule";

const Form = () => {
    const [data, setData] = useState({});
    const fillData = (e) => setData(state => ({...state, [e.target.name]: e.target.value}));
    const validateForm = (e) => {
        e.preventDefault();
        // We will implement validate method later
    }

    return (
        <form onSubmit={validateForm}>
           <input type="text" name="name" placeholder="name" onChange={fillData}/><br/>
           <input type="text" name="surname" placeholder="surname" onChange={fillData}/><br/>
           <input type="text" name="email" placeholder="email address" onChange={fillData}/><br/>
           <button type="submit">Send</button>
        </form>
    )
}
Now we have something like bellow in data variable after filling form:
{
   "name": "Farbod",
   "surname": "Shams",
   "email": "[email protected]"
}
So want we want to validate is this object. We can use validate asynchronous function like this:
const validateForm = (e) => {
    e.preventDefault();
    validate({
       name: [new RequiredRule()],
       surname: [new RequiredRule()],
       email: [new RequiredRule(), new EmailRule()],
    }).then(res => {
        if(!res.result)
            console.error("Validation error: ", errors)
       else {
           //Do main thing
        }
    })
}
Using validators in API
In api you can simply use req.validate asynchronous function. Is has only one argument which is an object maps field
names to an array of rules. All of your request data (query string, body and files) are passed to validator function
automatically. req.validate throws an ValidationError error on request is not validate with rules check. This error
is automatically caught and returns an object holds message and errors with the status code of 422.
Errors
Almost all API errors are caught using NGN request handler. There are two
main types of errors:
-
NGNError: THis error is a throwable class with extended from javascript
native Error class. NGNError expects three arguments:- status: status code of response when error is thrown.
- message: error message
- context: an object which holds additional data about error and
returned in response.
Feel free to develop your own errors with even default status code or
message by extending this class. -
NGNSilentError: Is NGNError but error message and context is shown
to user only when APP_DEBUG env variable is set to true and
Server error message will be returned otherwise. You always have
error details in logs by the way.
Logging
Logging is NGNJs is as simple as importing Logger class. Log files are
located in storage/logs/ directory. new log file is generated each day and
older log files are never deleted. Logs can be submitted in 8 different
levels: (emergency, alert, critical, error, warning, notice, info, debug)
These levels are the priority of log message. You can set LOG_LEVEL env
variable to ignore logs with levels less than LOG_LEVEL to be logged.
logging in server-side
Since logging required filesystem support, you can use Logger class only
in server-side. This class uses singleton pattern and you need to create
an instance of it with getInstance() static method like the code bellow:
import Logger from "ngn/dist/services/logger/Logger"

const logger = Logger.getInstance();
logger.error("ERROR", {notFrom: "NGNJs"});
logging in client-side
although you cannot use Logger class to log messages in client-side, an
API endpoint will be created for you called log on NGNJs initialization.
You can use that API to use logging feature client-side:
import axios from "axios";

axios.post("/api/log", {
    level: "ERROR",
    message: "ERROR",
    context: {notFrom: "NGNJs"}
})
Configuration
All NGNJs config files are located in config/ directory. This directory
is created by NGNJs initialization:
-
rateLimit: This file is configuration for withThrottle middleware to
throttle your users’ api requests. This middleware is enabled globally by
default, but you can comment it if you want. You will learn how to set
a middleware globally later in this section. -
trustedProxies: An array of ip addresses to be considered trusted. If
request is sent to your application from these IPs,req.ipwill be
X-Forwarded-FororX-Real-Ipheader in case of existence. Otherwise,
req.ipwill be remote address -
middlewares: You can manage global middlewares in this file. This file
returns an object which maps endpoints to a group of middlewares.
custom middlewares could be created usingmilkshake make middleware
command.
Using global custom middlewares
Imagine you created a middleware called withUser which you want to apply
it to all api endpoint starts with /users. You can change middlewares
config file like bellow:
import withUser from "../src/middlewares/withUser"

const middlewares = {
    "/": [
        //All global middlewares
    ],
    "/users": [withUser]
}

export default middlewares;
Caching
NGNJs supports two driver for handling cache: File and Redis.
You need to have redis-server if you want to use Redis cache driver.
you can use cache ability by importing one of RedisCache or FileCache:
import RedisCache from "ngn/dist/services/cache/RedisCache";
import FileCache from "ngn/dist/services/cache/FileCache";
Methods supported by cache drivers:
async get(key, defaultValue): returns value of key in cache storage if
key is existed and default value otherwise.async set(key, value, ttl?): Sets a key in cache storage with the
provided value for a specific time which is set with TTL
(TTL is in seconds). If ttl is not provided, key will be kept foreverasync delete(key): Deletes a key from cache storageasync clear(): Deletes all keys.async getMultiple(keys): Gets an array of keys and returns an object
of key value pair.async setMultiple(object): Gets an object of key values and sets them
in cache storage.async deleteMultiple(keys): Gets an array of keys and deletes them.async getTTL(key): Returns remaining time to live of a key.async has(key): Returns true if key is existed and false otherwise.
Static content
You may want to show an image you’ve uploaded before. A solution is to use
third party services like AS3. You can also access all of your files
located in storage/public/ with /api/storage endpoint. for example,
consider a file located in storage/public/images/1.jpg. You can view it
by calling /api/storage/images/1.jpg in browser.
CAUTION: Using storage endpoint is not optimized, and it’s highly
recommended to you to use aliases to point storage/public to /storage
with your webserver config.
creating file URL and path
You can use Path facade to generate URL and/or path of a file located in
storage directory. Path facade has some methods which is described
bellow by an example. (In this example, project is in
/var/www/http/ngn directory):
import Path from "ngn/dist/facades/Path";

const imagePath = '/images/1.jpg';

Path.makeStorageUrl(imagePath);
    //returns http://localhost:3000/api/storage/images/1.jpg
Path.makePublicStoragePath(imagePath);
    //returns /var/www/http/ngn/storage/public/images/1.jpg
Path.makeStoragePath(imagePath);
   //returns /var/www/http/ngn/storage/images/1.jpg
Path.makeUploadsPath(imagePath);
   //returns /var/www/http/ngn/storage/public/uploads/images/1.jpg
Note: You have to set STORAGE_BASE_URL env variable to use
makeStorageUrl method.
