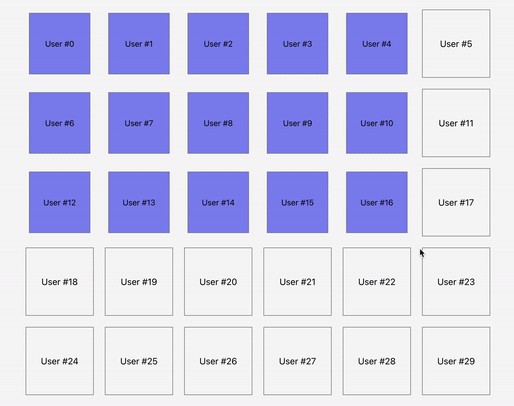
Selecting DOM elements by moving the mouse for React
Компонент предназанчен для визуализации выделения DOM элементов с помощью движения курсора по экрану,
реализацию дальнейшего взаимодействия с выделенными файлами мы оставляем за вам
через callback finishSelectionCallback
Кажется что такой подход делает бибилотеку более универсальной,
потому что дальшейнее взаимодействие с выделенными объектами всегда уникально.
В одном случае вам нужно получить id из datasets и обновить redux-store.
В другом случае добавить класс к выледенным элементам и отправить запрос на сервер.
Насколько сложным не был бы ваш кейс, вы сможете реализовать его в finishSelectionCallback
имея массив всех выделенных элементов
DEMO
Installation
npm install --save react-mouse-select
Usage
import { ReactMouseSelect } from 'react-mouse-select';

function App() {
  const borderSelectionContainer = document.getElementById('portal') as HTMLElement;
  const containerRef = useRef<HTMLElement>(null);

  const itemClassName = 'mouse-select__selectable';

  return (
    <div className="App">
      <main className="container" ref={containerRef}>
        {[...Array(10)].map((item, idx) => {
          return (
            <div key={idx} className={itemClassName} data-id={idx}>
              Selectable block
            </div>
          )
        })}
      </main>
      <ReactMouseSelect
        containerRef={containerRef}
        portalContainer={borderSelectionContainer}
        itemClassName={itemClassName}
      />
    </div>
  );
}

export default App;
!!! ОБРАТИТЕ ВНИМАНИЕ
Вам самостоятельно нужно позаботиться о том что бы контейнер containerRef содержал элементы с классом itemClassName,
как это показано в примере выше.
Также вам нужно описать стили для рамки и выделенных элементов, чтобы выделение было видно визуально
Вы можете стилизовать рамку выделения с помощью классов frameClassName и openFrameClassName
или же оставить ее невидимой
Стилизовать элементы можно с помощью itemClassName и selectedItemClassName
Example:
.mouse-select__selectable {
    width: 100px;
    height: 100px;
    margin: 10px;
    background: gray;
}

.mouse-select__selectable .selected {
    border: 2px solid red;
}

.mouse-select__frame {
    background: red;
    opacity: 0.5;
}
Configuration
The ReactMouseSelect component accepts a few props:
-
containerRef[required]: Container ref in which selecting should work -
portalContainer[required]: Portal container in which the highlighting frame will be rendered -
sensitivity(number) default = 10: Sensitivity in pixels. Selection starts working only if the cursor is shifted for the specified number of pixels -
tolerance(number) default = 0: The number of pixels that must be contained in a frame for the element to be selected -
onClickPreventDefault(boolean) default = false: When the selection ends, after the onMouseUp event, the onClick event is dispatched by default If = true, the event bubbling is prevented after the selection With a normal click (without selection) the event happens standardly Useful, when there is a click handler on the container, which shouldn’t happen in case of selection -
itemClassName(string) default = ‘mouse-select__selectable’: The class by which it is determined which elements we can select -
selectedItemClassName(string) default = ‘selected’: The class that is added to the elements that come into the selecting frame -
frameClassName(string) default = ‘mouse-select__frame’: Highlighting frame className -
openFrameClassName(string) default = ‘open’: The class that is added to the highlighting frame when it is active -
notStartWithSelectableElements(boolean) default = false: If true, then the selection will not start with the selected elements, but only with the space between them It can be useful, if the selecting elements, aside from the selection, are involved in drag and drop -
saveSelectAfterFinish(boolean) default = false: Keep selected Item ClassName on selected items after selection is complete -
startSelectionCallback(function(e: MouseEvent) => void;): Callback that calls at the start of the selection (when the frame appears) -
finishSelectionCallback(function(items: Element[], e: MouseEvent) => void;): Callback that calls at the end of the selection
Development plans
If you have a desire, you can help the development of this library
- поддержка касаний на мобильных телефонах
- оптимизация производительности за счет перебора циклом не всех элементов, а только необходимой части Идея: имеем массив выделенных элементов и массив не выделенных элементов. В случае увеличения рамки по одной из сторон проходим массив не выделенных элементов и перемещаем в выделенные. В случае уменьшения рамки по двум сторонам проходим массив выделенных элементво и необхожимые перемещаем в массив не выделенных элементов
- Для простоты использования компонета, добавить WrapperComponent в котором будет реализован рендер container и portal для рамки