fflow


Give a ⭐️ if our project helped or interests you!
About fflow
React is the most popular library used by frontend developers today. Yet, getting a React application started requires a too much boilerplate code and unnecessary time.
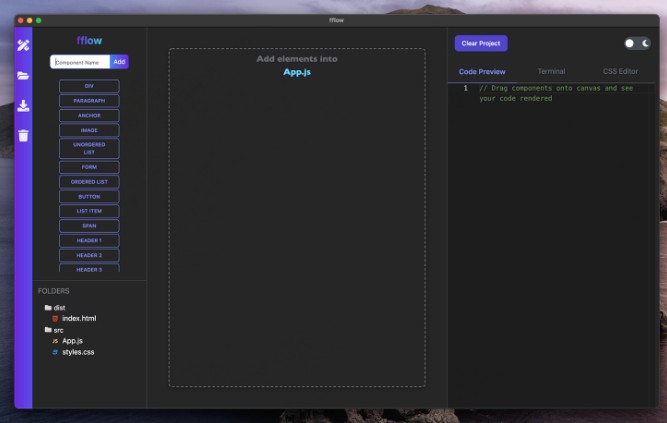
fflow is a free, open-source developer tool to create React applications rapidly and with minimal effort using the simple drag and drop UI. It combines the most compelling features of Create React App, React ES6 snippets, and a beautiful user experience. Here is a medium article describing the philosophy behind fflow and you can download it here.
We are really excited to launch this alpha version and hope you will download, play around with it, and provide us with feedback.
Visit our website here ? https://fflow.dev

Features
- Drag, Drop, Reorder and Delete HTML Tags
- Create Custom React Components
- Light and Dark Theme based on OS Preferences and Manual Toggle
- Delete Project and Clear Canvas to restart build process
- Live preview in Code editor
- Interactable CSS Code Editor
- Easily switch between files with file tree or on the canvas
- Easy redirect to App.jsx by clicking on the fflow icon
- Export app with preconfigured and versatile webpack
- In-built terminal initializes an instance of the exported app without leaving fflow
- Accessibility features including canvas item highlighting when the HTML tag or Component is picked up
Built with
- React.js
- Electron
- React-Monaco/Editor
- Webpack 5
- TailwindUI
- React–Redux
- Redux Toolkit
- React Beautiful DnD
- React Icons
- Xterm.js
- node-pty
- Jest
- React Testing Library
- Playwright
Loading Screen

Light and Dark Mode

Create Custom Components and Nest HTML elements

Edit CSS directly in the App

Export Working Project

Clear canvas to start from scratch
![]()
Getting Started
The following instructions are split into two sections for:
Production Mode
Please download the latest release of fflow for MacOS or Windows.
? Linux version coming soon. ?
-
Mac users: After opening the dmg and dragging fflow into your Applications folder,
CTL + Clickthe icon and ‘Open’ from the context menu to open the app. This extra step is necessary since we don’t have an Apple developer license yet. -
Windows users: Install the application by running fflow setup 1.0.0.exe.
Clone this repo
- Clone this repo
git clone https://github.com/oslabs-beta/fflow - Install the dependencies
npm install - Copy and run this in your terminal (
./node_modules/.bin/electron-rebuild) or.\node_modules\.bin\electron-rebuild.cmdfor Windows - Run script for development mode
npm run start - Build the app (automatic)
npm run build - Test the app (after
npm run build||yarn run build)npm run prod
Current issues
Note there is currently an issue where the Monaco Code Editor keeps showing ‘loading…’ in development mode. We are working to solve this. In the meantime, when you drag HTML tags onto canvas you can still see the code editor’s contents in the Developer Tools.
Running tests
Electron, React and Redux tests can be run using npm run test
Run Exported Project
Below is the generated directory structure of the React and Webpack application that is created when you export your application.
├── dist                    # Compiled files
│    └── index.html
├── src                     # Source files
│    └── App.js
│    └── index.js
│    └── styles.css
├── webpack.config.js       # Webpack configuration
├── .babelrc                # Babel configuration
├── .gitignore              # Git ignore file
├── package.json            # Dependencies file
└── README.md               # Boilerplate README file
- Using the inbuilt terminal,
cdinto the Exported Project in yourDownloadsfolder - In the root of the Exported Project folder, install dependencies
npm install - Start an instance
npm run start - If
Localhost:8080does not open automatically in your default browser, navigate to the specified port to see your running app with Hot Module Reloading and a pre-configured webpack
Add Sass
Adding Sass to your exported project requires updating webpack configs and adding necessary loaders.
- Install loaders for sass,
sass-loaderandnode-sass - Add another object to the rules in
webpack.configwith the following:
 {
        test: /\.scss$/,
        use: [
          'style-loader',
          'css-loader',
          'sass-loader'
        ]
      }
- Rename
styles.csstostyles.scss
Add Tailwind
Adding Tailwind to your exported project requires updating webpack configs, adding necessary loaders and tailwind config.
- Install tailwind as a dependency
npm install tailwindcss
- Install postcss-loader and autoprefixer as development dependencies
npm install -D postcss-loader autoprefixer
- Copy the following copy into
src/styles.css
@tailwind base;

@tailwind components;

@tailwind utilities;
- Create a
postcss.config.jsfile and copy the following code in
module.exports = {
  plugins: [require('tailwindcss'), require('autoprefixer')],
};
- Add
'postcss-loader'to the css rules inwebpack.config
Change App Title
This boilerplate names your project Exported Project. You can change the app title by inserting the app title within the <title> </title> tags in index.html.
Contributors
- Rain Hsu @crumblepie | Linkedin
- Jake Pino @jakepino | Linkedin
- Bryanna DeJesus @BryannaDeJesus | Linkedin
- Ronak Hirpara @ronakh130 | Linkedin
Project Links: Github | Linkedin | Medium
Roadmap
- Editable JS Code Preview
- GitHub OAuth Integration and online project save
- Keyboard shortcuts for Mac and Windows
- Export in TypeScript
- Save Multiple Projects
- Create Custom HTML Elements
- Open and compose multiple projects in different windows simultaneously
- BrowserView to preview project
- Live Editing with other collaborators
- AWS hosted version
Contributing Guide
Contributions are what make the open source community an amazing place to learn, inspire, and create. Any contributions are greatly appreciated.
If you have a suggestion of how to make fflow better, please fork the repo and create a pull request. You can also simply open an issue with the tag “enhancement”.
- Fork this repo
- Create your Feature Branch (
git checkout -byourgithubhandle/AmazingFeature) - Commit your Changes (
git commit -m‘Add some AmazingFeature’) - Create and push to your remote branch (
git push originyourgithubhandle/AmazingFeature) - Open a Pull Request
License
Licensed under MIT License © fflow.