How to Code Push Notifications for React Native Apps
Please step through the following tasks that they are listed below. After (or during) each task please commit to your feature branch:
Step 1 – Create a new React Native project with TypeScript
React Native TypeScript project setup
npx react-native init PushyPush --template react-native-template-typescript
Step 2 – Enable Apple Push in Xcode
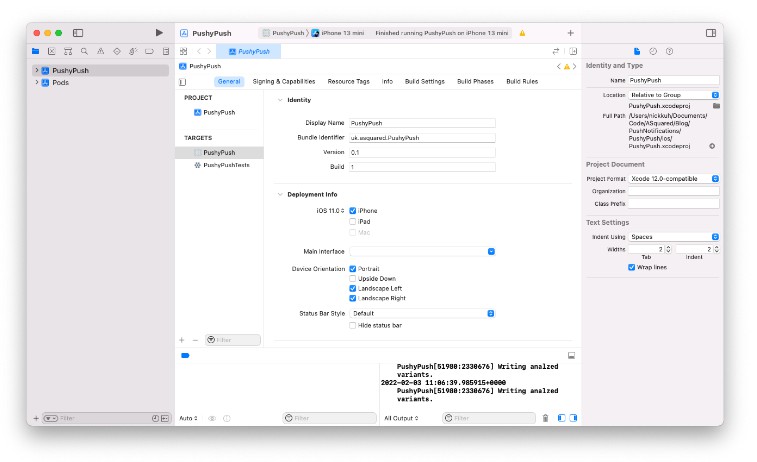
- Setup a bundle identifier
- Login to your Apple Developer Account via Xcode > Preferences > Accounts
- Under Signing & Capabilities in Xcode select and connect the Xcode Project to your Apple Developer Team
- Tap to add a new capability and select Background Modes
- Select
Remote Notificationsfrom the options - Tap again to add another new capability and select Push Notifications. Your options should look similiar to the following:
Step 4 – Add Firebase
Using Firebase for easy targeting of push notifications to:
- groups of users or…
- individual users
- Create a new Firebase project
- Activate Authentication in Firebase
- Enable Anonymous Sign-in option (if you’re already using Firebase for your authenticate that’s fine too, the aim is to have a unique user id to send push notifications too)
Setup your iOS Project in Firebase
- Within the Firebase UI tap the settings cog of your project and choose
Project Settings - Tap the iOS app from the different app options
- Enter your iOS app’s unique bundle identifier – make sure it matches the one you setup in Xcode.
- As per the Firebase instructions download the
GoogleServices-Info.plistfile to your Mac and add it to the root of your Xcode project by dragging it into your project in Xcode. I reccommend selectingCopy items if neededwhen adding it:
- Don’t worry about adding the Firebase iOS SDK – that will get added in a later stage via React Native Firebase
Step 5 – Create a APNs Authentication Key Push in the Apple Developer Center
- Login to your Apple Developer Account and choose Keys.
- Tap the
+button to add a new push key - Ensure the
Apple Push Notifications service (APNs)option is selected and then hitContinue
- Register your new key.
- Download your new key. Don’t close this window as it displays your key’s id which you’ll need in the next step.
- Back in Firebase > Project Settings > Cloud Messaging upload your new key to your Apple project
You will need to enter both your key id and apple team id that you can copy and paste from the Apple Developer portal.
Step 6 – Back to the App – Install React Native Firebase modules
- Install the following 3 React Native Firebase modules:
npm install @react-native-firebase/app @react-native-firebase/messaging @react-native-firebase/messaging @react-native-firebase/auth
cd ios
pod install
-
Follow the iOS Setup instructions to ensure the native iOS Firebase SDK get’s initialised by the AppDelegate
-
Install Push Notification iOS library
npm install @react-native-community/push-notification-ios
cd ios
pod install
- Install React Native Community Hooks
npm install @react-native-community/hooks
cd ios
pod install
Step 6 – User Permissions
Step 7 – Subscribing to Topics
Step 8 – Sending and Targetting Push Notifications
- Create and download a Firebase admin service key for your project
- Create a folder at the root of your project named
scriptsand within that add akeysfolder. Move the downloaded key to that folder.
npm install --dev firebase-admin ts-node
Add a new script entry to your package.json:
“send-notification”: “GOOGLE_APPLICATION_CREDENTIALS=./scripts/keys/[name of your key].json npx ts-node ./scripts/send-notification.ts”
And then add the following send-notification.ts file to your scripts folder:
import * as admin from 'firebase-admin';

export const sendNotification = async (props: {
  topic: string;
  payload: admin.messaging.MessagingPayload;
}) => {
  const {topic, payload} = props;
  try {
    admin.initializeApp();
    await admin.messaging().sendToTopic(topic, payload, {priority: 'high'});
    return 'Sent';
  } catch (err) {
    // tslint:disable-next-line: no-console
    console.log('err', err);
    throw err;
  }
};

sendNotification({
  topic: 'all',
  payload: {
    notification: {
      title: 'Hello There Nick!',
      body: 'Whassup bud!',
      sound: 'default',
    },
    data: {
      deeplink: 'home',
    },
  },
})
  .then(res => {
    console.log(res);
    process.exit();
  })
  .catch(err => {
    console.log('Failed to send push', err);
    process.exit();
  });
Try it out:
npm run send-notification
Step 9 – Receiving Push Notifications
- Checkout the docs here
