@spyna/react-store
React app state management that uses a storage.
Install
npm install --save @spyna/react-store
Usage
View working code on CodeSandbox
Create store
// App.js
import React, { Component } from 'react'
import { createStore } from '@spyna/react-store'

class App extends Component {
  render() {
    return (
      <div>
        <h1>My App</h1>
        {/*
        children here
        <ConnectedComponent />
        */}

      </div>
    )
  }
}

const initialValue = {
  amount: 15,
  username : {
    name : 'spyna',
    url : 'https://spyna.it'
  }
}

export default createStore(App, initialValue)
You can pass the initial store value as the second argumento of the function createStore.
Connect a component to the store
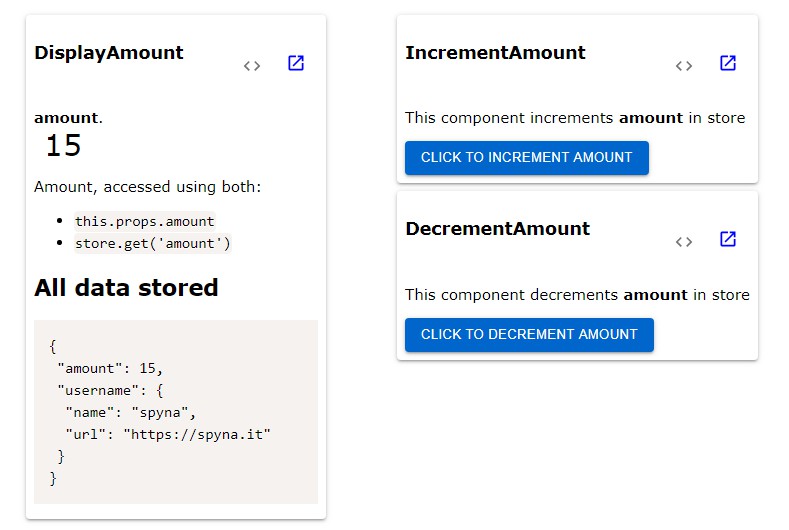
Using props.store.get('key')
// MyComponent
import React, { Component } from 'react'
import { withStore } from '@spyna/react-store'

class MyComponent extends Component {
   render() {
     return (
       <p>My Amount: {this.props.store.get('amount')}</p>
     )
   }
}

const ConnectedComponent = withStore(MyComponent);
Using props.key
You can pass an array of keys to the function withStore to spread the keys of the store into the Component props
// MyComponent
import React, { Component } from 'react'
import { withStore } from '@spyna/react-store'

class MyComponent extends Component {
   render() {
     return (
       <p>My Amount: {this.props.amount}</p>
     )
   }
}

const ConnectedComponent = withStore(MyComponent, ['amount']);
Set data in store
this.props.store.set('a_key', 'a value')
this.props.store.set('another_key', {name: 'another value'})
Read data from the store
const a_key  = this.props.store.get('a_key')

const defaultValue = {name : 'an optional default value if the key is not found'}
const another_key = this.props.store.get('another_key', defaultValue)
Remove data from the store
this.props.store.remove('a_key', 'a value')
Get all data from the store
const store = this.props.store.getState()
Set multiple data in one shot
Using an object with the key and the value properties: {key: 'key', value: theValue}
const firstObject = {
  key: 'key-one',
  value: 'value-one'
}
const secondObject = {
  key: 'key-two',
  value: 'value-two'
}
this.props.store.setAll(firstObject, secondObject)
Listen to store modification
You can listen to store modifications passing a callback function to the createStore function config object.
The config property is: listener.
In the following example, the store is initialized reading the localStorage and every time the store is modified, its value is stored in the localStorage.
const MY_STORE = 'my-store';

const initialValue = JSON.read(localStorage.getItem(MY_STORE) || "{}");

const config = {
  listener: (state) => {
    localStorage.setItem(MY_STORE, JSON.stringify(state))
  }
}

export default createStore(App, initialValue, config)
Configuration
When creating the store with createStore you can pass some options:
- initial store value
- custom store configuration
initial value
const initialValue = {
  someKey : 'some value',
  anotherKey : {
    name : 'my initial value'
  }
}
export default createStore(App, initialValue)
Default config
const config = {
  listener: (state) => {},
  proxyStore: true;
}
export default createStore(App, {}, config)
| Property | Type | default | meaning |
| --- | --- | --- |
| listener | function | (state) => {} does nothing | A callback function that is called after the methods: set, setAll, remove. The function accepts the new store value as parameter. |
| proxyStore | boolean | Whether or not to use a Proxy to lock the store object. In some environment the Proxy object is not available, for example when using Facebook hermes, in these cases you can set this property to false. Keep in mid that if you set this option to false, store will not be protected against modifications. |
Contributing
Pull request and contributions are welcome.
The develop branch is the one where you want to develope your changes.
The master branch is the source code of the current release.
The gh-pages branch is mainteined by CI and contains the documentation and example. You don't need to use it.
- Add test for your changes
- Add documentation and examples of your changes under the folder
example - Run
yarn prettierornpm run prettierto format the source of the project - Thank you
Developmnent
Run yarn start to compile to source code.
To test changes run cd example && yarn start