Signature Based Minting with Next.JS
Introduction
In this guide, we will utilize signature-based minting of NFTs to create a “community-built” NFT collection, where each user mints and owns their own NFT based on specific conditions that we provide.
By the end, we’ll have an NFT collection of NFTs that are all animal names, as specified in the animalNames.ts file.
Check out the Demo here: https://signature-based-minting.thirdweb-example.com/
Tools:
- thirdweb React SDK: to enable users to connect and disconnect their wallets to our website, using useMetamask & useDisconnect, and prompt them to approve transactions with MetaMask. We’ll also use the helpful hooks such as useNFTs to easily fetch data from the smart contract.
- thirdweb NFT Collection: to create an ERC721 NFT Collection that our community can mint NFTs into.
- thirdweb TypeScript SDK: to connect to our NFT Collection Smart contract via React hooks such as useNFTCollection, mint new NFTs with signature based minting.
- Next JS API Routes: For us to securely generate signatures on the server-side, on behalf of our wallet, using our wallet’s private key.
Using This Repo
- Create a project using this example by running:
npx thirdweb create --template signature-based-minting
-
Create your own NFT Collection via the thirdweb dashboard (follow the steps in Setting Up The NFT Collection of this doc if you need more help)
-
Create an environment variable in a
.env.localfile with your private key, in the formPRIVATE_KEY=xxx, similarly to the.env.examplefile provided. -
Add the
NEXT_PUBLIC_NFT_COLLECTION_ADDRESSenvironment variable to your.env.localfile too, in the formNEXT_PUBLIC_NFT_COLLECTION_ADDRESS=xxx, similarly to the.env.examplefile provided.
What is Signature Based Minting?
NFT Collections come in different shapes, sizes, and rules.
On one end of the spectrum, an NFT collection can be a set amount of NFTs, and they’re all made by one wallet, once they’re all claimed/minted, no more NFTs are ever minted in the collection. A popular example of this is the Bored Ape Yacht Club Collection.
On the other end of the spectrum, an NFT collection could also start out with no NFTs! NFTs in this collection could be created by anyone, at any time, and the NFTs could look completely different. This type of collection is a bit less well-known, but demonstrates that NFT collections can be totally different!
Signature-based minting enables a use case that is somewhere between these two ends of the spectrum. What if you didn’t want EVERYONE to be able to mint an NFT into your collection, or you only wanted specific types of NFTs to be minted?
Signature-based minting allows you to specify exactly what NFTs you allow to be minted into your NFT collection, by generating a signature for an NFT. This signature can be used by a wallet address that you specify to mint that NFT.
In this guide, we’ll grant users signatures to mint NFTs into our collection that follow the format we expect.
In the end, we’ll have a community-made collection that only contains NFTs with animal names, by restricting the signatures we provide to only allow NFTs with one of our animal names!
Let’s get into it!
Setting Up The NFT Collection
To create an NFT collection, we can use the thirdweb dashboard and create a fully customizable NFT collection in just a few clicks.
Head to https://thirdweb.com/dashboard and create a new contract on the Polygon Mumbai network. Click Create NFTs and Tokens > NFT Collection.
Give your collection a name and click Deploy now!
Nice! Now we have an NFT collection. Let’s set up a project and see how we can start minting some NFTs using the thirdweb SDK.
Setting Up The Project
To get started, we have a ready-made template that includes all the code you need to work with Thirdweb, TypeScript and Next JS available here https://github.com/thirdweb-example/next-typescript-starter
Our application is wrapped in a Thirdweb Provider so that we can access Thirdweb anywhere in our application:
import { ChainId, ThirdwebProvider } from "@thirdweb-dev/react";

// This is the chainId your dApp will work on.
const activeChainId = ChainId.Mumbai;

function MyApp({ Component, pageProps }: AppProps) {
  return (
    <ThirdwebProvider desiredChainId={activeChainId}>
      <Component {...pageProps} />
    </ThirdwebProvider>
  );
}
Connecting User’s Wallets
Over at the home page at index.tsx, we’re using the thirdweb React SDK MetaMask Connector so our user can connect their wallet to our website.
import {
  useAddress,
  useDisconnect,
  useMetamask,
  useNFTCollection,
} from "@thirdweb-dev/react";

  const address = useAddress(); // Grab the current user's address
  const connectWithMetamask = useMetamask(); // Connect with metamask
  const disconnectWallet = useDisconnect(); // Disconnect from metamask

};
We’ve attached these connectWithMetamask and disconnectWallet functions to the onClick to fire when the user clicks the Connect or Disconnect buttons.
You can see an example of how to implement that logic in our index.tsx file
Loading & Displaying NFTs
For our community collection, each NFT is minted by a different user. We’re using another thirdweb hook called useNFTCollection to connect to our smart contract and load all of the NFT’s in our collection.
// Fetch the NFT collection from thirdweb via it's contract address.
const nftCollection = useNFTCollection(
  // Replace this with your NFT Collection contract address
  process.env.NEXT_PUBLIC_NFT_COLLECTION_ADDRESS
);
Once we’ve loaded them from the smart contract, we can display each NFT to the user.
We’ll be using the React SDK’s useNFTs to fetch all of the NFTs in our collection.
Fetch All NFTS:
const { data: nfts, isLoading: loadingNfts } = useNFTs(nftCollection);
Now we’ve got the NFT’s loaded, we can display them to the user!
We’ll let you decide how best to display your NFTs, but if you’re looking for an example, check out the index.tsx file to see how we did it.
We can also see who is the owner of each nft with .owner, and the metadata.name and metadata.description inside of each NFT!
Creating NFTs with Signature Based Minting
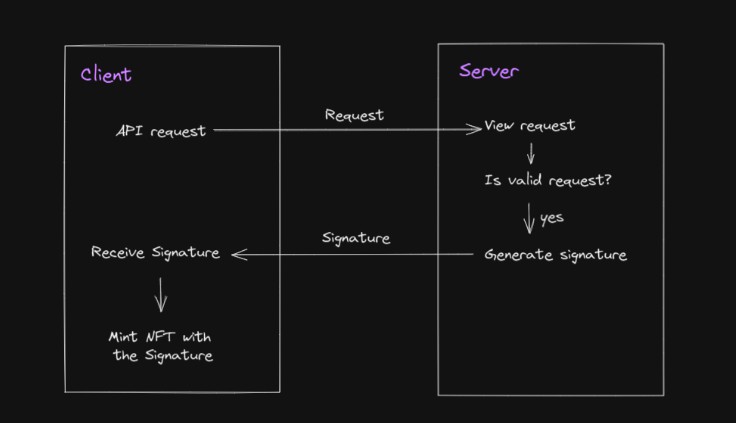
The way that our signature-based minting process works is in 3 steps:
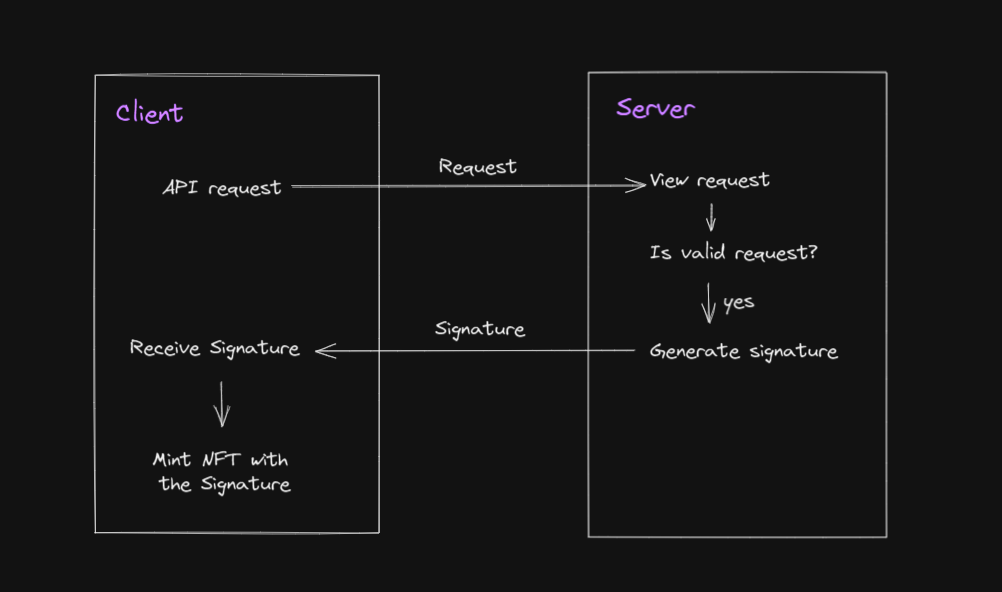
-
The connected wallet calls a Next JS API Route with three parameters,
authorAddress,nftName, andimagePathinside the request body. -
The API route runs some checks on the server-side to see if this user and the NFT they are requesting to mint is eligible or not. If the request is eligible, it generates a signature to mint an NFT with a specific set of characteristics.
-
Once the API function is done processing, it sends the client/user a signature. The user can call
mintwith this signature to create an NFT with the conditions provided from our server.
The main benefit here is that we have made an environment where us (the owner of the smart contract) can decide what the user can mint into our collection, all programmatically.
API Route
To create an API Route, you’ll need to create a file in the /pages/api directory of your project.
On the server-side API route, we can:
- Run a few checks to see if the requested NFT meets our criteria
- Generate a signature to mint the NFT if it does.
- Send the signature back to the client/user if the NFT is eligible.
De-structure the arguments we passed in out of the request body:
const { authorAddress, nftName, imagePath } = JSON.parse(req.body);
Initialize the Thirdweb SDK on the server-side
// Initialize the Thirdweb SDK on the serverside
const sdk = ThirdwebSDK.fromPrivateKey(
  // Your wallet private key (read it in from .env.local file)
  process.env.PRIVATE_KEY as string,
  "mumbai"
);
Load the NFT Collection via it’s contract address using the SDK
const nftCollection = sdk.getNFTCollection(
  // Replace this with your NFT Collection contract address
  "0x000000000000000000000000000000000000000"
);
Example Check #1 – Is the name of the NFT an animal name?
if (!animalNames.includes(nftName?.toLowerCase())) {
  res.status(400).json({ error: "That's not one of the animals we know!" });
  return;
}
Example Check #2 – Check that this wallet doesn’t already own an NFT in this collection
const hasMinted = (await nftCollection.balanceOf(authorAddress)).gt(0);
if (hasMinted) {
  res.status(400).json({ error: "Already minted" });
  return;
}
When we are satisfied with the NFT conditions, we can generate a signature to mint the NFT
// This is to generate the page number based on how many pages have been minted already
const pageNumber = (await nftCollection.totalSupply()).add(1);

// Generate the signature for the page NFT
const signedPayload = await nftCollection.signature.generate({
  to: authorAddress,
  metadata: {
    name: nftName as string,
    image: imagePath as string,
    description: "An awesome animal NFT",
    properties: {
      // Add any properties you want to store on the NFT
    },
  },
});
Return the signature to the client
// Return back the signedPayload to the client.
res.status(200).json({
  signedPayload: JSON.parse(JSON.stringify(signedPayload)),
});
If at any point this process fails or the request is not valid, we send back an error response instead of the generated signature.
res.status(500).json({ error: `Server error ${e}` });
Making the API Request on the client
With our API route available, we make fetch requests to this API, and securely run that code on the server-side.
Call the API route on the client
// Make a request to /api/server
const signedPayloadReq = await fetch(`/api/server`, {
  method: "POST",
  body: JSON.stringify({
    authorAddress: address, // Address of the current user
    nftName: nftName,
    imagePath: url,
  }),
});

// Grab the JSON from the response
const json = await signedPayloadReq.json();
Read the signature from the response
const signedPayload = json.signedPayload;
Mint the NFT with the signature
// Now we can call signature.mint and pass in the signed payload that we received from the server.
const nft = await nftCollection?.signature.mint(signedPayload);
Join our Discord!
For any questions, suggestions, join our discord at https://discord.gg/thirdweb.