X Microfrontends: Twitter Clone with Microfrontends
x-microfrontends is an open-source project that demonstrates the concept of microfrontends by building a Twitter clone with seven (7) separate React projects that seamlessly work together to create a complete web application.
I built this as a demo for my “Scaling teams with Microfrontends – Every CTO’s dream” talk at SysConf 2023.
See Demo.
Overview
Microfrontends are an architectural approach. They help you to break down your frontend monolith into smaller, independently developed, deployable applications.
This project serves as a practical example of how microfrontends can be used to build a complex web application with different teams working on different parts of the application.
Project Structure
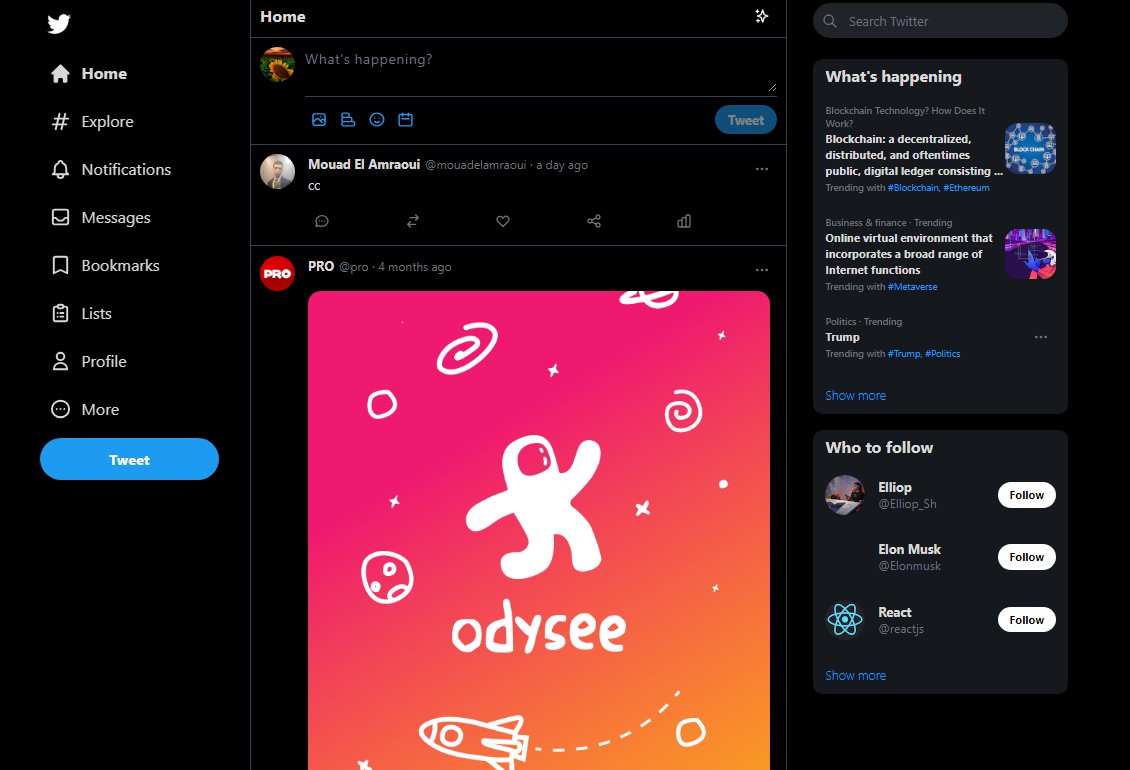
The chassis project composes 6 web apps, communities, explore, messages, notifications, timeline (home), verified into a cohesive web experience.
Each microfrontend is responsible for a specific part of the X clone.
The outline colors in the image above show which projects are responsible for which parts of the page.
Getting Started
To get started with x-microfrontends and run the Twitter clone locally, run:
git clone https://github.com/mykeels/x-microfrontends.git
pnpm i
pnpm run -r copy:env
pnpm run --parallel -r start
and open https://localhost:4000 in the browser.
This starts the 7 Frontend projects described above in different ports, along with the api and begins building the microfrontends library.
How it works
Each project uses Webpack’s Module Federation to expose files.
See example in mf-timeline, where we
- expose 3 apps,
- ensure there is a remoteEntry.js file which tells webpack how to find these files.
- and give them all a unique name identifier, which we get from the package.json.
The above actions form 3 concepts called module, entry, and scope respectively, where a microfrontend can expose one or more module apps, under the same scope, with an entry that tells webpack how to find them. These concepts are helpful for understanding what comes next.
Dynamic Remote Resolution
This project uses Webpack Module Federation’s Promise-based Dynamic Remotes, where instead of having to manually specify each remote in the chassis project, we can resolve the values for their scope, module and entry at runtime.
When running locally, these values are obtained from the microfrontend manifests served by the api project at http://localhost:3333.
What are microfrontend manifests?
To aid in dynamic remote resolution, each microfrontend publishes a microfrontend-manifest.json file that contains information about how to load itself.
See example in mf-timeline, where we have a
- scope:
timeline - module:
./unused-root-module.js - entry:
http://localhost:4001/remoteEntry.js
Notice that the module: ./unused-root-module.js is incorrect compared to the 3 exposed apps in its webpack module federation config. This is because the manifest can have multiple slots modules, so it helps to reserve the root module for route slots.
What are Slots?
Slots are how we are able to express within our microfrontend-manifest.json file, that we have exposed more than one app in our module federation config.
Each slot represents an exposed interface, that:
- inherits its
scopeandentryfrom the root manifest, - may inherit its
modulefrom the root manifest, - may contain other parameters that can be used in choosing which slots get rendered.
Slots can be rendered either:
- directly on the route with MicrofrontendScreen, making them a route-level slot.
- To specify routes, you would use the
slots.routesproperty of the microfrontend-manifest.json file, which works:- just the same as other slots,
- except it requires a
"route": "/explore/*"property, specifying its route.
- You can get away with having one route slot that resides in the root, especially if your exposed app includes its own BrowserRouter and handles its own navigation, relying on the
navigatemount prop when it needs to navigate to a route controlled by its parent. - Or you can choose to expose an app per route.
- just the same as other slots,
- and lets you add a
"route": "/explore/*"property, specifying its route.
- To specify routes, you would use the
- directly within an HTML Element with MicrofrontendSlot, making them a non route-level slot.
Loading Microfrontends
When matching slots are found, their:
entryscript (usuallyremoteEntry.js) is loaded on the DOM- we initialize the exposed
modulewe want - using the exposed mount and unmount functions, we can:
mountthe app to an HTML element- and
unmountwhen done.
Mount and Unmount?
Every exposed app exports as default:
export default {
  mount: (container, props) => {
    return () => unmount();
  },
  unmount: (container) => {},
};
such as in mf-timeline.
What are mount props?
the mount function’s props parameter contain data and functions we pass down to every microfrontend.
Having such a simple interface instead of exporting say a React component directly is a powerful concept because it lets us abstract away the moving parts of different frameworks. Technically, this can be used to load Angular, Vue, Solid, HTMX, etc, because all we need is a way to mount HTML with behaviours to an element, and unmount it when done.
Communication among microfrontends
One of the properties of the microfrontend-manifest.json I did not talk about is the events, which may expose a mapping of event names to a JSON schema object that describes its data.
Using the Microfrontend Context, we can pass an eventBus to our microfrontends, which they can use to communicate across the various apps.
Cool tricks with Microfrontends
All the above sounds like a lot if there is no clear advantage. Besides the team and management advantages of independence and being able to iterate simultaneously on multiple parts of the product, here are some technical advantages to using this architectural pattern.
1. Show off your work to a colleague
Imagine you’re working on the Timeline project, and you’ve deployed your work to staging, so it lives at https://staging.x.com/mfs/timeline/ while production is at https://x.com.
You could ensure your page takes an ?override_manifest query string, so you send a URL like:
https://x.com?override_manifest=https://staging.x.com/mfs/timeline/microfrontend-manifest.json
to your colleague, and they would see the new funky thing you have in staging, in the production environment, because it would load the remoteEntry.js from staging.
2. Debug production in localhost
A tangent of the above is that when you want to test a new feature in production, or debug a problem, you don’t need to wait until your code gets to production, because you can load the following URL:
https://x.com?override_manifest=http://localhost:4001/microfrontend-manifest.json
and instantly have your localhost-served copy of the Timeline project, running in the production web page, with webpack hot-reload.
Be sure to limit the domains that can be used to override your manifests to localhost and other domains you control.
3. Instant Rollbacks
Because we are dealing with SPAs, we can easily maintain the say last 50 deployed versions of each microfrontend, because storage and CDN are relatively cheap.
This means that if something happens with the latest 1.2.3 version of the Timeline such as https://x.com/mfs/timeline/1.2.3/remoteEntry.js, then we can quickly change the remoteEntry.js location to one we know that works e.g. https://x.com/mfs/timeline/1.2.0/remoteEntry.js, and all your users need to do is refresh to get the latest.
You could even push a notification to the web page to prompt them to refresh when this happens.
Contributing
Contributions to x-microfrontends are welcome!
Feel free to open issues, or create pull requests.
Potential contribution areas are:
1. Sharing Tanstack Query Client
I’ve been toying with the idea of passing a tanstack query client, as part of the mount function’s props parameter, which will enable sharing the query cache, a very powerful tool if it works.
2. Demonstrate communicating with the Event Bus
A good example of this is the aside-search app,
- emitting a
searchevent that contains{ "query": "Blah" }, - having the chassis receive the event data and log to the console.
3. Demonstrate route-level slots
To enhance the above, the aside-search app could
- navigate to to
/explore?query=Blah, – passing thequeryas a route search param..
4. Clean up this README
Oh man, I wrote this in a few sleep-deprived hours, so this could use some work. Send help!
License
This project is licensed under the MIT License. See the LICENSE file for details.
Happy microfrontending, and enjoy exploring this X clone built with microfrontends!
Credits
The original html+css code used for this demo is by @shubhstwt on X. Without his work on the open source xclone, it would be much harder to put this demo together than it currently is.