todo-app
A code kata on testing webapps
Setup

- You will need to wait a bit until
npm installfinishes - Run
npm startin the integrated terminal. This starts both the ‘backend’ server (port 8001) and the frontend (port 3000). In the ports tab you can open the app in the browser.

Alternatively you can also set up the project locally:
- Make sure NodeJS 18.12.1 has been installed. You can also use nvm and execute
nvm installandnvm use. - Execute
npm install - You can then execute
npm startto run backend server (port 8001) and frontend (port 3000) locally.
Application

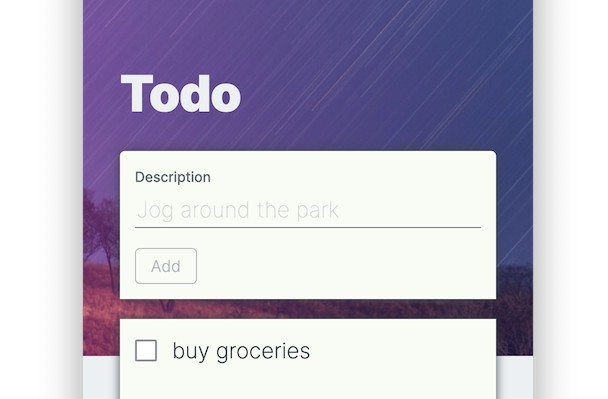
The application allows you to create todos, mark them as done, delete them and see how many todos are left.
Exercises
1. Get familiar with Jest
To write our unit tests, we will be using Jest. This is a unit testing framework for JavaScript/TypeScript.

Notice how the “Add” button is disabled when the description is emtpy. It remains empty if the user enters whitespace. This logic
is done in the isValid function in src/components/add-todo/index.tsx.
Create tests in src/components/add-todo/add-todo.test.tsx:
Note: Tests are typically co-located with the actual implementation and end in
.test.tsxor.spec.tsx.
- when passing an empty string,
isValidshould return false - when passing a string with just whitespace,
isValidshould return false - when passing a string with text,
isValidshould return true
Keep the expect documentation and api documentation handy.
To execute the tests run npm test. This will start Jest in “watch” mode. Whenever you save a file, the tests will run. Press w to explore
the watch mode
- try only watching the
add-todo.test.tsxfile - try focusing on a single test
- switch back to running all tests
- run only the tests related to files changed since last commit
If you want to debug a test in VSCode, you can set a breakpoint and press F5. The first time you might need to select the “Debug Test”
launch configuration. Adding console.log statements is also a great debugging tool ?
2. Test builders

At the bottom of the todo app you will see the number of todos that are left. As you toggle todos, this number will change. The number is calculated in
the countTodosLeft function (in src/components/footer/index.tsx). It takes an array of todos and returns how many todos are still left.
Create tests in footer.test.tsx:
- when passing an empty array,
countTodosLeftshould return 0 - when passing an array where all todos are done,
countTodosLeftshould return 0 - when passing an array where 1 todo is done and 2 are not done,
countTodosLeftshould return 2 - …
A todo looks as follows:
const todo = {
    id: "3044efbc-7e54-4751-a96c-e01474caf8a7",
    description: "Jog around the park",
    done: false,
};
To generate ids and descriptions you can use faker. Check out the api documentation to see what it can do
import { faker } from "@faker-js/faker";
const id = faker.datatype.uuid();
You might also want to create a test builder to easily create todos. A pattern you can use in JavaScript/TypeScript is based on the spread syntax.
function anAddress(overrides: Partial<Address> = {}): Address {
    return {
        street: faker.address.street(),
        zipCode: faker.address.zipCode("####"),
        city: faker.address.city(),
        ...overrides,
    };
}

const randomAddress = anAddress();
const addressInTheCity = anAddress({ zipCode: "2000" });
Note: You can keep the test-builder in the test file, or put it in a separate test-builders file in
src/test-lib.
3. Testing Library

You might notice that the application shows
- “All done!” when there are no todos left
- “1 todo left” when there is one
- “4 todos left” when there are multiple
Write some tests in footer.test.tsx to cover these cases. This time the functionality is in a React component. We can use
testing-library to render a React component in our tests.
Note: Testing-library also works on regular DOM applications, and with other frameworks (Vue, Angular,..)
Import screen and render from our test-lib. In a test you can render the Footer component with an array of todos.
import { screen, render } from "../../test-lib/test-utils";
test("show todos", () => {
    const exampleTodos = [aTodo({ done: true })];
    render(<Footer todos={exampleTodos} />);
});
Note: Wondering why we import from test-lib/test-utils instead of @testing-library/react? This setup is recommended to reduce certain boilerplate code.
Use the testing-library queries to find the DOM element. Unsure which
query would work best? Try putting screen.logTestingPlaygroundURL() after the render method and go to the url.
- Make sure you understand the difference between
getBy..,queryBy..andfindBy...
These queries return DOM elements which you might want to assert. (is it present, is a button disabled, …). Go over jest-dom to see what matchers can help you.
Note: Aren’t we running these tests in NodeJS? How can we render DOM elements without a browser? We’re testing against a fake implementation of the DOM called jsdom. It can’t implement/simulate everything, but works great for these tests.
4. Simulating the user
video-add-todo.mov
After a user adds a todo, we clear the “Description” field to allow the user to quickly add a new todo.
Create tests in add-todo.test.tsx:
- user types something in ‘Description’, presses enter: description should become empty
- user types something in ‘Description’, clicks the add button: description should become empty
Just like in the previous exercise, we can use testing-library to find and verify the DOM elements. This time we also want to
trigger DOM events to simulate the user. However we want to avoid coupling our test to a specific choice in the implementation.
In the test, we don’t care if the component is using onChange/onKeyDown/onKeyUp/onSubmit/…
We’ll use user-event instead. It will simulate all the correct DOM events
when simulating a user action. The render function from test-lib/test-utils has been setup to return a userEvent object.
test("user hovers over a button", async () => {
    const { user } = render(<AddTodoForm />);
    const coolButton = screen.getByRole("button", { name: /my cool button/i });
    await user.hover(coolButton);
});
Note: the methods on
userreturn promises, you will need toawaitthem.
You might notice that the “Description” field is only cleared after submitting to the server. You can use waitFor for this. (eg: await waitFor(() => expect(...).toHaveValue(...)))
5. Faking the backend
video-flow.mov
When the user adds a todo in the <AddTodoForm> component (doing a POST to /api/todos), the <TodoList> will show this new todo.
A user can then mark the todo as done or delete it. We would like to test if this actually happens:
Create tests in src/app.test.tsx:
- user types something in the description and clicks add. The todo shows up in the list.
- start off with a single todo item in the list. When the user marks it as done, the footer should show ‘All done!’
- start off with a single todo item in the list. When the user deletes it, the text ‘Add some todos’ should show up
The components we are testing are executing REST calls. Luckily we are not testing against the real backend. In src/test-lib/test-server.ts
msw is being used to fake our backend. In src/setupTests.ts we make sure
that we cleanup after every test.
Extra tips:
- Before rendering, call
resetTodosto start the test with a specific todo item. This way you don’t have to add it through the UI in every test. - We are missing a call for removing todo items. Make sure the test-server also implements
DELETE /api/todos/:todoId. Currently our web-app always requires a JSON response. HTTP reponses without a body are not supported. - Even if the server is fake, the results won’t be “instant”. The
await screen.findBy-queries will come in handy. docs - You can scope testing-library queries using
within. (eg,within(list).getBy...) - The todo items have a trash icon, but it does have accessible text so it is still easy to find. A UI that is not accessible, will be hard to test.
6. Stubbing the backend

We would like to test situations where the server returns an error. We could expand the fake test-server implementation, but that could lead to an overly complex
fake implementation. Instead we will temporarily replace an endpoint with a stub in our tests. The POST /api/todos should return a 400 status code and a json response
that looks like this {"code":"description_too_long","errorMessage":"Description may not be more than 100 characters"}
Create tests in add-todo.test.tsx:
- given the user adds a todo, when the server returns an error, then the error message shows up
- given the user adds a todo, when the server returns an error, then description input text is not cleared
You can temporarily override a call by calling mswServer.use(). These overrides are cleaned up after each test (see src/setupTests.ts).
For example
import { rest } from "msw";
import { mswServer } from "../../test-lib/test-server";

test("my test", () => {
    mswServer.use(
        rest.get('/api/todos', (req, res, ctx)=> {...})
    ); // similar to `test-server.ts`
    ...
})
7. Mocking the backend
We would like to verify if the Add button actually calls the backend. Does it do a POST with the correct parameters?
Create tests in add-todo.test.tsx:
- when the user adds a todo, a
POSTcall is done to/api/todoswith{"description":"..."}in the body.
Jest allows us to create and verify mock functions. We can combine this with the previous exercise to verify a call was executed.
const postCall = jest.fn();
mswServer.use(
    rest.get('/api/todos', (req, res, ctx)=> {
        // use postcall
    })
);
...
expect(postCall).toHaveBeenCalledWith({ description: expectedDescription })
Bonus rounds

- when the GET call to
/api/todosfails, a message should show up with “Something broke”. - when toggling a todo item, a
checkedcss class should be applied to the todo item. - when toggling a todo item, the checkbox is checked optimistically. However if the
PUTcall fails, the todo item should be unchecked - while adding a todo, the ‘Add’ button should be disabled and show ‘Adding…’. You might need to delay the server to verify this.
- create a helper method
mockHandlerthat takes ajest.Mock<any, any>and returns aResponseResolver<RestRequest, RestContext>to easily mock REST calls: For example:
const postCall = jest.fn().mockReturnValue({ id: 3 });
mswServer.use(rest.post("/api/contacts", mockHandler(postCall)));
// ...
expect(postCall).toHaveBeenCalledWith({ name: "Burt" });