WWW-REACT-POSTGRES

What is this for?
This template is for making a good website or web application. I made it to kick off 2022!
If you are a beginner and just want to make a simple React website with no database, try next-sass.
Why would I use this?
You want…
- To use React.
- To write SASS, like the good old days.
- To manage your own service secrets and not expose them to the client by using SSR from https://nextjs.org/ and
dotenv. - To use Postgres 11 to manage local data or local authentication.
- The minimum SEO optimal SEO metatags.
- [OPTIONAL] To start with a Google Authentication example.
- [OPTIONAL] To start with an example of “organizations”, each organization is created with an e-mail’s domain name.
- [OPTIONAL] To authenticate your Ethereum addresses from Metamask to build a DAPP or DAO. This example keeps a table of Ethereum addresses where you can store local information in the
jsonbcolumn. - [OPTIONAL] To authenticate your Solana address (public key) from Phantom to build a DAPP or DAO. This example also keeps a table of Solana addreses in the same way above.
- Minimal code to get the job done for a production ready website.
Will add support for Filecoin, NEAR and other networks as I develop the template.
Setup (MacOS)
All steps assume you have Homebrew installed on your machine. You might want to install iTerm since you will need multiple terminal windows open. One will be for your web server, the other will be for your Postgres database.
Step 1
Clone this repository!
Step 2
Create an .env file in your project root.
JWT_SECRET=74b8b454-29a6-4282-bdec-7e2895c835eb
SERVICE_PASSWORD_SALT=\$2b\$10\$JBb8nz6IIrIXKeySeuY3aO
PASSWORD_ROUNDS=10
- Generate your own
SERVICE_PASSWORD_SALTwithBCrypt.genSaltSync(10). You need to use\to escape the$values as shown above. Also make sure you’re using the correct amount of rounds. - Generate your own
JWT_SECRET.
[OPTIONAL] Step 3
To get google auth support to work, add the following to your .env file in your project root directory.
GOOGLE_CLIENT_ID=GET_ME_FROM_GOOGLE
GOOGLE_CLIENT_SECRET=GET_ME_FROM_GOOGLE
GOOGLE_REDIRECT_URIS=http://localhost:3005/google-authentication
- Obtain
GOOGLE_CLIENT_IDandGOOGLE_CLIENT_SECRETfrom https://console.developers.google.com after you setup your application. - Enable People API. Otherwise Google Auth will not work for this example.
- Use
CMD+Fto findGOOGLE_REDIRECT_URISin@data/environment. Google needs this string for the Authorized redirect URIs setting. The default is:http://localhost:3005/google-authentication.
Step 4
Install Postgres 11
brew uninstall postgresql
brew install postgresql@11
brew link postgresql@11 --force
Make sure NodeJS version 10+ is installed on your machine.
brew install node
Install dependencies
npm install
npm run dev
Step 5
The next step involves running Postgres 11.
I prefer the option to start and stop postgres through the command line. If you have another way of doing things, just make sure your port is set to 1334.
In a seperate terminal tab run
postgres -D /usr/local/var/postgresql@11 -p 1334
You may need to run brew services stop postgresql@11 since we’re running postgres on a different port.
If you get an error that lock file "postmaster.pid already exists like I did, you can delete that file with something like rm /usr/local/var/postgresql@11/postmaster.pid. But most likely running the brew command above will solve your problems.
Step 5
You need to create a user named admin and database named wwwdb.
# Enter Postgres console
psql postgres -p 1334

# Create a new user for yourself
CREATE ROLE admin WITH LOGIN PASSWORD 'oblivion';

# Allow yourself to create databases
ALTER ROLE admin CREATEDB;

# You need to do this to install uuid-ossp in a later step
ALTER USER admin WITH SUPERUSER;

# Exit Postgres console
\q

# Log in as your new user.
psql postgres -p 1334 -U admin

# Create a database named: nptdb.
# If you change this, update knexfile.js
CREATE DATABASE wwwdb;

# Give your self privileges
GRANT ALL PRIVILEGES ON DATABASE wwwdb TO admin;

# List all of your databases
\list

# Connect to your newly created DB as a test
\connect wwwdb

# Exit Postgres console
\q
Step 6
Setup and install the necessary Postgres plugins. Aftewards seed the database with the necessary tables.
npm run script database-setup
npm run script database-seed
There is also npm run script database-drop if you just want to drop your tables for testing.
[OPTIONAL] Step 7
If you need to run a node script without running the node server, an example is provided for your convenience
npm run script example
Finish
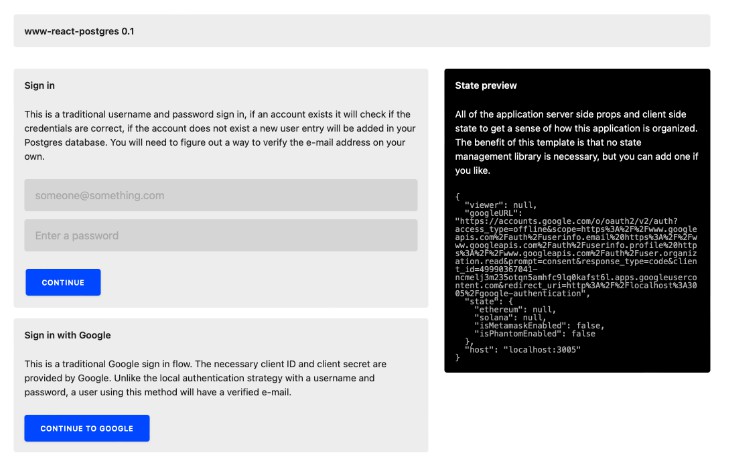
View http://localhost:1337 in your browser. You should be able to use the full example end-to-end and modify the code however you like.
Production deployment
You will need to add production environment variables. If you set up your Postgres database on Render the values will look something like this
PRODUCTION_DATABASE_PORT=5432
PRODUCTION_DATABASE_HOST=oregon-postgres.render.com
PRODUCTION_DATABASE_NAME=yourdatabasename
PRODUCTION_DATABASE_USERNAME=yourdatabasename_user
PRODUCTION_DATABASE_PASSWORD=XXXXXXXXXXXXXXXXXXXXX
Then you will need to run production scripts
npm run production-script database-setup
npm run production-script database-seed
For deploying your new website, I recommend any of the following choices:
Questions?
Contact @wwwjim.