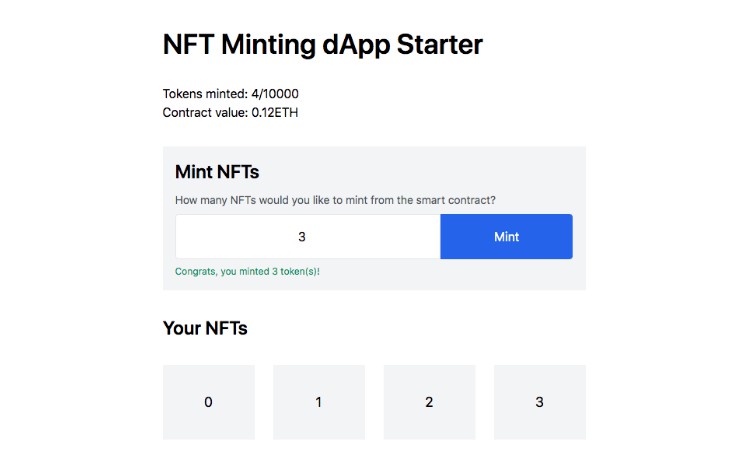
NFT Minting dApp Starter
A full stack dApp starter for minting NFTs built on Ethereum (Solidity) with Next.js (React).
This repo contains code for minting NFTs from the client-side using Solidity, React and TailwindCSS.

Prerequisites
Getting Started
Clone This Repo
Use git clone https://github.com/tomhirst/nft-minting-dapp-starter.git to get the files within this repository onto your local machine.
Environment Setup
Duplicate .env.example to .env and fill out the HARDHAT_CHAIN_ID environment variable. The port from the example file, if it’s free, will be fine in most cases.
Run npm install.
Running The Smart Contract Locally
Compile the ABI for the smart contract using npx hardhat compile.
If you’re successful, you’ll recieve a confirmation message of:
Compilation finished successfully
And, a src/artifacts folder will be created in your project.
Deploy the smart contract to the local blockchain for testing with npx hardhat node.
If you’re successful, you’ll be presented with a number of account details in the CLI. Here’s an example:
Account #0: 0xf39fd6e51aad88f6f4ce6ab8827279cfffb92266 (10000 ETH)
Private Key: 0xac0974bec39a17e36ba4a6b4d238ff944bacb478cbed5efcae784d7bf4f2ff80
Then in a new terminal window, npx hardhat run scripts/deploy.js --network localhost.
If you’re successful, you’ll get something like the following CLI output:
Minter deployed to: 0x9fE46736679d2D9a65F0992F2272dE9f3c7fa6e0
Adding A Local Account To MetaMask
Open your MetaMask browser extension and change the network to Localhost 8545.
Next, import one of the accounts by adding its Private Key (for example, 0xac0974bec39a17e36ba4a6b4d238ff944bacb478cbed5efcae784d7bf4f2ff80 to MetaMask.
If you’re successful, you should see the a balance resembling something like 10000 ETH in the wallet.
Connecting The Front-End
In .env set the NEXT_PUBLIC_MINTER_ADDRESS environment variable to the address your smart contract was deployed to. For example, 0x9fE46736679d2D9a65F0992F2272dE9f3c7fa6e0.
In a new terminal window, load the front-end with npm run dev. If you want to use an alternate port from 3000, use npm run dev -- --port=1234, or whatever port number you prefer.
Demo’ing The Functionality
Once set up, go to localhost:3000 (or whatever post number you used), to view your dApp in the browser.
First, connect your wallet by clicking Connect wallet. Ensure you’re connected to the Localhost 8454 network in your MetaMask extension. Select the wallet that you imported earlier.
You can now test minting tokens, between 1 and 10 per transaction, by filling out the input with your desired amount and clicking the Mint button.
If you successfully mint a number of NFTs, you should see the Tokens minted amount increment.
Switching accounts in MetaMask will update the wallet address in the top right hand corner. Disconnecting all accounts will prompt you to connect your wallet.
All state is retained on browser refresh.
Editing The Front-End
To modify the front page of your application, edit pages/index.js.
All TailwindCSS classes are available to you.
To lint your front-end code, use npm run lint.
Testing
To test the smart contract, run npx hardhat test.
Basic tests can be found in test/Minter.test.js.
Roadmap
- Show the funds available in the connected account’s wallet
- Add common owner functionality to the contract
- Reserve tokens
- Flip sale state
- Set starting index
- Set base URI for asset metadata
- Set provenance hash
- Withdraw funds
- Attach image data to minted tokens with IPFS
- Deploy to the Ropsten test network
- Introduce code style rules and linting
- Write more extensive tests
- Create a TypeScript fork