CRM – Integrate CRM data with Apideck
A sample project for viewing and managing leads with the Apideck CRM API.
The CRM API is a single API to push and query CRM data from +12 connectors. In this sample project, we use the Apideck Node SDK to create a customer relationship management tool that allows you to manage leads from multiple services (e.g., Salesforce, HubSpot, Copper, etc.)
Built with Next.js, TypeScript, and Tailwind.

Run the sample locally
Requirements
- An Apideck account: You can sign up for an Apideck account here: https://app.apideck.com/signup
- Apideck Application ID: Available in your Apideck dashboard.
- Apideck API Key: Available in your Apideck dashboard.
Installing the sample
This project uses the CRM API with the Node SDK. Visit https://developers.apideck.com/apis/crm/reference for documentation of the API and https://github.com/apideck-libraries/apideck-node for documentation about the SDK.
Step 1: Update your environment variables
- Copy
.env.exampleand create a.env.localfile - Add your API key:
NEXT_PUBLIC_API_KEY=<your-api-key> - Add your Application ID:
NEXT_PUBLIC_APP_ID=<your-app-id> - Your env should also include
NEXT_PUBLIC_API_URL=https://unify.apideck.com - Your env could include
NEXT_PUBLIC_CONSUMER_ID=test-consumer, but if you don’t want to scope this application to a single consumer, you should use a unique user identifier as consumer ID. You can provide a consumer ID when creating a session by passing thex-apideck-consumer-idheader.
Step 2: Install dependencies
- Install dependencies with
yarnornpm install - Run the development server with
yarn devornpm run dev - Visit
http://localhost:3000/to see if it’s running. If you haven’t configured any integrations you will see a message.
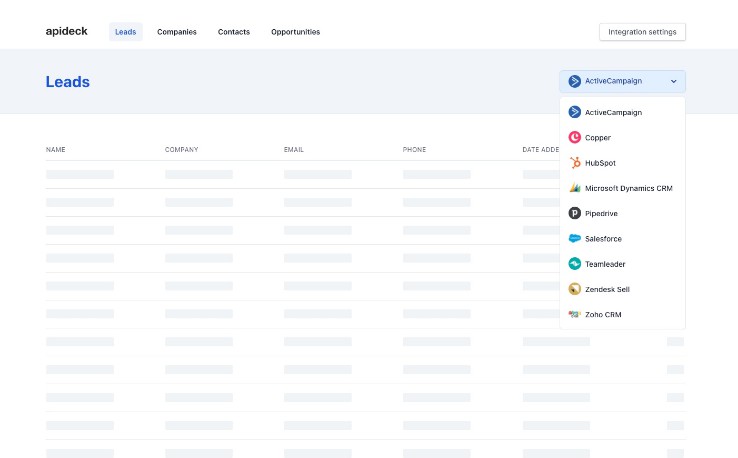
Step 3: Create a Vault session and add connections
You need to create a Vault session and add/configure at least one CRM connection. You can do this by clicking the Integrations settings button in the navbar. This button will redirect you to the Integration Settings app that gives you a UI to configure CRM connections.
After configuring at least one CRM connection, you can use the Return to application link to return to localhost:3000. You can change the return URL by providing a redirect_uri while creating a session.
You should now be able to load and manage the leads of the connection you have configured.
Project overview
 crm
 ┣ __tests__
 ┃ ┣ components
 ┃ ┗ pages
 ┣ public
 ┃ ┣ fonts
 ┃ ┣ img
 ┣ src
 ┃ ┣ components
 ┃ ┣ pages
 ┃ ┣ styles
 ┃ ┣ types
 ┃ ┗ utils
 ┣ .babelrc
 ┣ .env.local
 ┣ .eslintrc.json
 ┣ .gitignore
 ┣ .prettierrc
 ┣ README.md
 ┣ jest.config.js
 ┣ next-env.d.ts
 ┣ package.json
 ┣ postcss.config.js
 ┣ tailwind.config.js
 ┣ tsconfig.json
 ┗ yarn.lock
After you have cloned the project and once the installation is done, you can open your project folder:
cd crm
Inside the newly created project, you can run some commands:
yarn dev
Runs next dev, which starts the app in development mode.
Open http://localhost:3000 to view it in the browser.
yarn build
Runs next build, which builds the application for production usage
yarn start
Runs next start, which starts a Next.js production server
yarn lint
Runs the eslint command for all files with the js, ts, jsx, and tsx extensions. See the .eslint.json file for all configuration settings.
yarn lint:fix
Runs the eslint command with the --fix flag, which automatically tries to fix linting problems.
yarn lint:cache
Runs the eslint command with the --cache flag, which only checks the changed files.
yarn lint:format
Runs Prettier, which formats all files inside the src directory based on the configuration set inside the .prettierrc file.
yarn type-check
Runs the tsc command to compile the project and check if it has type errors.
yarn test
Runs the jest command, which runs all tests
yarn test:watch
Runs the jest command with --watch flag, which runs all tests in watch mode.
yarn test:coverage
Runs the jest command with --coverage flag, which indicates that test coverage information should be collected and reported in the output.
Commit hooks
This project uses husky and lint-staged to run linters against staged git files on commit.
Pre-commit
Before each commit, we run eslint and prettier on all staged files.
Pre-push
Before each push to the repository, we run jest to check if all tests are passing.
Resources
To learn more, take a look at the following resources:
- CRM API – info about the CRM API of Apideck
- CRM API Documentation – documentation of the CRM API
- Vault API Documentation – documentation of the Vault API
- Next.js Documentation – learn about Next.js features and API
- Vercel Serverless Functions – learn more about serverless functions by using the
/pages/apidirectory in Next.js projects - Learn Next.js – an interactive Next.js tutorial
- TypeScript – learn about TypeScript
- Tailwind CSS – learn about the utility-first CSS framework Tailwind
- Jest – learn about Jest, the JavaScript Testing Framework
- React Testing Library – learn about testing React components with React Testing Library
- ESLint – learn about analyzing code with ESLint
- Prettier – learn about formatting code with Prettier
- Prettier Extension – a Prettier extension for Visual Studio Code