Cloud Dev ND Final Project
Serverless TODO App
Functionality of the application
The objective of this project is to develop a TODO application using AWS Lambda and serverless framework. This application will allow creating/removing/updating/fetching TODO items. Each TODO item can optionally have an attachment image. Each user only has access to TODO items that he/she has created.
TODO items
The application willstore TODO items, and each TODO item contains the following fields:
todoId(string) – a unique id for an itemcreatedAt(string) – date and time when an item was createdname(string) – name of a TODO item (e.g. “Change a light bulb”)dueDate(string) – date and time by which an item should be completeddone(boolean) – true if an item was completed, false otherwiseattachmentUrl(string) (optional) – a URL pointing to an image attached to a TODO item
Prerequisites
To run this applictions, you’ll need;
- Auth0 account
- GitHub account
- NodeJS version up to 12.xx
- Serverless
- Create a Serverless account user
- Install the Serverless Framework’s CLI (up to VERSION=2.21.1). Refer to the official documentation for more help.
npm install -g [email protected]
serverless --version
- Login and configure serverless to use the AWS credentials
# Login to your dashboard from the CLI. It will ask to open your browser and finish the process.
serverless login
# Configure serverless to use the AWS credentials to deploy the application
# You need to have a pair of Access key (YOUR_ACCESS_KEY_ID and YOUR_SECRET_KEY) of an IAM user with Admin access permissions
sls config credentials --provider aws --key YOUR_ACCESS_KEY_ID --secret YOUR_SECRET_KEY --profile serverless
Functions implemented
The following functions have been implemented and configured in the serverless.yml file:
-
Auth– this function implements a custom authorizer for API Gateway added to all other user specific functions. -
GetTodos– returns all TODOs for a current user. A user id can be extracted from a JWT token that is sent by the frontend
It returns data that looks like this:
{
  "items": [
    {
      "todoId": "123",
      "createdAt": "2019-07-27T20:01:45.424Z",
      "name": "Buy milk",
      "dueDate": "2019-07-29T20:01:45.424Z",
      "done": false,
      "attachmentUrl": "http://example.com/image.png"
    },
    {
      "todoId": "456",
      "createdAt": "2019-07-27T20:01:45.424Z",
      "name": "Send a letter",
      "dueDate": "2019-07-29T20:01:45.424Z",
      "done": true,
      "attachmentUrl": "http://example.com/image.png"
    },
  ]
}
CreateTodo– thios function creates a new TODO for a current user. A shape of data send by a client application to this function can be found in theCreateTodoRequest.tsfile
It receives a new TODO item to be created in JSON format that looks like this:
{
  "createdAt": "2019-07-27T20:01:45.424Z",
  "name": "Buy milk",
  "dueDate": "2019-07-29T20:01:45.424Z",
  "done": false,
  "attachmentUrl": "http://example.com/image.png"
}
It should return a new TODO item that looks like this:
{
  "item": {
    "todoId": "123",
    "createdAt": "2019-07-27T20:01:45.424Z",
    "name": "Buy milk",
    "dueDate": "2019-07-29T20:01:45.424Z",
    "done": false,
    "attachmentUrl": "http://example.com/image.png"
  }
}
UpdateTodo– this updates a TODO item created by a current user. A shape of data send by a client application to this function can be found in theUpdateTodoRequest.tsfile
It receives an object that contains three fields that can be updated in a TODO item:
{
  "name": "Buy bread",
  "dueDate": "2019-07-29T20:01:45.424Z",
  "done": true
}
The id of an item that should be updated is passed as a URL parameter.
It should return an empty body.
DeleteTodo– should delete a TODO item created by a current user. Expects an id of a TODO item to remove.
It should return an empty body.
GenerateUploadUrl– returns a pre-signed URL that can be used to upload an attachment file for a TODO item.
It should return a JSON object that looks like this:
{
  "uploadUrl": "https://s3-bucket-name.s3.eu-west-2.amazonaws.com/image.png"
}
All functions are already connected to appropriate events from API Gateway.
An id of a user can be extracted from a JWT token passed by a client.
All necessary AWS resources to run this application have also been added to the resources section of the serverless.yml file such as DynamoDB table and S3 bucket.
Frontend
The client folder contains a web application that can use the API that should be developed in the project.
This frontend should work with your serverless application once it is developed, you don’t need to make any changes to the code. The only file that you need to edit is the config.ts file in the client folder. This file configures your client application just as it was done in the course and contains an API endpoint and Auth0 configuration:
const apiId = '...' API Gateway id
export const apiEndpoint = `https://${apiId}.execute-api.us-east-1.amazonaws.com/dev`

export const authConfig = {
  domain: '...',    // Domain from Auth0
  clientId: '...',  // Client id from an Auth0 application
  callbackUrl: 'http://localhost:3000/callback'
}
Authentication
To implement authentication in your application, you would have to create an Auth0 application and copy “domain” and “client id” to the config.ts file in the client folder. We recommend using asymmetrically encrypted JWT tokens.
Logging
This code comes with a configured Winston logger that creates JSON formatted log statements. You can use it to write log messages like this:
import { createLogger } from '../../utils/logger'
const logger = createLogger('auth')

// You can provide additional information with every log statement
// This information can then be used to search for log statements in a log storage system
logger.info('User was authorized', {
  // Additional information stored with a log statement
  key: 'value'
})
How to run the application
Backend
To deploy an application run the following commands:
cd backend
npm install
sls deploy -v
Frontend
To run a client application first edit the client/src/config.ts file to set correct parameters. And then run the following commands:
cd client
npm install
npm run start
This should start a development server with the React application that will interact with the serverless TODO application.
Postman collection
An alternative way to test your API, you can use the Postman collection that contains sample requests. You can find a Postman collection in this project. To import this collection, do the following.
Click on the import button:

Click on the “Choose Files”:

Select a file to import:

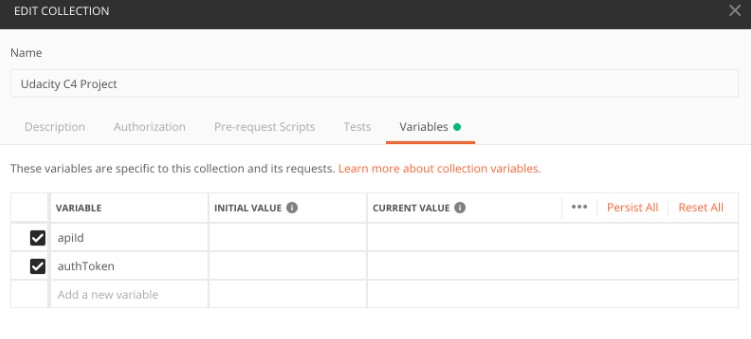
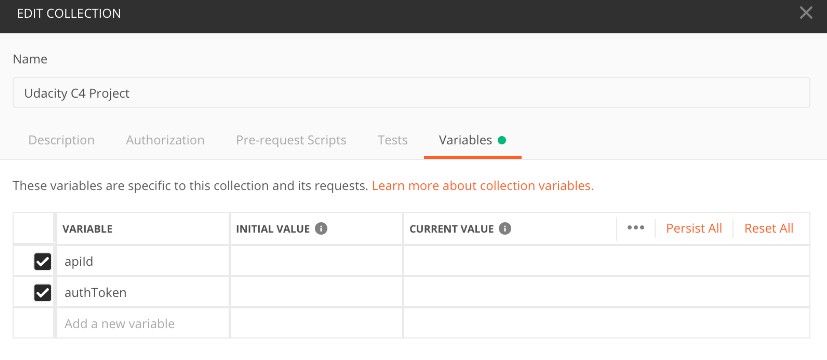
Right click on the imported collection to set variables for the collection:

Provide variables for the collection (similarly to how this was done in the course):