GitHub Project Calendar
A tool designed to view GitHub project issues in a calendar view.
? Jump to the Set up the project section to get a calendar view for your own GitHub Projects in just minutes.
Inspiration
PlanetScale has recently moved away from several siloed productivity tools to using GitHub projects exclusively. One of the pain points in this transition was viewing tasks on a proper calendar. This project aims to bridge that gap by utilizing the GitHub GraphQL API and react-big-calendar to display project issues in a visual way.
The project was initially built by the Developer Education team at PlanetScale to view upcoming blog posts and events planned by the Marketing team.
How it works
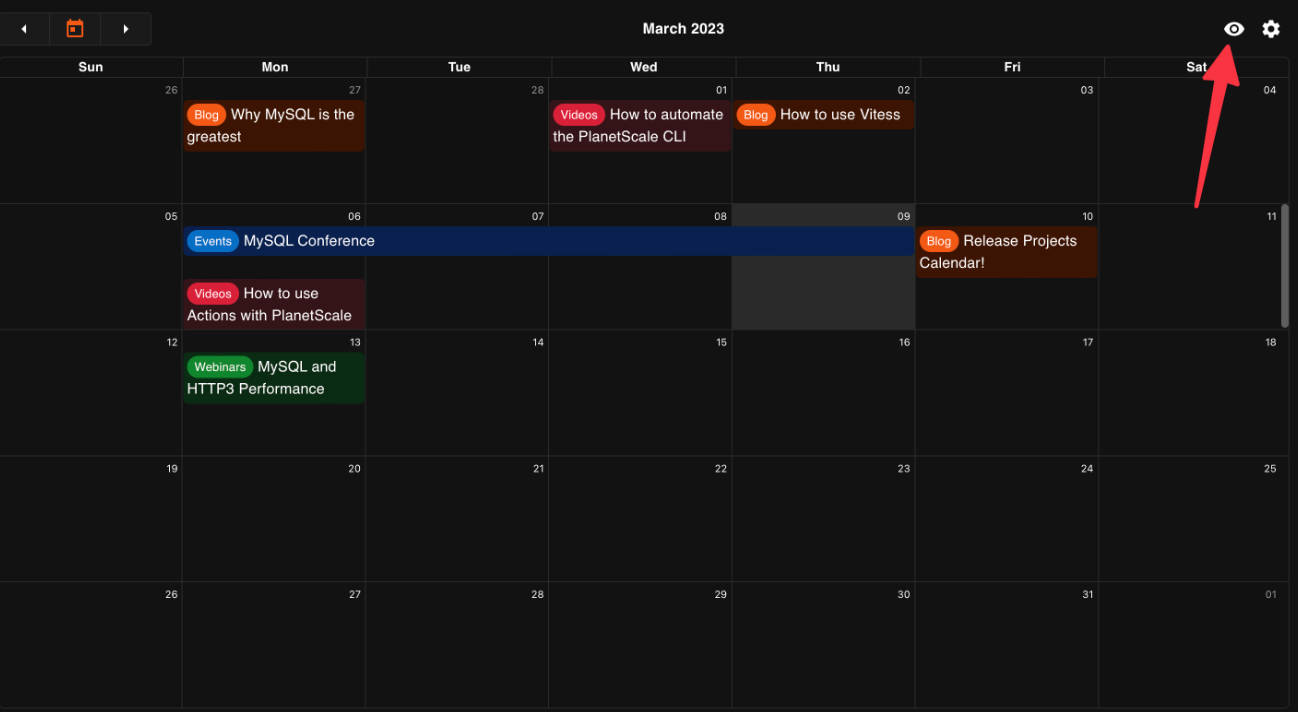
The tool displays issues from one or more GitHub projects in a calendar format. Clicking on any item on the calendar opens the linked issue in GitHub.

Toggle project calendars
Each configured project calendar can be toggled on or off, depending on which calendars are important for you. To access to Displayed Calendars modal, click the eye icon in the upper right.

The modal can then be used to toggle calendars as needed. When a calendar is toggled, the user preferences are saved to a PlanetScale database so they can be reflected on any device used.

Configure project calendars
Existing projects can be viewed by clicking the “cog icon” in the upper right corner of the app.

Upon clicking the icon, you’ll be presented with a modal displaying the configured projects. Clicking the “trash icon” will allow you to delete a project (note that this operation is permanent). Clicking the “+ icon” below the modal allows you to add a new project to the calendar.

The following form is used to add a project to the calendar:
- Friendly name — Used for reference in the list of calendars.
- Organization name — The name of the GitHub organization or user name.
- Project ID — The project ID you want to add.
- Start date field — The field to use for the start date range.
- End date field — The field to use for the end date. For single day entries, re-use the Start date field.
- Use milestones — If checked, the tool will break down the calendar entries by the Milestone in GitHub and allow you to toggle them by Milestone instead of Project name.

These entries are saved into a PlanetScale database for all users of your instance of the tool.
Set up the project
This project is designed to be run on Vercel, although can be modified to work with any hosting provider. In order to use the project as is, you’ll need to:
- Create a GitHub OAuth app
- Have a Vercel account for deployment
- Create a free PlanetScale account for hosting the database
Local development
Start by creating a GitHub OAuth app and populate the necessary fields. For local development, use http://localhost:3000/auth for the “Authorization callback URL”.

In the following view, click “Generate a new client secret”. Note Client ID and the generated Client Secret as you’ll need them in the next step.

Next, open the project in your preferred IDE and rename .env.sample to .env. Populate the values as follows:
REACT_APP_GH_REDIRECT_URI—http://localhost:3000/authREACT_APP_GH_CLIENTID— The Client ID from the previous stepGH_CLIENTSECRET— The Client Secret from the previous step
To configure the calendars displayed, open the Project which contains the issues you wish to display in GitHub. The URL is formatted as follows:
https://github.com/orgs/<ORG_NAME>/projects/<PROJECT_ID>
Note the values for <ORG_NAME> and <PROJECT_ID> for configuring the calendars. You’ll also need to know the name of the fields for which you want to display start & end dates. To reference these, start in the project by clicking the “…” button in the upper right and then “Settings”.

The names of the fields available for the project will be listed on the left sidebar. The fields to display on the calendar MUST have the Date field type.

Set up the database
The tool is set up to use a PlanetScale database to store the calendars to be displayed, as well as the users currently toggled calendars.
- Head to PlanetScale to sign up for a free account.
- Click “Create database” once in the dashboard. This will spin up a dev branch,
main, where you can create your schema. - The script to set up the tables is located in
/db/init_db.sqlof this repo. - You may run the two
CREATE TABLEcommands using the web console in the PlanetScale database or by following our guide on executing scripts using the PlanetScale CLI. - To use the web console, click “Console” in the PlanetScale dashboard.
- Now that your schema is set up, connect the database to the application by clicking “Connect” in the PlanetScale dashboard.
- Select “General” from the dropdown, copy the connection string, and paste it into your
.envfile. - If you’re going to use this database in production (see Deploy to Vercel section), you may consider promoting this database branch to production. This gives you an additional replica, automated daily backups, and protects your database from direct DDL.
Visit our documentation portal for guides on how to create a database and generating connection details to connect to the database.
Run the project
You may now run the project using the following command from your terminal:
npm start
If everything is set up properly, navigating to http://localhost:3000 in your browser should prompt a login through GitHub.
Deploy to Vercel
To deploy the project to Vercel so that everyone on your team can see this calendar, you will need to generate a new GitHub OAuth app since a single app does not support multiple redirect URIs. You’ll need a domain to set up the GitHub app before you can create it. Perform the following steps in order to successfully deploy the tool:
- Deploy to Vercel, capture the URL (referred to by
<VERCEL_URL>) - Set up the new GitHub OAuth app using the steps described earlier in this README. The redirect should be
<VERCEL_URL>/auth - Navigate to the deployed site in Vercel and populate the following environment variables in Settings > Environment Variables:
- DATABASE_PASSWORD — The PlanetScale DB password.
- DATABASE_USERNAME — The PlanetScale DB password.
- DATABASE_HOST — The PlanetScale DB password.
- REACT_APP_GH_REDIRECT_URL — The redirect URI for the newly created GitHub OAuth app.
- REACT_APP_GH_CLIENTID — The client ID of the OAuth app.
- GH_CLIENTSECRET — The client secret of the OAuth app.
Once these details are populated, navigate to <VERCEL_URL> and you should be prompted to login via GitHub.
You may optionally choose to use a separate database branch for your local & deployed versions of the tool. To do this, create a separate branch and use those connection details in Vercel instead of the connection details taken from the local development section. See Step 8 of Set up the database for more information.
How to contribute
To contribute to this project, fork the repository to your own GitHub account, and open a Pull Request with the changes you wish to apply.
Support
This project is provided as-is with no support. To report bugs and request features, or to discover known bugs, please use the Issues tab.