![]()


Before you start


The README on main branch can contain some unreleased changes.
Go to release branch to see the actual README for the latest version from NPM.
Why?
- Most configs contain too common rules inside, so you need to do a lot of things to finalize them for your project
- The other configs are bound to specific stack/technology, so it’s hard to extend them in a way you’re like
- Sometimes, configs use formatting rules. Formatting is not the ESLint’s job, so it’s a high chance to get the conflict someday
- Together, above means that most likely you’ll need a different ESLint config for each of your project
- You may often need to install a lot of dependencies: eslint, plugins, configs, parser, etc.
- You may often face the problems with eslint/parser/plugin/config versions. It takes time to find the issue and solution.
ESLint Kit is solving all these problems by providing a many small presets, each performing a specific task.
You can select presets by using configure function in your .eslintrc.js file:
const { configure, presets } = require('eslint-kit')

module.exports = configure({
  presets: [
    presets.typescript(),
    presets.prettier(),
    presets.node(),
    presets.react({ version: '18.0' }),
    presets.alias({
      root: './src',
      paths: { '@app': './' }
    })
  ],
  extend: {
    rules: {
      'some-rule': 'off'
    }
  }
})
eslint-kit package contains all the dependencies you might need. It’s ok – this is a development dependency, so you won’t get any bundle size problems.
The ESLint Kit presets try to contain only the best-practice rules to make overwriting as rare as possible. But you can still easily override them by using extend property.
Installation
NPM:
npm install -D eslint-kit
Yarn:
yarn add -D eslint-kit
After installing, add the .eslintrc.js file in your project root:
const { configure, presets } = require('eslint-kit')

module.exports = configure({
  presets: [],
})
Now, just select the presets you need. The full information about them is located in Presets section.
You can also set up your editor if you haven’t already.
configure API
configure({
  // (optional) Project root
  root: __dirname,

  // presets
  presets: [],

  // (optional) Custom eslint config
  // It gets merged with presets at the end
  extend: { rules: { /* ... */ } }
})
Presets
Common
TypeScript
- Changes parser to
@typescript-eslint/parser - Allows the usage of
.tsand.tsxextensions - Adds some TypeScript specific rules (for TS files)
- Replaces some default ESLint rules with their TypeScript analogues (for TS files)
configure({
  presets: [
    presets.typescript({
      // (optional) Project's root
      root: './',

      // (optional) A path to tsconfig file
      tsconfig: 'tsconfig.json'
    })
  ]
})
Prettier
- Enables the rule
prettier/prettierfrom Prettier ESLint plugin
configure({
  presets: [
    /*
     * Optionally, you can pass the Prettier config
     * Note: it will merge and override any options set with .prettierrc files
     */
    presets.prettier({
      semi: false,
      singleQuote: true
      // ...
    })
  ]
})
The recommended Prettier config:
{
  "semi": false,
  "singleQuote": true,
  "tabWidth": 2,
  "quoteProps": "consistent",
  "endOfLine": "lf",
  "importOrder": [
    "^(child_process|crypto|events|fs|http|https|os|path)(\\/(.*))?$",
    "<THIRD_PARTY_MODULES>",
    "^~(\\/(.*))?$",
    "^@(\\/(.*))?$",
    "^@app(\\/(.*))?$",
    "^[./]"
  ],
  "experimentalBabelParserPluginsList": [
    "jsx",
    "typescript"
  ]
}
As you see, we use @trivago/prettier-plugin-sort-imports. You can find the options on its README page.
Alias
- Allows to set the aliases for
importplugin - Automatically uses
tsconfig.jsonwhentypescriptpreset is applied
configure({
  presets: [
    presets.alias({
      // (optional) Base path for all aliases
      // Defaults to './'
      root: './src',

      // (optional) Alises, all paths should be relative or absolute
      // Defaults to empty object
      paths: { '@app': './' },

      // (optional) A custom path to jsconfig
      // Defaults to jsconfig.json
      jsconfig: 'jsconfig.json'
    })
  ]
})
Node
- Enables
nodeenvironment
configure({
  presets: [presets.node()]
})
Frameworks
React
- Adds some React and React Hooks rules
- Enables
browserenvironment andjsxecma feature
configure({
  presets: [
    presets.react({
      // (optional) Allows to specify React version
      version: 'detect',
      // (optional) Allows using JSX without importing `React`
      newJSXTransform: false
    })
  ]
})
Vue
- Adds
vueplugin - Changes parser to
vue-eslint-parser - Detects installed vue version and enables
/recommendedrules for it - Enables
@typescript-eslint/parserfor<script>blocks whentypescriptpreset is used - Enables
browserenvironment andjsxecma feature - Allows
export default
You still need to setup your editor / IDE to lint .vue files. You can use this guide from Vue documentation.
configure({
  presets: [
    presets.vue({
      // (optional) Allows to specify Vue version
      version: 'detect'
    })
  ]
})
Solid.js
- Adds
solidplugin and enables/recommendedrules - Enables
/typescriptrules whentypescriptpreset is active
configure({
  presets: [presets.solidJs()]
})
Svelte
- Adds
svelte3plugin and configures it - Enables some TypeScript settings when
typescriptpreset is active
You still need to setup your editor / IDE to lint .svelte files. You can use this guide from svelte3 plugin repo.
configure({
  presets: [
    presets.svelte({
      // (optional) Disable type checking for .svelte files
      noTypeCheck: true
    })
  ]
})
Next.js
- Enables
@next/eslint-plugin-nextplugin rules - Allows the usage of
export default
configure({
  presets: [presets.nextJs()]
})
Libraries
Effector
- Adds
effectorplugin and enables/recommended,/scope, and/reactrules
configure({
  presets: [
    presets.effector({
      // (optional) Enables /future rules
      onlySample: false
    })
  ]
})
Common issues
Q: My .eslintrc.js doesn’t work, why?
A: It’s a regular issue with tools like @vue/cli and create-react-app. Check package.json and remove eslintConfig if you find it. Otherwise, try to restart your editor.
Q: I get some error when using eslint-kit in monorepo
A: We didn’t test monorepos much. They often have different issues with eslint and plugins resolving. And we also don’t guarantee that your aliases settings will work in monorepo.
Setting up editors
VSCode
Install ESLint VSCode extension:

Next, select from the following and click on it:
Using a keybind
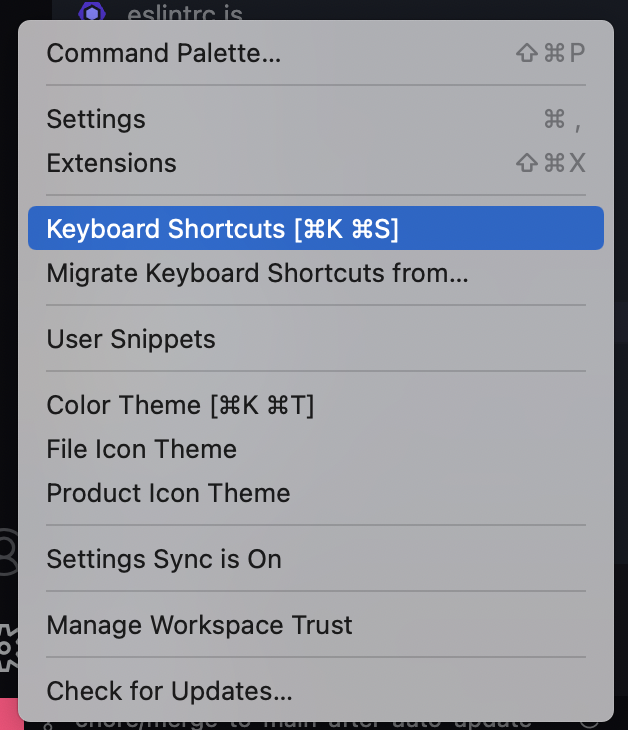
Click on Settings icon:
![]()
Select “Keyboard shortcuts”
Type “eslint” and click on “edit” button:
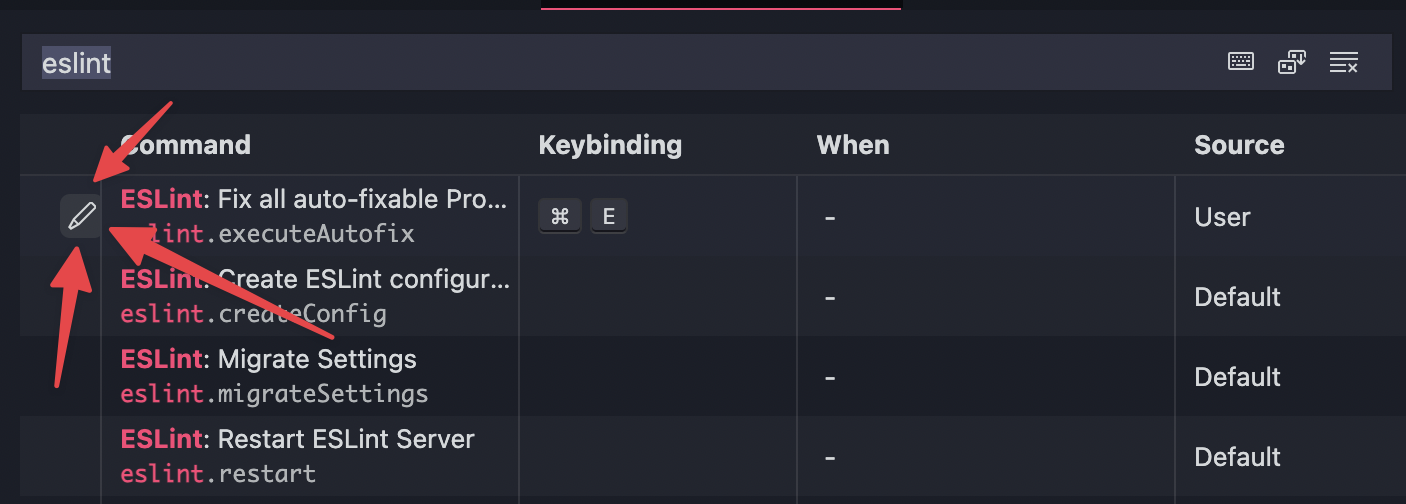
Finally, choose the keybind you like.
Linting on file save
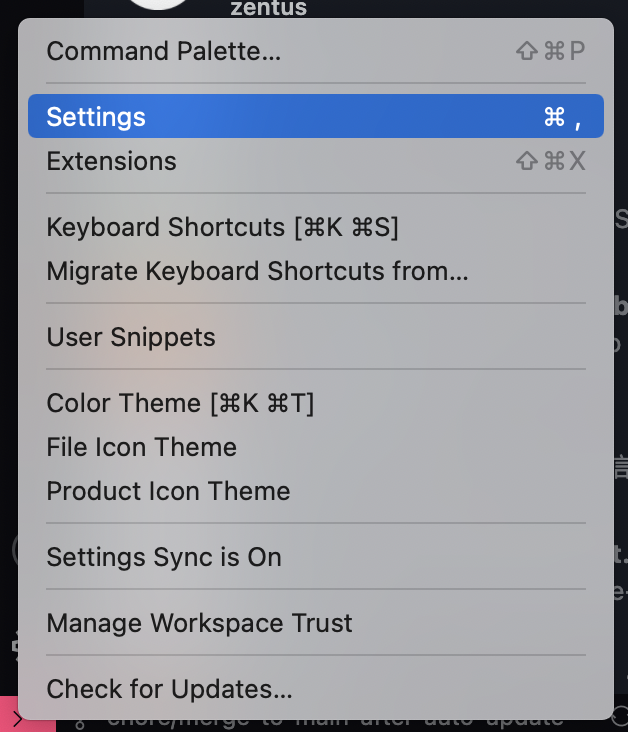
Click on Settings icon:
![]()
Select “Settings”
Switch to text mode:

Finally, add the following and save:
{
  "eslint.validate": [
    "javascript",
    "javascriptreact",
    "typescript",
    "typescriptreact",
  ],
  "editor.codeActionsOnSave": {
    "source.fixAll.eslint": true,
  },
}
Contributing
- Fork this repo
- Switch to new branch, it should start with
feat/,fix/,docs/,refactor/, and etc., depending on the changes you want to propose - Make changes
- Create a Pull Request into this repo’s
mainbranch - When the checks is done and review is passed, I’ll merge it into
mainand it will create a new record in the changelog. Then, when release is finally ready, your changes will be released.
Maintenance
The dev branch is main – any developer changes is merged in there. Also, there is a release branch. It always contains the actual published release source code and tag.
All changes is made using Pull Requests – push is forbidden. PR can be merged only after successfull test-and-build workflow checks.
When PR is merged, release-drafter workflow creates/updates a draft release. The changelog is built from the merged branch scope (feat, fix, etc) and PR title. When release is ready – we publish the draft.
Then, the release workflow handles everything:
- We run tests and build a package
- Then, we merge release tag into the
releasebranch - After, we restore build artifacts and publish it to NPM
Also, this repo has Renovate bot set up to auto-update typescript preset dependencies (they change frequently). The bot creates a PR into main branch and automatically merges it after successful checks.