Running the Project
Create an env file with your Notion credentials
Create a server/.env file:
NOTION_SECRET=
NOTION_DATABASE_ID=
See Creating a Notion Integration for information on how to get these values.
Run the server
From the /server directory:
npm run start
Run the app
From the /sample-app directory:
npm run start
Connect on http://localhost:3000/
Tutorial
All code from this tutorial as a complete package is available in this repository.
If you find this tutorial helpful, please share it with your friends and colleagues! For more like it you can subscribe on Youtube or follow me on Twitter.
Table of Contents
- What is Notion?
- Introduction
- Project Setup
- Creating a Notion Database
- Creating the Server
- Querying the Server
- Creating a Notion Integration
- Querying the Database
- Connecting the App
- Wrapping Up
What is Notion?
Before we jump in I want to explain quickly a little bit what Notion is.
It’s basically an organizational tool that runs in the cloud and supports multiple user collaboration at the same time.
It can be used for anything from organizing daily tasks, keeping track of school schedules, to managing the documentation of large enterprise projects.
Basically if you want to “organize” any kind of information, Notion is a great tool for that.
Similar products you might be familiar with would be something like Confluence, Evernote or OneNote.
{% youtube https://youtu.be/oTahLEX3NXo %}
Introduction
Recently I discovered that Notion provides an API to read and modify data on your Notion workspace.
They also have fantastic support for simple databases (even relational ones) so I thought it would be fun to try a little app that could use Notion as a quick and dirty CMS, and I had a lot of fun doing it, so I thought I would write up a little tutorial to share the process with others.
I want to be clear that I am absolutely not advocating for the use of Notion as a real database for a production application.
I do not know anything about the actual speed and performance of querying it at any scale, and I also wouldn’t trust any critical data on a service that isn’t specifically designed to offer a reliability guarantee.
However, for fun little projects I think it’s a great option, especially for front end developers who don’t have a lot of existing knowledge about databases and just want to get their feet wet.
It can also be a great way to collaborate with less technical folks and allow them the flexibility that Notion offers for creating content, and giving developers the ability to directly reference that content in code.
So without further delay, let’s play around with it.
Project Setup
The structure of our project will be:
React App -> Node server -> Notion database
The reason we need the Node server is because if we were to query directly from our React app, we would have to expose our Notion account credentials and secret/database ID. Anything on the client side is always visible to the user.
By querying on the server we can keep the credentials there, out of reach of the front end, and only provide the database table data itself to the front end.
We’ll begin by creating the project directory and React app. We’re using Create React App here as it’s still the simplest way to get an instant React project up and running with minimal complexity:
mkdir react-node-notion
cd react-node-notion
npx create-react-app@latest sample-app --template typescript
cd sample-app
npm run start
Make sure you are able to see the example React app on http://localhost:3000/ before you continue.
Creating a Notion Database
Next we are going to create our Notion workspace and database.
Navigate to:
You can create an account or login with an existing Google or Apple account. Notion is free to use for an individual.

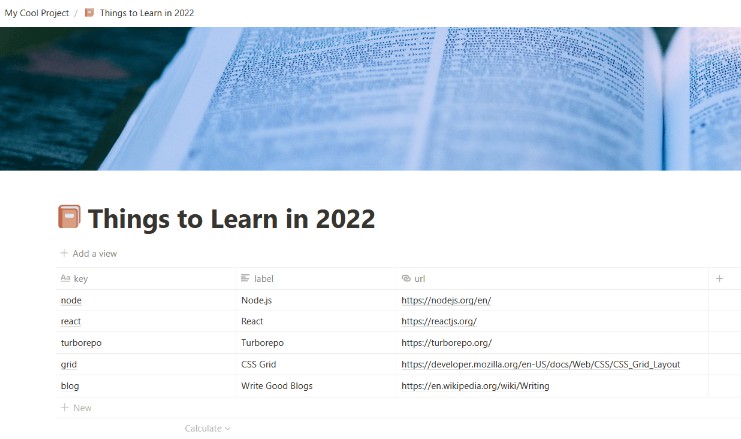
Next we’ll create a page where our database will live. My database is going to help me keep track of stuff I want to learn in 2022.
Click anywhere on the “My Cool Project” page and type /page. You’ll have te option of creating a new page. Create one and give it an icon.

Open your new page. You can give it a cover image at the top. CLick anywhere on the blank page and type /database. You’re going to select “Table Database – Inline”
The first column should be a unique value (our primary key). I’m simply going to name that column key. The second column I will name label and the third column I will name url. The key column will be of type title by default, but you will need to set the label column to text and the url column to url:
I’ve made the column headers lowercase on purpose since we will be referring to them with Javascript properties when we query (which are traditionally lowercase).

I will be using this database to keep track of the things I want to learn, and a URL link to the resource to learn them. This is super simple but you can come up with anything as complex as you want, we’re mostly just here to give an example of how to query this data and display it in an app (or anywhere you like really).
Populate the DB with whatever data suits you best. Here’s mine:

Creating the Server
We’re next going to spin up a super simple Node server to serve the data. All we need is the http module and the Notion client library from NPM.
Let’s begin with just the server and confirm we can query the data before we add the Notion integration:
Go back to the root directory react-node-notion before running these commands:
mkdir server
cd server
npm init -y
npm install -D typescript @types/node
npx tsc --init
mkdir src
touch src/server.ts
In case you aren’t creating your files from the command line, the above instructions will install the necessary packages and create a server directory and an src directory inside with a server.ts file. Your full directory structure for the entire project should look like:
.
├── sample-app
│   └── (React app files)
└── server
    ├── src
    │   └── server.ts
    ├── tsconfig.json
    ├── package-lock.json
    └── package.json
Your server.ts file will look like:
server/src/server.ts
import http from "http";

const host = "localhost";
const port = 8000;

const server = http.createServer((req, res) => {
  // Avoid CORS errors
  res.setHeader("Access-Control-Allow-Origin", "*");
  res.setHeader("Content-Type", "application/json");
  switch (req.url) {
    // Will respond to queries to the domain root (like http://localhost/)
    case "/":
      res.writeHead(200);
      res.end(JSON.stringify({ data: "success" }));
      break;

    // Only supports the / route
    default:
      res.writeHead(404);
      res.end(JSON.stringify({ error: "Resource not found" }));
  }
});

server.listen(port, host, () => {
  console.log(`Server is running on http://${host}:${port}`);
});
Your npx tsc --init command will have created a tsconfig.json file. All the defaults are fine, you just need to add one value:
tsconfig.json
{
  ...
  "outDir": "./dist"
}
That will output the result of the tsc command into a dist folder with a JS file that you can run.
Give it a try by running:
npx tsc && node dist/server.js`
That says “run typescript and then use Node to run the resulting Javascript file it creates in the output folder”.
Querying the Server
Navigate back to the sample-app directory and open the src directory. We can delete App.css and the logo.svg file.
We’ll update the index.css with some super simple CSS based off this minimalist style.
sample-app/src/index.css
html {
  max-width: 70ch;
  padding: 3em 1em;
  margin: auto;
  line-height: 1.75;
  font-size: 1.25em;
}

h1,h2,h3,h4,h5,h6 {
  margin: 3em 0 1em;
}

p,ul,ol {
  margin-bottom: 2em;
  color: #1d1d1d;
  font-family: sans-serif;
}
Now we update the contents of App.tsx. Remove all the default content inside the file (including the imports) and replace it with the following:
sample-app/src/App.tsx
function App() {

  return (
    <div>
      <h1>Things to Learn</h1>

      <button
        type="button"
        onClick={() => {
          fetch("http://localhost:8000/")
            .then((response) => response.json())
            .then((payload) => {
              console.log(payload)
            });
        }}
      >
        Fetch List
      </button>
    </div>
  );
}

export default App;
We use the Fetch API to query the simple server we just wrote that we made listen on port 8000 and respond on the root domain route /.
So that means to reach that endpoint we need to query http://localhost:8000/. Save and run your app, then press the “Fetch List” button. Open the dev console with F12 and you will see:
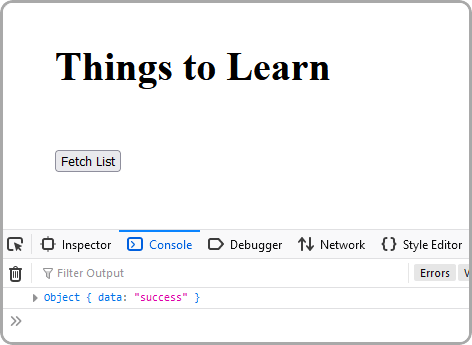
Notice the { data: "success" } response there in the console. Great!
Our React app is connected to our server and we can query basic data. Let’s get Notion hooked up.
Creating a Notion Integration
Before you can query data from your Notion account you need to create an integration that has the necessary permissions. You can configure integrations to have different permissions like read/write/insert depending on who you are sharing the integration secret with.
Go to the following URL:
https://www.notion.so/my-integrations
And click the big [+ New Integration] button on the left.
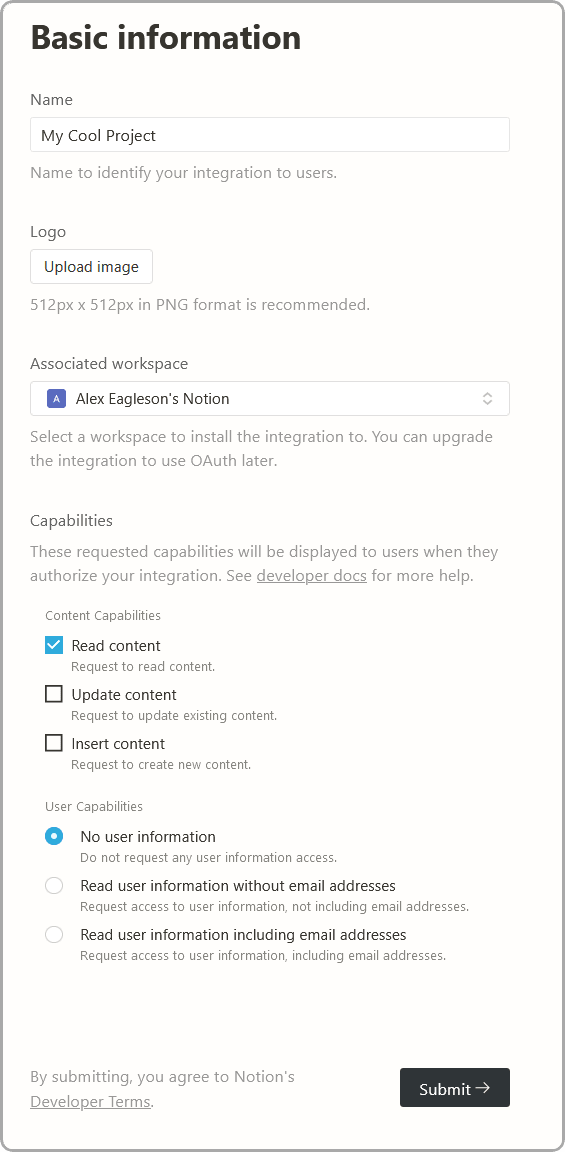
You can configure and name your integration how you like. For mine I only want to be able to read content from my database, so I am only giving it read permissions and no access to user data:
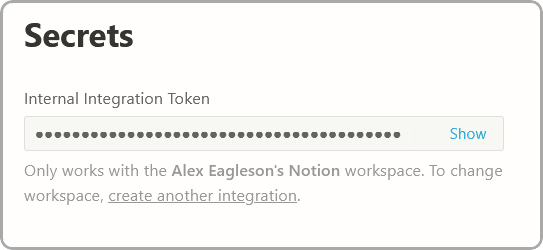
After you have created the integration you will be provided with a “secret” that gives access to your integration. Keep this handy as we will need it soon:
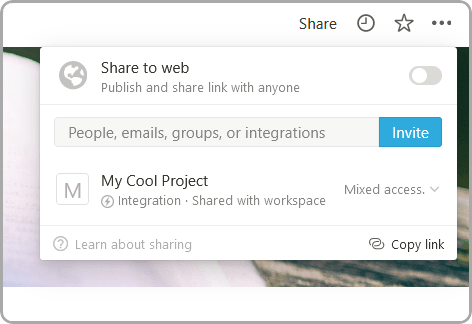
In addition to the secret, we also need to configure the database itself to be allowed to be read. Go back to your “Things to Learn” database (or whatever you wrote).
At the upper right corner of your database page is a “Share” button. Click it and then click the “Invite” button. You will have the ability to invite your new integration that you created to have access to this database. It will still be private and hidden from the general public.
The two values you need to query this database from your Node app are the Notion secret (which you already have) and the database ID. The database ID you can get from the URL when you are looking at your database. The URL will look something like this:
https://www.notion.so/aaaaaaaaaaaaaaaaaaaaaaaaaa?v=bbbbbbbbbbbbbbbbbbbbbbbbbbb
In the above example your database id is the aaaaaaaaaaaaaaaaaaaaaa part before the question mark.
You now have everything you need to query the data. Back to the Node server.
Querying the Database
We are going to need a secure place to store our Notion secret and database ID. If we put them in our code they will become visible to anyone who checks the source when we push to a remote repository. To get around this we will store our credentials in a .env. file.
Inside your server directory create two new files (note that both of them are hidden files that are prefix with a . before the filename):
server/.env
NOTION_SECRET="secret_xxxxxxxxxxxxxxxxxxxxxx"
NOTION_DATABASE_ID="aaaaaaaaaaaaaaaaaaaaaaaaaaaaaaa"
Where the dummy values above are replaced by the values you took from Notion. Remember your secret key does need the secret_ prefix in front of it.
We also want to create a .gitignore file:
server/.gitignore
.env
dist
node_modules
This will tell git not to push your secret .env file our your automatically generated dist folder when you commit.
While we’re at it let’s add a start script for our server that does the tsc build and runs the JS output:
server/package.json
{
  ...
  "scripts": {
    "start": "tsc && node dist/server.js"
  },
}
Alright! Now that that is taken care of we just need two packages. One is the official Notion client for Node, and the other is dotenv library that will made it super simple to read your secret and database id values from that .env file:
npm install @notionhq/[email protected] dotenv
Note that I have locked Notion client to 0.4.9 as the API may change since this is a relatively new product and I would like this tutorial to work for anyone who uses it in the future. You can try running the latest build however you may need to refer to their documentation and make corrections if anything has changed.
Now we’re going to update our server.ts file. We’ll do it all at once but I’ll add lots of comments to explain everything:
server/src/server.ts
require("dotenv").config();
import http from "http";
import { Client } from "@notionhq/client";

// This is Typescript  interface for the shape of the object we will
// create based on our database to send to the React app
// When the data is queried it will come back in a much more complicated shape, so our goal is to
// simplify it to make it easy to work with on the front end
interface ThingToLearn {
  label: string;
  url: string;
}

// The dotenv library will read from your .env file into these values on `process.env`
const notionDatabaseId = process.env.NOTION_DATABASE_ID;
const notionSecret = process.env.NOTION_SECRET;

// Will provide an error to users who forget to create the .env file
// with their Notion data in it
if (!notionDatabaseId || !notionSecret) {
  throw Error("Must define NOTION_SECRET and NOTION_DATABASE_ID in env");
}

// Initializing the Notion client with your secret
const notion = new Client({
  auth: notionSecret,
});

const host = "localhost";
const port = 8000;

// Require an async function here to support await with the DB query
const server = http.createServer(async (req, res) => {
  res.setHeader("Access-Control-Allow-Origin", "*");

  switch (req.url) {
    case "/":
      // Query the database and wait for the result
      const query = await notion.databases.query({
        database_id: notionDatabaseId,
      });

      // We map over the complex shape of the results and return a nice clean array of
      // objects in the shape of our `ThingToLearn` interface
      const list: ThingToLearn[] = query.results.map((row) => {
        // row represents a row in our database and the name of the column is the
        // way to reference the data in that column
        const labelCell = row.properties.label;
        const urlCell = row.properties.url;

        // Depending on the column "type" we selected in Notion there will be different
        // data available to us (URL vs Date vs text for example) so in order for Typescript
        // to safely infer we have to check the `type` value.  We had one text and one url column.
        const isLabel = labelCell.type === "rich_text";
        const isUrl = urlCell.type === "url";

        // Verify the types are correct
        if (isLabel && isUrl) {
          // Pull the string values of the cells off the column data
          const label = labelCell.rich_text?.[0].plain_text;
          const url = urlCell.url ?? "";

          // Return it in our `ThingToLearn` shape
          return { label, url };
        }

        // If a row is found that does not match the rules we checked it will still return in the
        // the expected shape but with a NOT_FOUND label
        return { label: "NOT_FOUND", url: "" };
      });

      res.setHeader("Content-Type", "application/json");
      res.writeHead(200);
      res.end(JSON.stringify(list));
      break;

    default:
      res.setHeader("Content-Type", "application/json");
      res.writeHead(404);
      res.end(JSON.stringify({ error: "Resource not found" }));
  }
});

server.listen(port, host, () => {
  console.log(`Server is running on http://${host}:${port}`);
});
Should be good! We’ll start the server with the new script we made in package.json:
npm run start
Connecting the App
A quick jump back into the React app and hit that “Fetch Data” button again. If everything went well you will be greeted with the content of your database in your browser console:
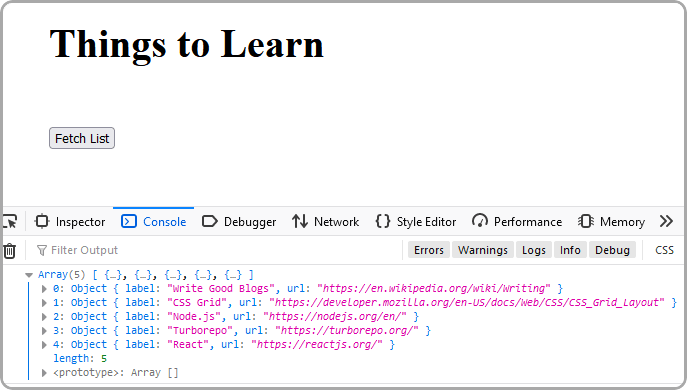
You’ve now got the data in your React app, you can do whatever you want with it! We could probably wrap up the tutorial here, but let’s make one final step of turning the data into an actual list of links:
sample-app/src/App.tsx
import { useState } from "react";

// Copy the payload shape interface from our server
// We want to copy (rather than import) since we we won't necessarily deploy our
// front end and back end to the same place
interface ThingToLearn {
  label: string;
  url: string;
}

function App() {
  // A state value will store the current state of the array of data which can be updated
  // by editing your database in Notion and then pressing the fetch button again
  const [thingsToLearn, setThingsToLearn] = useState<ThingToLearn[]>([]);

  return (
    <div>
      <h1>Things to Learn</h1>
      <button
        type="button"
        onClick={() => {
          fetch("http://localhost:8000/")
            .then((response) => response.json())
            .then((payload) => {
              // Set the React state with the array response
              setThingsToLearn(payload);
            });
        }}
      >
        Fetch List
      </button>

      {/* Map the resulting object array into an ordered HTML list with anchor links */}
      {/* Using index as key is harmless since we will only ever be replacing the full list */}
      <ol>
        {thingsToLearn.map((thing, idx) => {
          return (
            <li key={idx}>
              <a href={thing.url} target="_blank" rel="noopener noreferrer">
                {thing.label}
              </a>
            </li>
          );
        })}
      </ol>
    </div>
  );
}

export default App;
And with that, a click of the fetch button and we get a nice list of things to do which reflects the state of our Notion database and creates links to the relevant pages.
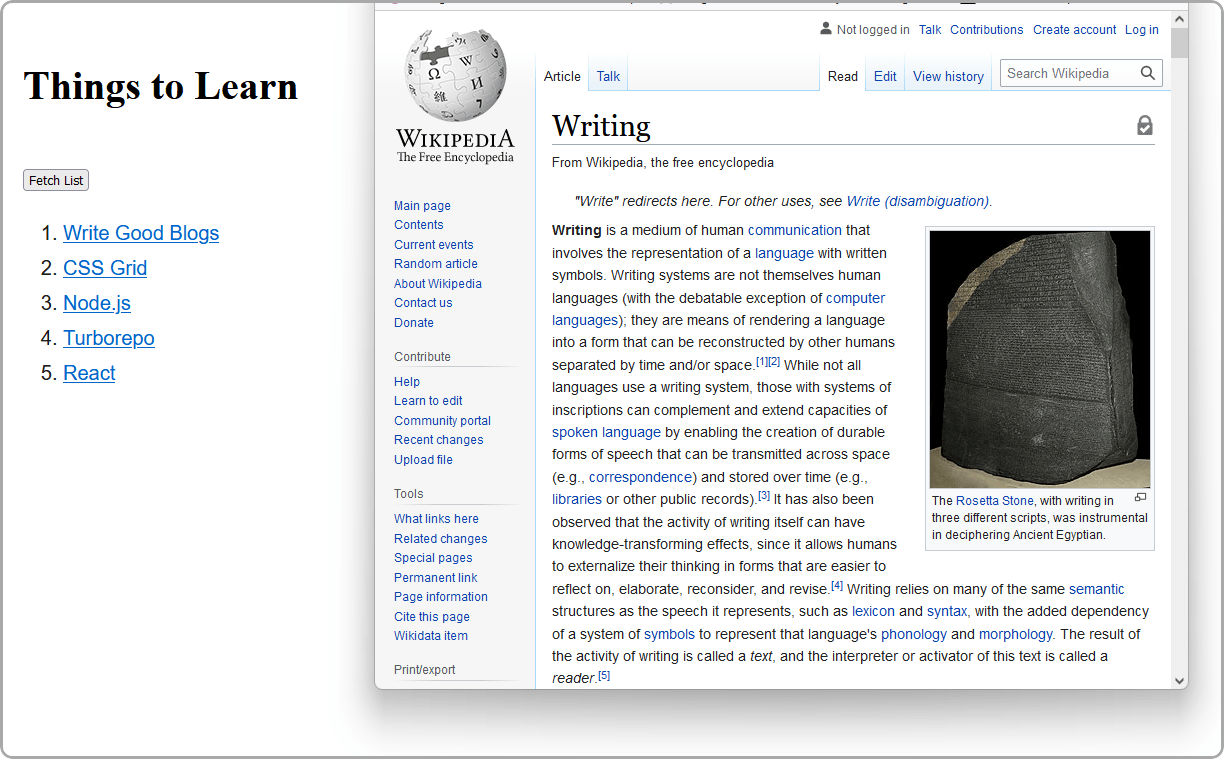
Go ahead, try changing some text in your DB and hitting the button again.
Wrapping Up
Well that’s pretty neat! Now that you know how to do this, what cool projects can you think to build?
Remember that all code from this tutorial as a complete package is available in this repository.
Please check some of my other learning tutorials. Feel free to leave a comment or question and share with others if you find any of them helpful:
If you find this tutorial helpful, please share it with your friends and colleagues! For more like it you can subscribe on Youtube or follow me on Twitter.