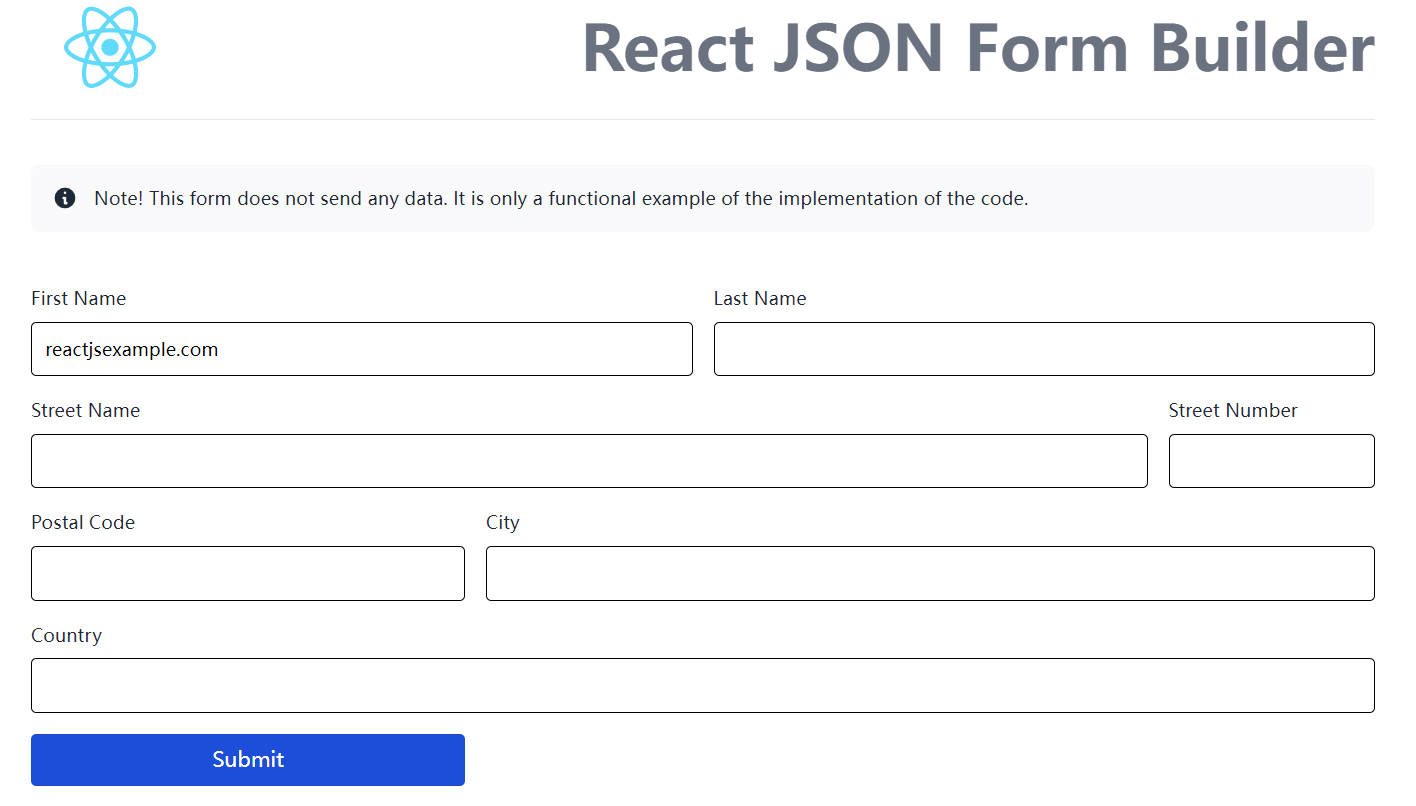
React JSON Form Builder
See example page: https://alexanderweigelt.github.io/JSONFormBuilder/
The Task
-
Create a new React component called
FormBuilderthat will be responsible for rendering the form fields based on the provided data schema. -
The
FormBuildercomponent should accept aschemaprop, which is a JSON object that describes the data schema. The schema should specify the types of fields that should be rendered, along with any validation rules or other requirements. -
The
FormBuildercomponent should parse theschemaprop and generate the appropriate form fields based on the specified types. For example, if the schema specifies a text input field, the component should render an<input>element with the appropriate attributes and validation rules. -
To keep the component lightweight, you can use existing React form libraries like
react-hook-formorformikto handle form validation and submission. Decide which library is appropriate. -
Use
Yupto generate a validation schema based on theschemaprop. -
You can also add additional features like conditional logic, custom field types, and styling options to make the form builder more flexible and customizable.
Here’s some sample code to get you started:
Example schema file content for the component props to generate a form with the following fields:
- first name
- last name
- street name
- street number
- postal code
- city
- country:
const schema = {
  fields: [
    {
      name: 'firstName',
      label: 'First Name',
      type: 'text',
      validation: yup.string().required('First name is required'),
    },
    {
      name: 'lastName',
      label: 'Last Name',
      type: 'text',
      validation: yup.string().required('Last name is required'),
    },
    {
      name: 'streetName',
      label: 'Street Name',
      type: 'text',
      validation: yup.string().required('Street name is required'),
    },
    {
      name: 'streetNumber',
      label: 'Street Number',
      type: 'number',
      validation: yup.number().required('Street number is required'),
    },
    {
      name: 'postalCode',
      label: 'Postal Code',
      type: 'text',
      validation: yup.string().required('Postal code is required'),
    },
    {
      name: 'city',
      label: 'City',
      type: 'text',
      validation: yup.string().required('City is required'),
    },
    {
      name: 'country',
      label: 'Country',
      type: 'text',
      validation: yup.string().required('Country is required'),
    },
  ],
};
In this schema file, we’re defining an array of field objects, where each object represents a form field. Each field object has a name property, which is used as the name attribute of the form field, a label property, which is used as the label of the form field, a type property, which is used as the type attribute of the form field, and a validation property, which is used as the validation schema for the form field.
In this example, we’re using the Yup validation library to define the validation schema for each field. We’re using the required method to ensure that each field is required. For the streetNumber field, we’re using the number method to ensure that the field value is a number.
Variant 1: react-hook-form
This variant was created with react-hook-form and yup-schema form validation.
What is react-hook-form?
react-hook-form is a library for managing forms in React using hooks. It has a small API and is focused on performance. react-hook-form uses uncontrolled components, which means that it doesn’t store the form data in state. Instead, it uses refs to access the form data directly.
Code example
Code example with react-hook-form that uses Yup for validation:
import React from 'react';
import { useForm } from 'react-hook-form';
import * as yup from 'yup';

const FormBuilder = ({ schema }) => {
  const validationSchema = yup.object().shape(
    schema.fields.reduce((schemaObj, field) => {
      schemaObj[field.name] = field.validation || yup.string();
      return schemaObj;
    }, {})
  );

  const { register, handleSubmit, errors } = useForm({
    validationSchema,
  });

  const onSubmit = (data) => {
    console.log(data);
  };

  const renderField = (field) => {
    switch (field.type) {
      case 'text':
        return (
          <div>
            <label>{field.label}</label>
            <input
              type="text"
              name={field.name}
              ref={register}
            />
            {errors[field.name] && <span>{errors[field.name].message}</span>}
          </div>
        );
      case 'number':
        return (
          <div>
            <label>{field.label}</label>
            <input
              type="number"
              name={field.name}
              ref={register}
            />
            {errors[field.name] && <span>{errors[field.name].message}</span>}
          </div>
        );
      // Add additional field types as needed
      default:
        return null;
    }
  };

  return (
    <form onSubmit={handleSubmit(onSubmit)}>
      {schema.fields.map((field) => renderField(field))}
      <button type="submit">Submit</button>
    </form>
  );
};

export default FormBuilder;
In this code, we’re using Yup to generate a validation schema based on the schema prop. We’re also passing the validation schema to useForm to handle form validation.
Note that we’re using the validation property of each field in the schema prop as the validation schema for that field. If the validation property is not specified for a field, we’re defaulting to a yup.string() validation schema.
Variant 2: Formik
Use Formik instead of react-hook-form and Yup schema form validation
What is Formik?
Formik is a library for managing forms in React. It uses controlled components, which means that it stores the form data in state. Formik provides a set of components and hooks to help you manage form state, validation, and submission.
Code example
Code example with Formik that uses Yup for validation:
import React from 'react';
import { Formik, Field, Form } from 'formik';
import * as yup from 'yup';

const FormBuilder = ({ schema }) => {
  const validationSchema = yup.object().shape(
    schema.fields.reduce((schemaObj, field) => {
      schemaObj[field.name] = field.validation || yup.string();
      return schemaObj;
    }, {})
  );

  const initialValues = schema.fields.reduce((valuesObj, field) => {
    valuesObj[field.name] = field.value || '';
    return valuesObj;
  }, {});

  const onSubmit = (values) => {
    console.log(values);
  };

  const renderField = (field) => {
    switch (field.type) {
      case 'text':
        return (
          <div>
            <label>{field.label}</label>
            <Field
              type="text"
              name={field.name}
            />
            <ErrorMessage name={field.name} />
          </div>
        );
      case 'number':
        return (
          <div>
            <label>{field.label}</label>
            <Field
              type="number"
              name={field.name}
            />
            <ErrorMessage name={field.name} />
          </div>
        );
      // Add additional field types as needed
      default:
        return null;
    }
  };

  return (
    <Formik
      initialValues={initialValues}
      onSubmit={onSubmit}
      validationSchema={validationSchema}
    >
      {({ errors }) => (
        <Form>
          {schema.fields.map((field) => renderField(field))}
          <button type="submit">Submit</button>
        </Form>
      )}
    </Formik>
  );
};

export default FormBuilder;
In this updated code, we’re using Formik to handle form validation and submission. We’re also using the Field and ErrorMessage components provided by Formik to render the form fields and error messages.
Note that we’re using the validation property of each field in the schema prop as the validation schema for that field.
If the validation property is not specified for a field, we’re defaulting to a yup.string() validation schema. We’re also using the value property of each field in the schema prop as the initial value for that field. If the value property is not specified for a field, we’re defaulting to an empty string.
Decision for a library
React has a plethora of libraries and frameworks for form management, but two of the most popular are react-hook-form and Formik. Both libraries provide similar functionality, but they approach form management in different ways. In this article, we’ll compare react-hook-form and Formik and make a decision on which one to use.
Comparing react-hook-form and Formik
API
react-hook-form has a smaller and simpler API than Formik. react-hook-form provides a useForm hook, which returns a set of functions and values that you can use to manage your form. Formik provides a Formik component and a set of hooks that you can use to manage your form state, validation, and submission.
Performance
react-hook-form is focused on performance and has a small bundle size. It uses uncontrolled components, which means that it doesn’t store the form data in state. Instead, it uses refs to access the form data directly. This approach avoids the performance overhead of controlled components.
Formik uses controlled components, which means that it stores the form data in state. This approach can lead to performance issues, especially with large forms. However, Formik provides a shouldUpdate prop that you can use to optimize performance.
Validation
Both react-hook-form and Formik provide validation functionality. react-hook-form uses the yup library for validation, while Formik provides its own validation API.
Community and Documentation
Both libraries have a large and active community, and both have comprehensive documentation. However, Formik has been around longer and has a more mature ecosystem, which means that it has more third-party integrations and plugins.
Learning Curve
react-hook-form has a smaller and simpler API than Formik, which makes it easier to learn. However, Formik has more features and functionality, which means that it has a steeper learning curve.
Which one should we use?
Both react-hook-form and Formik are solid choices for managing forms in React. react-hook-form is focused on performance and simplicity, while Formik provides more features and functionality.
If you’re building a small form or a form with simple validation, react-hook-form is a good choice. It has a small API and is focused on performance. However, if you’re building a large and complex form, Formik is a better choice. It provides more features and functionality, and has a more mature ecosystem.
In summary, the choice between react-hook-form and Formik depends on the size and complexity of your form. Since we want to implement large and complex forms it is a good decision to use Formik.
Development
In the project directory, you can run:
npm start
Runs the app in the development mode. Open http://localhost:3000 to view it in the browser.
The page will reload if you make edits. You will also see any lint errors in the console.
npm test
Launches the test runner in the interactive watch mode. See the section about running tests for more information.
npm run build
Builds the app for production to the build folder.
It correctly bundles React in production mode and optimizes the build for the best performance.
The build is minified and the filenames include the hashes. Your app is ready to be deployed!
See the section about deployment for more information.
npm run eject
Note: this is a one-way operation. Once you eject, you can’t go back!
If you aren’t satisfied with the build tool and configuration choices, you can eject at any time. This command will remove the single build dependency from your project.
Instead, it will copy all the configuration files and the transitive dependencies (webpack, Babel, ESLint, etc) right into your project so you have full control over them. All of the commands except eject will still work, but they will point to the copied scripts so you can tweak them. At this point you’re on your own.
You don’t have to ever use eject. The curated feature set is suitable for small and middle deployments, and you shouldn’t feel obligated to use this feature. However we understand that this tool wouldn’t be useful if you couldn’t customize it when you are ready for it.
Deployment
Deploy React app to GitHub Pages
npm run deploy
We can deploy our React application by simply running: npm run deploy. This will create a bundled version of our React application and push it to a gh-pages branch in our remote repository on GitHub.