React Story
From vanilla javascript to a real React app step by step.
Use commits history to follow the steps, and learn how React and Babel works, then we build a basic workflow using webpack and node.
STEP 1: Basic structure
Let’s get started with a basic public folder with:
-
/public:
- index.html
<!DOCTYPE html>
<html lang="en">
  <head>
    <meta charset="UTF-8" />
    <meta http-equiv="X-UA-Compatible" content="IE=edge" />
    <meta name="viewport" content="width=device-width, initial-scale=1.0" />
    <title>STEP 1: Basic structure</title>

    <!--OUR STYLE-->
    <link rel="stylesheet" href="./style.css" />
  </head>
  <body>
    <!--OUR SPA-->
    <div id="root"></div>

    <!--OUR SCRIPT-->
    <script src="./index.js"></script>
  </body>
</html>
- style.css
@import url("https://fonts.googleapis.com/css2?family=Fira+Sans:ital,wght@0,100;0,200;0,300;0,400;0,500;0,600;0,700;0,800;0,900;1,100;1,200;1,300;1,400;1,500;1,600;1,700;1,800;1,900&display=swap");

* {
  color: whitesmoke;
  font-family: "Fira Sans", sans-serif;
}

body {
  background-color: rgb(38, 38, 38);
}

.container {
  background-color: rgb(48, 48, 48);
  padding: 0.5em;
  display: flex;
  flex-direction: column;
  max-width: 1000px;
  margin: auto;
}

span {
  font-weight: 300;
  text-decoration: underline;
  font-size: 1.2em;
}

p {
  font-weight: 200;
  font-size: 0.9em;
  text-decoration: none;
}
-
index.js
//Button component
const Button = ({ style, onClick, children }) => {
  const button = document.createElement("button"); //creating the HTML element

  button.style = style; //adding style from props

  //Adding default style
  button.style.border = "none";
  button.style.padding = "10px";
  button.style.margin = "auto";

  button.addEventListener("click", onClick); //adding event from props

  button.innerHTML = children; //Adding children inside the button

  return button; //Return element to append in parent
};

//The Global parent component
const App = () => {
  //Function to test click event
  function click() {
    alert("Click");
  }
  const div = document.createElement("div"); //creating the HTML element

  div.classList.add("container"); //Adding a class to the div

  //Adding some content
  div.innerHTML = `
                    <h1 style="color:#108cb5;">STEP 1: Basic structure</h1>
                    <ul>
                        <li>
                            <span>/public:</span>
                            <p>Folder served for development. Later we will bundle evrything in a /build folder</p>
                            <ol>
                                <li>
                                    <span>index.js:</span>
                                    <p>The entry point for the Single Page App</p>
                                </li>
                                <li>
                                    <span>inex.html:</span>
                                    <p>The single html file of our app</p>
                                </li>
                                <li>
                                    <span>style.js:</span>
                                    <p>The Stylesheet</p>
                                </li>
                            </ol>
                        </li>
                    </ul>

`;
  //Adding the Button component at the end
  div.appendChild(
    Button({
      style: "background-color:green;",
      onClick: click,
      children: "Click me!",
    })
  );
  return div; //return the element to render in the root
};

//Function that append a component to the parent
function render(component, parent) {
  parent.innerHTML = "";
  parent.appendChild(component);
}

render(App(), document.querySelector("#root")); //Render the App
STEP 2: Our Own Simple React Clone (MyReact)
Let’s implement a basic logic of React, to understand how it works.
The library
Function helper to transfrom component objects
function createElement(type, props, ...children) => { type, props }
Function to create texts components
function createTextElement(nodeValue) => { type, props };
Function that transfrom objects to HTMLElements and recursively append them to the parent
function render(component, parent) => void;
Function used by render to set attributes of HTMLElement: style, events…
function updateProperties(element, props) => void;
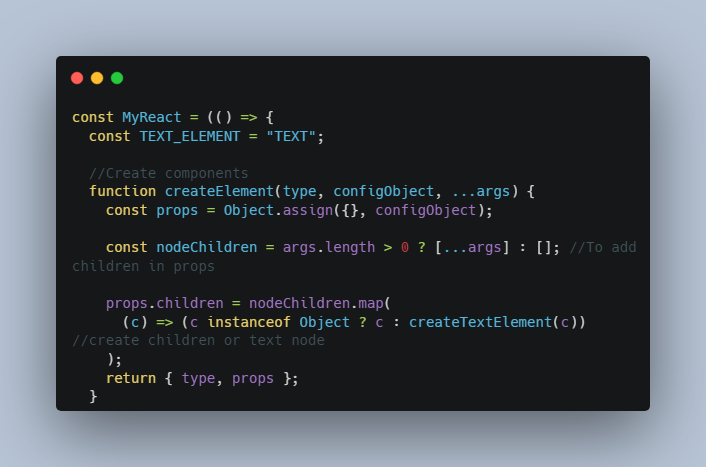
/MyReactCDN/MyReact.cdn.js: (Implementaion)
const MyReact = (() => {
  const TEXT_ELEMENT = "TEXT";

  //Create components
  function createElement(type, configObject, ...args) {
    const props = Object.assign({}, configObject);

    const nodeChildren = args.length > 0 ? [...args] : []; //To add children in props

    props.children = nodeChildren.map(
      (c) => (c instanceof Object ? c : createTextElement(c)) //create children or text node
    );
    return { type, props };
  }

  function createTextElement(nodeValue) {
    return {
      type: TEXT_ELEMENT,
      props: {
        nodeValue,
        children: [],
      },
    };
  }

  //Create and ppend element to parent recursively
  function render(component, parent) {
    const element = component;
    const dom =
      element.type == TEXT_ELEMENT
        ? document.createTextNode(element.props.nodeValue)
        : document.createElement(element.type);
    updateProperties(dom, element.props);
    element.props.children.forEach((child) => render(child, dom));
    parent.appendChild(dom);
  }

  return {
    createElement,
    render,
  };
})();

//DOM utils:
function updateProperties(element, props) {
  //Managing events like: onClick, onChange...
  const isListener = (name) => name.startsWith("on"); //true if onEvent

  Object.keys(props)
    .filter(isListener)
    .forEach((name) => {
      const eventType = name.toLowerCase().substring(2); //onEvent => event
      element.addEventListener(eventType, props[name]); //onEvent:callback => (event, callback)
    });

  //Managing style: color, fontSize...
  if (props.style) {
    Object.keys(props.style).forEach((name) => {
      element.style[name] = props.style[name];
    });
  }

  //Managing attriubute like: id, class...
  const isAttribute = (name) =>
    !isListener(name) && name !== "children" && name !== "style";

  Object.keys(props)
    .filter(isAttribute)
    .forEach((name) => {
      element[name] = props[name];
    });
}
/public/index.js
Let’s use the library in our App:
//Button component
const Button = (props) => {
  return MyReact.createElement(
    "button",
    {
      onClick: props.onClick,
      style: {
        backgroundColor: props.backgroundColor,
        padding: "10px",
        border: "none",
        color: "white",
      },
    },
    props.name
  );
};

//The Global parent component
const App = () => {
  //Function to test click event
  function click() {
    alert("Click");
  }
  return MyReact.createElement(
    "div",
    { className: "container" },

    //Title
    MyReact.createElement(
      "h1",
      { style: { color: "#108cb5" } },
      "STEP 2: Our Own Simple React Clone"
    ),
    //Unordered list
    MyReact.createElement(
      "ul",
      { style: { border: "black" } },
      MyReact.createElement(
        "li",
        {},
        "/MyReactCDN/MyReact.cdn.js",
        MyReact.createElement(
          "ol",
          {},
          MyReact.createElement(
            "li",
            {},
            "MyReact.createElement(tag, props, ...children)"
          ),
          MyReact.createElement("li", {}, "MyReact.render(compoenent, parent)")
        )
      )
    ),
    Button({ onClick: click, backgroundColor: "green", name: "Click me!" })
  );
};

//Function that append a component to the parent
function render(component, parent) {
  parent.innerHTML = "";
  parent.appendChild(component);
}

MyReact.render(App(), document.querySelector("#root")); //Render the App
/public/index.html
Let’s add the library to our html file:
...

<!--MyReact CDN-->
<script src="../MyReactCDN/MyReact.cdn.js"></script>

<!--OUR SCRIPT-->
<script src="./index.js"></script>

...
STEP 2: JSX
Let’s add babel cdn to the index.html and use JSX syntaxe.
/public/index.html
Let’s add the babel script to the html file:
...

<!--BABEL SCRIPT-->
<script src="https://cdnjs.cloudflare.com/ajax/libs/babel-standalone/6.25.0/babel.min.js"></script>

<!--MyReact CDN-->
<script src="../MyReactCDN/MyReact.cdn.js"></script>

<!--OUR SCRIPT-->
<script src="./index.js"></script>

...
/public/index.js
And let’s use it in our /public/index.js:
/**@jsx MyReact.createElement */
const Button = ({ backgroundColor, children, onClick }) => {
  return (
    <button
      style={{ backgroundColor: backgroundColor, padding: "10px", border: "none" }}
      onClick={onClick}
    >
      {children}
    </button>
  );
};

//The Global parent component
const App = () => {
  //Function to test click event
  function click() {
    alert("Click");
  }
  return (
    <div className='container'>
      <h1>STEP 3: Adding JSX</h1>
      <ul>
        <li>Adding Babel script to /public/index.html</li>
        <li>Using JSX syntaxe in /public/index.js</li>
      </ul>
      {Button({ backgroundColor: "green", children: "Click me!", onClick: click })}
    </div>
  );
};

//Function that append a component to the parent
function render(component, parent) {
  parent.innerHTML = "";
  parent.appendChild(component);
}

MyReact.render(App(), document.querySelector("#root")); //Render the App
STEP 3: Adding React
Now let’s add the React library with CDN, and revert the render function to ReactDOM.render()
/public/index.html
<!DOCTYPE html>
<html lang="en">
  <head>
    <meta charset="UTF-8" />
    <meta http-equiv="X-UA-Compatible" content="IE=edge" />
    <meta name="viewport" content="width=device-width, initial-scale=1.0" />
    <title>STEP 3: Adding JSX</title>

    <!--OUR STYLE-->
    <link rel="stylesheet" href="./style.css" />
  </head>
  <body>
    <!--OUR SPA-->
    <div id="root"></div>

    <!--React CDN-->
    <script
      crossorigin
      src="https://unpkg.com/react@16/umd/react.production.min.js"
    ></script>
    <script
      crossorigin
      src="https://unpkg.com/react-dom@16/umd/react-dom.production.min.js"
    ></script>

    <!--BABEL SCRIPT-->
    <script src="https://cdnjs.cloudflare.com/ajax/libs/babel-standalone/6.25.0/babel.min.js"></script>

    <!--OUR SCRIPT-->
    <script type="text/jsx" src="./index.js"></script>
  </body>
</html>
/public/index.js
const Button = ({ backgroundColor, children, onClick }) => {
  return (
    <button
      style={{ backgroundColor: backgroundColor, padding: "10px", border: "none" }}
      onClick={onClick}
    >
      {children}
    </button>
  );
};

//The Global parent component
const App = () => {
  //Function to test click event
  function click() {
    alert("Click");
  }
  return (
    <div className='container'>
      <h1>STEP 3: Adding JSX</h1>
      <ul>
        <li>Adding Babel script to /public/index.html</li>
        <li>Using JSX syntaxe in /public/index.js</li>
      </ul>
      <Button backgroundColor={"green"} onClick={click}>
        Click me!
      </Button>
    </div>
  );
};

ReactDOM.render(<App />, document.querySelector("#root")); //Render the App
STEP 4: Using node packages
This setup using CDNs does not let us use imports and exports to separate our components in multiple files easily.
Install dependecies
It’s time to use node packages, and install React, ReactDOM, Babel and Webpack:
- Let’s get started by initializing the package.json
npm init
- And the React dependecies:
npm install react react react-dom
- Now we need to add dependecies for babel:
npm install -D @babel/core @babel/preset-env @babel/preset-react babel-loader
- And finally Webpack:
Webpack is a bundler that take all our javascript files and put them into one big file.
npm install -D webpack webpack-cli
babel and Webpack Configuration
- Create a .babelrc file:
{
  "presets": ["@babel/preset-react", "@babel-preset-env"]
}
- Create a webpack.config.js file:
const path = require("path");
module.exports = {
  entry: "./src/index.js",
  output: {
    filename: "index.js",
    path: path.resolve(__dirname, "public"),
  },
  watch: true,
  module: {
    rules: [
      {
        test: /\.jsx?$/,
        exclude: /node_modules/,
        loader: require.resolve("babel-loader"),
      },
    ],
  },
};
package.json
{
  "name": "react_tuto_story",
  "version": "1.0.0",
  "description": "From vanilla javascript to a real React app step by step.",
  "scripts": {
    "watch": "webpack --watch --mode=development",
    "build": "webpack --mode=production"
  },
  "author": "",
  "license": "ISC",
  "dependencies": {
    "react": "^18.2.0",
    "react-dom": "^18.2.0"
  },
  "devDependencies": {
    "@babel/core": "^7.18.10",
    "@babel/preset-env": "^7.18.10",
    "@babel/preset-react": "^7.18.6",
    "babel-loader": "^8.2.5",
    "webpack": "^5.74.0",
    "webpack-cli": "^4.10.0",
    "webpack-dev-server": "^4.9.3"
  }
}
Using React
Now that Webpack will take /src/index.js and create a bundle in /public/index.js, let’s move our code:
- /src/index.js
import React from "react";

import { render } from "react-dom";

const Button = ({ backgroundColor, children, onClick }) => {
  return (
    <button
      style={{ backgroundColor: backgroundColor, padding: "10px", border: "none" }}
      onClick={onClick}
    >
      {children}
    </button>
  );
};

//The Global parent component
const App = () => {
  //Function to test click event
  function click() {
    alert("Click");
  }
  return (
    <div className='container'>
      <h1>STEP 5: Using node packages</h1>
      <ul>
        <li>packages.json initialization</li>
        <li>Installing React, Babel and Webpack dependencies</li>
        <li>Move /public/index.js to /src/index.js</li>
      </ul>
      <Button backgroundColor={"green"} onClick={click}>
        Click me!
      </Button>
    </div>
  );
};

render(<App />, document.querySelector("#root")); //Render the App
Watch the app and open index.html
build the bundle and watch for changements:
npm run watch
STEP 6: Seperate files
- src/App.js
import React from "react";

import Button from "./Components/Button/Button";
//The Global parent component
const App = () => {
  //Function to test click event
  function click() {
    alert("Click");
  }
  return (
    <div className='container'>
      <h1>STEP 6: Separating files</h1>
      <ul>
        <li>Adding: /src/App.js</li>
        <li>Adding: /src/Components/Button/Button.js</li>
      </ul>
      <Button backgroundColor={"green"} onClick={click}>
        Click me!
      </Button>
    </div>
  );
};
export default App;
- src/Components/Button/Button.js
import React from "react";

const Button = ({ backgroundColor, children, onClick }) => {
  return (
    <button
      style={{ backgroundColor: backgroundColor, padding: "10px", border: "none" }}
      onClick={onClick}
    >
      {children}
    </button>
  );
};

export default Button;
- /src/index.js
import React from "react";

import { render } from "react-dom";

import App from "./App";

render(<App />, document.querySelector("#root")); //Render the App
STEP 7: Loaders, plugins and dev server
Install loaders
Let’s us add loaders for css, images…
npm install -D style-loader css-loader file-loader
Install Plugins
This plugin help adding the bundle to our html file, without doing it manually:
npm install -D html-webpack-plugin
/webpack.config.js
const path = require("path");
const HtmlWebpackPlugin = require("html-webpack-plugin");
module.exports = {
  entry: "./src/index.js",
  output: {
    filename: "index.js",
    path: path.resolve(__dirname, "build"),
  },
  plugins: [
    new HtmlWebpackPlugin({
      template: "./public/index.html",
    }),
  ],
  module: {
    rules: [
      {
        test: /\.jsx?$/,
        exclude: /node_modules/,
        loader: require.resolve("babel-loader"),
      },
      {
        test: /\.css$/,
        use: ["style-loader", "css-loader"],
      },
      {
        test: /\.png|svg|jpg|jpeg|gif$/,
        use: ["file-loader"],
      },
    ],
  },
};
/package.json
{
  "name": "react_tuto_story",
  "version": "1.0.0",
  "description": "From vanilla javascript to a real React app step by step.",
  "scripts": {
    "dev": "webpack-dev-server --mode=development --open",
    "watch": "webpack --watch --mode=development",
    "build": "webpack --mode=production"
  },
  "author": "",
  "license": "ISC",
  "dependencies": {
    "react": "^18.2.0",
    "react-dom": "^18.2.0"
  },
  "devDependencies": {
    "@babel/core": "^7.18.10",
    "@babel/preset-env": "^7.18.10",
    "@babel/preset-react": "^7.18.6",
    "babel-loader": "^8.2.5",
    "css-loader": "^6.7.1",
    "file-loader": "^6.2.0",
    "html-webpack-plugin": "^5.5.0",
    "style-loader": "^3.3.1",
    "webpack": "^5.74.0",
    "webpack-cli": "^4.10.0",
    "webpack-dev-server": "^4.9.3"
  }
}
Using css and images in App.js
import React from "react";

import Button from "./Components/Button/Button";

import "./style.css";
import logo from "./assets/logo.svg";

//The Global parent component
const App = () => {
  //Function to test click event
  function click() {
    alert("Click");
  }
  return (
    <div className='container'>
      <h1>STEP 7: Loaders, plugins and dev server</h1>
      <ul>
        <li>Installing loaders: style-loader css-loader file-loader</li>
        <li>Installing plugins: html-webpack-plugin</li>
        <li>Adding: /src/style.css</li>
        <li>Adding: /src/assets/logo.svg</li>
      </ul>
      <Button backgroundColor={"green"} onClick={click}>
        Click me!
      </Button>
      <img src={logo} alt='logo' />
    </div>
  );
};
export default App;
Removing style from /public/index.html
<!DOCTYPE html>
<html lang="en">
  <head>
    <meta charset="UTF-8" />
    <meta http-equiv="X-UA-Compatible" content="IE=edge" />
    <meta name="viewport" content="width=device-width, initial-scale=1.0" />
    <title>STEP 7: Loaders, plugins and dev server</title>
  </head>
  <body>
    <!--OUR SPA-->
    <div id="root"></div>
  </body>
</html>
npm run dev
STEP 8: To infinty and beyond
Congrats !!
You learned how React and Babel works, then you built a Development and Production workflow using Webpack.
You can now code your app using React library, and build it when you are done!
Happy hacking!
- Use this command in development to server your app with hot reload
npm run dev
- Use this command to build your app
npm run build