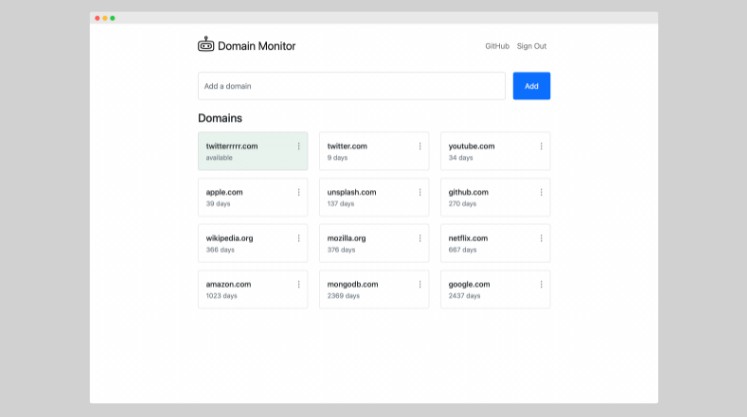
Domain Monitor
Domain Monitor is a React single-page application for tracking domain status changes.

Hosting on MongoDB Cloud
Requirements
Node.js is required to build the application and then deploy it to the cloud using the Realm CLI. If you
don’t have it already, please download it from here.
MongoDB Cloud account is required to access MongoDB Atlas and MongoDB Realm. MongoDB Atlas is for hosting
the application’s database, and MongoDB Realm is for hosting serverless functions and static files. Static files can be
hosted anywhere else, but I recommend using MongoDB Realm just for simplicity. Create MongoDB Cloud
account here.
The application can be deployed to MongoDB Cloud using the Realm UI, but a more convenient way is to
use the Realm CLI. You can find how to install and configure the Realm CLI here.
An SMTP server is an optional requirement to receive email notifications when domain status is changed.
Create Atlas Cluster
Here is an excellent guide on how to create a
MongoDB cluster.
Be advised that a free-tier cluster is more than enough for this application.
Create Realm Application
Once you have finished creating the Atlas Cluster, click on the Realm tab.
Inside the Realm tab, a popup with a list of available application templates will appear. Select the “Build your own
App” template and click Next.
In the next step, make sure that the application links to your freshly created Atlas cluster. You can also change the
application name or the region where it will be deployed.
Once the application is created, copy its ID. You will need it later.
Enable Hosting
While still inside the Realm UI, navigate to the Hosting page, which can be found inside the left navigation menu. On
the Hosting page, click the Enable Hosting button.
Deploy to Realm
Check out the project repository:
git clone [email protected]:tunaitis/domain-monitor.git && cd domain-monitor
Build the application using the command below. Don’t forget to replace the with the actual application ID
from the previous step.
REACT_APP_REALM_APP_ID="<Your App ID>" npm run build
Now you’re ready to deploy the application to the MongoDB Cloud.
realm-cli push
  --include-package-json
  --include-hosting
  --local="backend"
  --remote="<Your App ID>"
That’s it! You will be able to access your freshly deployed application as soon as MongoDB Realm finishes provisioning
hosting. By default, the application will be available at a domain with the following form:
https://<Your App ID>.mongodbstitch.com/
You can assign a custom domain name to it in the Hosting settings page from the Realm UI.
Application Settings
Application settings can be managed from the Values page inside the Realm UI.
| Name | Default | Description |
|---|---|---|
| registrationEnabled | true | Control whether users can sign up for an account using the registration form. Even when the registration is disabled, you can still create a new user account using the Realm UI. More about it here. |
| smtpHost | Hostname or IP address to connect to. | |
| smtpUser | Username to use when connecting to the SMTP server. | |
| smtpPassword | Password for the user when connecting to the SMTP server. | |
| smtpFrom | Email address of the sender. |
Credits
Logo icon is by Andrejs Kirma from NounProject.com.
License
The Domain Monitor is free and open-source software licensed under the Apache License 2.0.