remix-i18next
The easiest way to translate your Remix apps.
Why remix-i18next?
- Easy to set up, easy to use: setup only takes a few steps, and configuration is simple.
- No other requirements:
remix-i18nextsimplifies internationalisation for your Remix app without extra dependencies. - Production ready:
remix-i18nextsupports passing translations and configuration options into routes from the loader. - Take the control:
remix-i18nextdoesn’t hide the configuration so you can add any plugin you want or configure as pleased.
Setup
Installation
The first step is to install it in your project with
npm install remix-i18next i18next react-i18next
Configuration
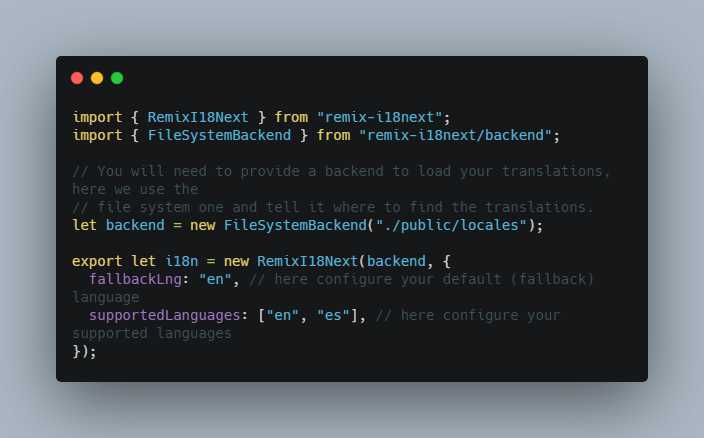
Then create a i18n.server.ts file somewhere in your app and add the following code:
import { RemixI18Next } from "remix-i18next";
import { FileSystemBackend } from "remix-i18next/backend";

// You will need to provide a backend to load your translations, here we use the
// file system one and tell it where to find the translations.
let backend = new FileSystemBackend("./public/locales");

export let i18n = new RemixI18Next(backend, {
  fallbackLng: "en", // here configure your default (fallback) language
  supportedLanguages: ["en", "es"], // here configure your supported languages
});
Client-side configuration
Now in your entry.client.tsx replace the code with this:
import i18next from "i18next";
import { hydrate } from "react-dom";
import { initReactI18next } from "react-i18next";
import { RemixBrowser } from "remix";
import { RemixI18NextProvider } from "remix-i18next/react";

// intialize i18next using initReactI18next and configuring it
i18next
  .use(initReactI18next)
  .init({
    supportedLngs: ["en", "es"],
    defaultNS: "common",
    fallbackLng: "en",
    // I recommend you to always disable react.useSuspense for i18next
    react: { useSuspense: false },
  })
  .then(() => {
    // then hydrate your app wrapped in the RemixI18NextProvider
    return hydrate(
      <RemixI18NextProvider i18n={i18next}>
        <RemixBrowser />
      </RemixI18NextProvider>,
      document
    );
  });
Server-side configuration
And in your entry.server.tsx replace the code with this:
import i18next from "i18next";
import { renderToString } from "react-dom/server";
import { initReactI18next } from "react-i18next";
import type { EntryContext } from "remix";
import { RemixServer } from "remix";
import { RemixI18NextProvider } from "remix-i18next/react";

export default async function handleRequest(
  request: Request,
  responseStatusCode: number,
  responseHeaders: Headers,
  remixContext: EntryContext
) {
  // Here you also ned to initialize i18next using initReactI18next, you should
  // use the same configuration as in your client side.
  await i18next.use(initReactI18next).init({
    supportedLngs: ["en", "es"],
    defaultNS: "common",
    fallbackLng: "en",
    react: { useSuspense: false },
  });

  // Then you can render your app wrapped in the RemixI18NextProvider as in the
  // entry.client file
  let markup = renderToString(
    <RemixI18NextProvider i18n={i18next}>
      <RemixServer context={remixContext} url={request.url} />
    </RemixI18NextProvider>
  );

  responseHeaders.set("Content-Type", "text/html");

  return new Response("<!DOCTYPE html>" + markup, {
    status: responseStatusCode,
    headers: responseHeaders,
  });
}
Usage
Now, in your root file create a loader if you don’t have one with the following code and also run the useRemixI18Next hook on the Root component.
import { json, LoaderFunction } from "remix";
import { useRemixI18Next } from "remix-i18next/react";

export let loader: LoaderFunction = async (request) => {
  let locale = i18n.getLocale(request);
  return json({ locale });
};

export default function Root() {
  let { locale } = useLoaderData<{ locale: string }>();
  useRemixI18Next(locale);

  return (
    <Document>
      <Outlet />
    </Document>
  );
}
Finally, in any route you want to translate you can do this:
import { json, LoaderFunction } from "remix";
import i18n from "~/i18n.server.ts"; // this is the first file you created
import { useTranslation } from "react-i18next";

export let loader: LoaderFunction = async ({ request }) => {
  return json({
    i18n: await i18n.getTranslations(request, ["common", "index"]),
  });
};

export default function Component() {
  let { t } = useTranslation("index");
  return <h1>{t("title")}</h1>;
}
And that’s it, repeat the last step for each route you want to translate, remix-i18next will automatically load the translations using the backend you configured and it will automatically inject the translations into your app.
Custom Backend
If you don’t want, or can’t use the FileSystemBackend to load your translations you can easily create your own backend.
An example on when you couldn’t use the FileSystemBackend is when you are deploying your app to Cloudflare Workers and you can’t read from the FS.
import type { Backend } from "remix-i18next/backend";

export class FetchBackend implements Backend {
  private url: URL;

  constructor(url: string) {
    this.url = new URL(url);
  }

  async getTranslations(namespace: string, locale: string) {
    let url = new URL(`${locale}/${namespace}.json`, this.url);
    let response = await fetch(url.toString(), {
      headers: { accept: "application/json" },
    });
    return response.json();
  }
}
With that, you created a simple backend that can be used with remix-i18next and load the translations from a remote server.
You could use this to load translations from specific services like Locize, Crowdin, Transifex, etc.