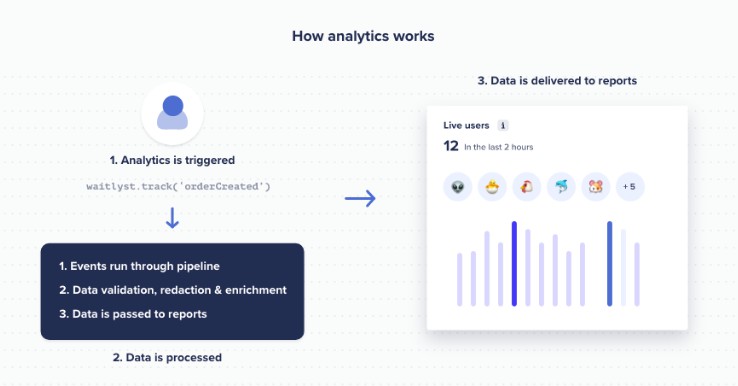

waitlyst.js provides in-app widgets for collecting customer feedback & product analytics.
- Track every event on your app
- Understand your users and how to improve your product
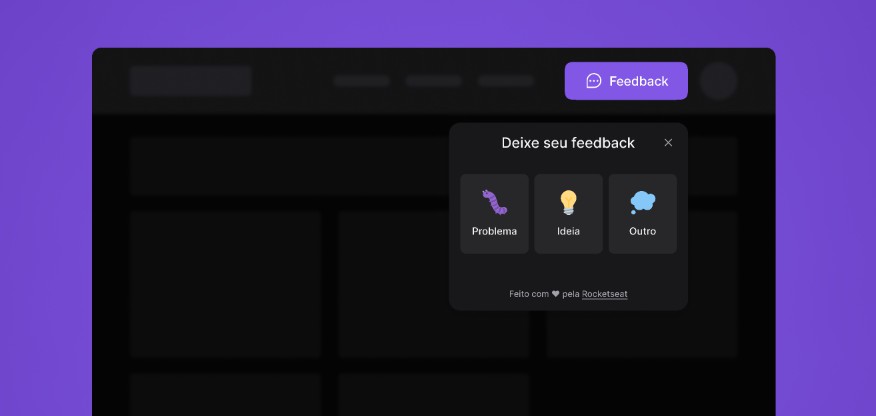
- Collect in-app customer feedback with 1 line of code
Documentation
Please visit https://waitlyst.co/docs to view the complete documentation.
Getting Started
This module is distributed via npm, which is bundled with node and should be installed as one of your project’s dependencies.
npm install @indextrus/waitlyst.js
or as a script tag:
<script src="https://cdn.waitlyst.co/sdk/waitlyst.js"></script>
Tracking product analytics

Using waitlyst.js as an es module:
import { Waitlyst } from 'waitlyst-js';

const waitlyst = new Waitlyst('YOUR_PUBLISHABLE_KEY');

/* Track a page view */
waitlyst.page();

/* Track a custom event */
waitlyst.track('stockPurchase', {
    price: 3000,
    id: '1234',
    quantity: 1
});

/* Identify a visitor */
waitlyst.identify('1234', {
    firstName: 'John',
    lastName: 'Doe',
    email: '[email protected]
});
Using waitlyst.js as a script tag:
<script src="https://cdn.waitlyst.co/sdk/waitlyst.js"></script>
<script>
    var waitlyst = new Waitlyst('YOUR_PUBLISHABLE_KEY');

    /* Track a page view */
    /* If used in a browser (non-spas) analytics will be tracked automatically */
    waitlyst.page();

    /* Track a custom event */
    waitlyst.track('stockPurchase', {
        price: 3000,
        id: '1234',
        quantity: 1
    });

    /* Identify a visitor */
    waitlyst.identify('1234', {
        firstName: 'John',
        lastName: 'Doe',
        email: '[email protected]'
    });
</script>
Collecting customer feedback

Using waitlyst.js as an es module:
- Attach a
data-waitlyst="feedback"attribute to an element in your DOM
<button type="button" data-waitlyst="feedback">Click me</button>
- Initialize waitlyst.js
import { Waitlyst } from 'waitlyst-js';

const waitlyst = new Waitlyst('YOUR_PUBLISHABLE_KEY');

// TIP: The code above must be initialized after your DOM has loaded`

// Here are some examples on where to place that code:
// Angular -> AfterViewInit
// React -> ComponentDidMount
// Jquery -> document.ready(function() { ... })
// VanillaJS -> document.addEventListener('DOMContentLoaded', callbackFunction, false);
Using waitlyst.js as an browser script tag:
- Attach a
data-waitlyst="feedback"attribute to an element in your DOM
<button type="button" data-waitlyst="feedback">Click me</button>
- Initialize waitlyst.js
<script src="https://cdn.waitlyst.co/sdk/waitlyst.js"></script>
<script>
    document.addEventListener('DOMContentLoaded', function() {
        var waitlyst = new Waitlyst('YOUR_PUBLISHABLE_KEY');

    });
</script>
Advanced usage
You can attach ids to an element and manually trigger them. This is especially useful for displaying widgets in context when a user take a certain action or encounters an error in your app.
<button type="button" data-waitlyst="feedback" id="feedback-button">Click me</button>
and then you can envoke it by:
const waitlyst = new Waitlyst("yourPublishableKey")
// To open
waitlyst.elements.open("feedback-button");

// To close
waitlyst.elements.close("feedback-button")