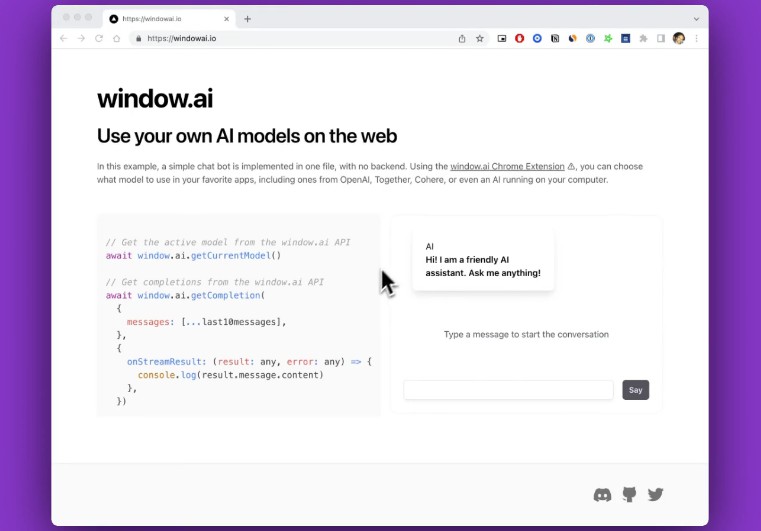
Window: use your own AI models on the web
Window AI is a browser extension that lets you configure AI models in one place and use them on the web.
-
For developers: easily make multi-model apps free from API costs and limits – just use the injected
window.ailibrary. Even make decentralized apps. -
For users: all your model setup in one place. Use your preferred model, whether it’s external (like OpenAI), proxied, or local, to protect privacy.
More about why this was made here.
Below, you’ll find out how to install, how to find apps, how to make apps, and how to connect custom models.
? Demo
⭐️ Main features
-
Configure keys: set all your API keys in one place and forget about them. They are only stored locally.
-
User-controlled models: use external, proxied, and local models of your choice.
-
Save your prompt history across apps (maybe train your own models with it).
⚙️ How it works
-
You configure your keys and models just once in the extension (see demo above).
-
Apps can request permission to send prompts to your chosen model via the injected
window.ailibrary (see the simple docs). -
You maintain visibility on what’s being asked and when.
It works with these models:
- OpenAI’s GPT-3.5 and GPT-4
- Together’s GPT NeoXT 20B
- Cohere Xlarge
- Open models, like Alpaca, that can run locally (see how).
? Installation
This extension is in beta and not on stores yet. For now, you can join the #beta-testing channel on Discord to get access to a downloadable extension that you can load into Chrome.
? Find apps
Better ways of doing this are coming soon, but today, you can use the Discord #app-showcase channel to discover new window.ai-compatible apps, or you can browse user-submitted ones on aggregators:
? Docs
This section shows why and how to get started, followed by a reference of window.ai methods.
Why should I build with this?
Infrastructure burden: No more model API costs, timeouts, rate limiting. Reduced server billing time.
Easily go multi-model. Integrate once, and then let Window handle model upgrades and support for other providers.
Privacy: Now you can build privacy-conscious apps that just talk to the user’s choice of model, and you have less liability for the model’s output.
Getting started
To leverage user-managed models in your app, simply call await window.ai.getCompletion with your prompt and options.
Example:
const response: Output = await window.ai.getCompletion(
    { messages: [{role: "user", content: "Who are you?"}] }: Input
  )

console.log(response.message.content) // "I am an AI language model"
All public types, including error messages, are documented in this file. Input, for example, allows you to use both simple strings and ChatML.
Example of streaming GPT-4 results to the console:
await ai.getCompletion({
  messages: [{role: "user", content: "Who are you?"}]
}, {
  temperature: 0.7,
  maxTokens: 800,
  model: ModelID.GPT4,
  onStreamResult: (res) => console.log(res.message.content)
})
Note that getCompletion will return an array, Output[], if you specify numOutputs > 1.
Functions
The Window API is simple. Just a few functions:
Get completion: get or stream a completion from the specified (or preferred) model.
window.ai.getCompletion(
    input: Input,
    options: CompletionOptions = {}
  ): Promise<Output | Output[]>
Input is either a { prompt : string } or { messages: ChatMessage[]}. Examples: see getting started above.
Current model: get the user’s currently preferred model ID.
window.ai.getCurrentModel(): Promise<ModelID>
Listen to events: to listen to events emitted by the extension, such as whenever the preferred model changes, here’s what you do:
window.ai.addEventListener((event: EventType, data: unknown) => {
  // You can check `event` to see if it's the EventType you care about, e.g. "model_changed"
  console.log("EVENT received", event, data)
})
All public types, including error messages, are documented in this file. Highlights below:
CompletionOptions
This options dictionary allows you to specify options for the completion request.
export interface CompletionOptions {

  // If specified, partial updates will be streamed to this handler as they become available,
  // and only the first partial update will be returned by the Promise.
  onStreamResult?: (result: Output | null, error: string | null) => unknown

  // What sampling temperature to use, between 0 and 2. Higher values like 0.8 will
  // make the output more random, while lower values like 0.2 will make it more focused and deterministic.
  // Different models have different defaults.
  temperature?: number

  // How many completion choices to generate. Defaults to 1.
  numOutputs?: number

  // The maximum number of tokens to generate in the chat completion. Defaults to infinity, but the
  // total length of input tokens and generated tokens is limited by the model's context length.
  maxTokens?: number

  // Sequences where the API will stop generating further tokens.
  stopSequences?: string[]

  // Identifier of the model to use. Defaults to the user's current model, but can be overridden here.
  model?: ModelID
}
Model IDs
ModelID is an enum of the available models:
// NOTE: this is an evolving standard, and may change in the future.
export enum ModelID {
  GPT3 = "openai/gpt3.5",
  GPT4 = "openai/gpt4",
  GPTNeo = "together/gpt-neoxt-20B",
  Cohere = "cohere/xlarge",
  Local = "local"
}
Error codes
Errors emitted by the extension API:
export enum ErrorCode {
  // Incorrect API key / auth
  NotAuthenticated = "NOT_AUTHENTICATED",

  // User denied permission to the app
  PermissionDenied = "PERMISSION_DENIED",

  // Happens when a permission request popup times out
  RequestNotFound = "REQUEST_NOT_FOUND",

  // When a request is badly formed
  InvalidRequest = "INVALID_REQUEST",

  // When an AI model refuses to fulfill a request. The returned error is
  // prefixed by this value and includes the status code that the model API returned
  ModelRejectedRequest = "MODEL_REJECTED_REQUEST"
}
Community tools
Hope to eventually make an awesome-window.ai repo, but in the meantime:
- ? Wanda: React Hooks for working with
window.ai
? Local model setup
You can configure any local model to work with Window-compatible apps by writing a simple HTTP server.
Here are instructions for setting up an Alpaca server locally with FastAPI and Uvicorn: Alpaca Turbo.
Server API Spec
Types
ChatMessage:{"role": string, "content": string}
POST /completions
This endpoint accepts a request body containing the following parameters:
prompt: The prompt(s) to generate completions for, encoded as astring. OR you can use ChatML format viamessages:messagesan array ofChatMessages.max_tokens: The maximum number of tokens to generate in the completion.temperature: What sampling temperature to use, between 0 and 2.stop_sequences: A string or array of strings where the API will stop generating further tokens. The returned text will not contain the stop sequence.stream: A boolean representing whether to stream generated tokens, sent as data-only server-sent events as they become available. Defaults to false.num_generations: How many choices to generate (should default to 1).
Note: apps like windowai.io will ask to stream, so your local server might not work with them until you support streaming.
Return value:
This endpoint should return an object that looks like:
{ choices: Array<{ text: string }> }
More WIP thinking here.
Demo comparing Alpaca with GPT-4
? Contributing
This is a turborepo monorepo containing:
- A Plasmo extension project.
- A web app serving windowai.io.
- Upcoming packages to help developers (see Discord for more info).
To run the extension and the web app in parallel:
pnpm dev
To build them both:
pnpm build
After building, open your browser and load the appropriate development build by loading an unpacked extension. For example, if you are developing for the Chrome browser, using manifest v3, use: build/chrome-mv3-dev.