
DacheQL
Welcome to DacheQL a lightweight GraphQL caching tool utilizing Redis and LRU eviction policy. Feel free to check out our Medium article here.
Overview
DacheQL is an open-source developer tool that leverages the pinpoint accuracy of GraphQL’s queries and implements caching to improve your website’s query efficiency
Prerequisites
- Before we divulge the prerequisites for using our npm package it should be noted that there are two different paths a developer can take when using our tool. The developer should decide whether or not they intend on utilizing Redis for its LFU (least frequently used) caching properties or if they would rather use our custom caching algorithm with its LRU (least recently used) behavior.
- If you are going to use Redis please make sure you have installed Redis first.
- Regardless of whether or not you are using Redis or our caching method, all developers will have to integrate GraphQL into their functionality. This means setting up your GraphQL schemas and resolvers as well as your database.
- Finally, our package is intended to work in tandem with a full-stack application where the front end makes query requests to the backend, so please set this up as well before using our package.
How to use our Demo
- At our website, if you would like to get a quick idea of how caching is beneficial head to our demo page.
- Using our demo is a simple 3-step process.
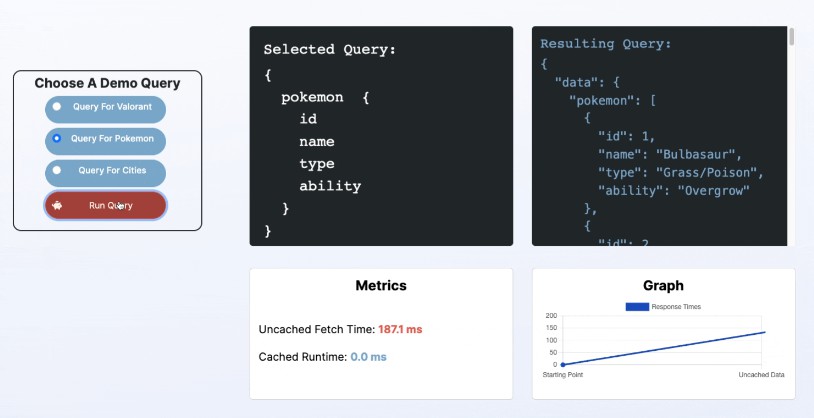
- First, choose your query of choose from our preset selection.
- Press the run query button to see the resulting GraphQL query result. If you divert your attention to the metrics box down below you will see an uncached fetch time populate. This statistic represents the time it took to make a GraphQL fetch and receive the response data. You can also see the spike in time upwards on the graph provided on the right.
- If you press the run query button again you will notice that your cached runtime metric will now render. The graph on the right will also dive down as the response time has significantly decreased. The uncached time should never change after this, as we are now retrieving your data from the cache every instance forward.

* *A small disclaimer: It should be noted that your first query will have a significantly higher runtime than the other first queries because it is establishing a connection.
Using our NPM package
Getting Started
If this is your first time using DacheQL, run the following command in your terminal:
npm install dacheql
In your server file, you want to require our middleware to handle GraphQL requests using the CommonJS format.
const dachql = require('dacheql');
DacheQL functionality depends on Express’ built-in method express.json() middleware function in order to parse incoming JSON payloads.
If you haven’t already set up your server file with Express, add the following code to require Express:
const express = require('express');
Add the following code to construct an Express application based on a GraphQL schema:
const expressGraphQL = require('express-graphql').graphqlHTTP;
Add the following code to use the express.json() middleware function:
app.use(express.json());
Using DacheQL with Redis
DacheQL lets you decide if you would like to use Redis, or our custom LRU eviction cache. If you are using Redis, make sure you have Redis installed and your Redis server is running. To run Redis, type the following command in your terminal:
redis-cli
Once your Redis server is up and running, type PING into the terminal where your Redis server is running and you should receive a PONG response. If you get this response, you are ready to use DacheQL with Redis!
Now that your Redis server is up and running, in your backend server file, import Redis like so:
const redis = require('redis');
After importing Redis, you will have to create your Redis client which can be done as so:
const client = redis.createClient(REDIS_PORT);
Replace the text REDIS_PORT with your own Redis port (typically 6379).
Lastly, connect your client!
client.connect();
In order to cache your graphQL query responses, all you have to do is call our DacheQL function as middleware in your /graphql endpoint. The parameters for our function are as follows:
app.use(
    '/graphql',
    dacheQL({ redis } = {<redis: client>}, capacity, endpoint, TTL),
    expressGraphQL({
      schema: schema,
      graphiql: true,
    })
  );
The first parameter is to let the function know whether you are using Redis or not as your cache. If you are, you will have to pass Redis into the function as {redis: client} like so.
The second parameter is the capacity for our custom LRU cache. If you are using Redis as your cache, just default to leaving the cache at 50.
The third parameter is the endpoint at which you are actually using GraphQL. For example, this endpoint may be http://localhost:3000/graphql.
Our last parameter is the Time to Live, or how long you want this specific query to last in your cache for. Pass in your time to live as seconds. Now you are good to cache your GraphQL responses!
Using DacheQL without Redis
If you are not using Redis caching, DacheQL provides a middleware for caching using the server’s memory with our custom cache that behaves with an LRU eviction policy. The arguments you should input for this middlware are as follows:
For the first parameter, since you are not using Redis, simply pass in an empty object {} like so.
Next, is the capacity you would like your cache to hold. This capacity refers to when our cache will begin evicting items. For example, if you set the capacity to 50, it will evict an item upon the 51st unique query. It should be noted that if you pass in a non-whole number, it will be rounded down for you. Non integers, negative numbers, and capacities below two will default to simply creating a GraphQL fetch without storing values in the cache.
The third parameter is the endpoint at which you are actually using GraphQL. For example, this endpoint may be http://localhost:3000/graphql.
Our last parameter is the Time to Live, or how long you want this specific query to last in your cache for. Since we aren’t using Redis here, just pass in anything for your TTL as our cache is not reliant on this information. Now you are good to cache your GraphQL responses!
app.use(
    '/graphql',
    dacheQL({}, capacity, endpoint, TTL),
    expressGraphQL({
      schema: schema,
      graphiql: true,
    })
  );
Now, you have properly set up the middleware functions in order to use DacheQL’s caching tools!
How does our LRU cache work?
- Here’s the breakdown of how the LRU caching algorithm works.
- After ascertaining that the developer is not using Redis the first thing we do is consider all edge cases like invalid or missing URLs or capacities. If you pass an invalid URL you will be thrown an error as this is essential. With regard to the capacity, if you pass in a non-whole number, it will be rounded down for you. On the other hand, nonintegers, negative numbers, and capacities below 1 will default to simply creating a GraphQL fetch without storing values in the cache. Now we can get started.
- Our algorithm utilizes object-orientated programming to devise a hashmap and linked list that work synergistically to maintain constant time (O1). We use the hashmap for its constant time in look-up and then we use the linked list for its constant time in updating, deletion, and creation. We have built several methods that accomplish functionality regarding how we delete and add to the LinkedList and the hashmap at the same time. There are also several methods that combine the previously devised methods to accomplish more specific tasks that will lead to our cache exhibiting LRU evicting behavior.
- First, we deconstruct your query request from your request body for later use.
- Put simply there are two more major scenarios we will check for. If your query is in our cache or not. If it isn’t, we will fetch it for you and add the data to the front of the list and hashmap along with returning the query result to you. If it is in the cache we will update the hashmap and LinkedList by removing said item and reinstating it at the front of the linked list and return the query result to you.
- When we update our list there is also the consideration of the capacity laid out and the size of our cache at this point. The whole point of evicting data from your cache is to keep your data predictable and maintainable so as to not pollute your memory. If your attempting to add data onto the cache when the capacity isn’t hit, it simply adds the data to the hashmap and the head of the linked list, where the most recently touched information sits. As a result, whatever is at the tail is the least recently touched data. Conversely, if you are trying to add data to the cache when you have hit your capacity we will evict the tail and remove it from the hashmap as well, before instating this new data as the new head of the linked list along with adding it to the map.
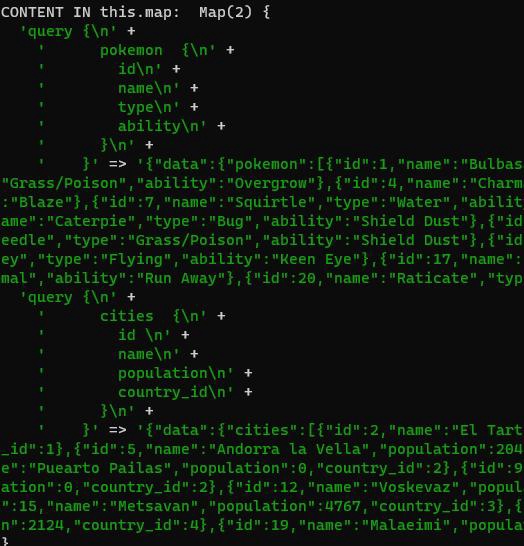
In the example above, you can see that we have run two queries for Pokemon and Cities respectively. For this instance, our capacity is set to 2. Those two queries and their respective data are shown above in our hashmap.
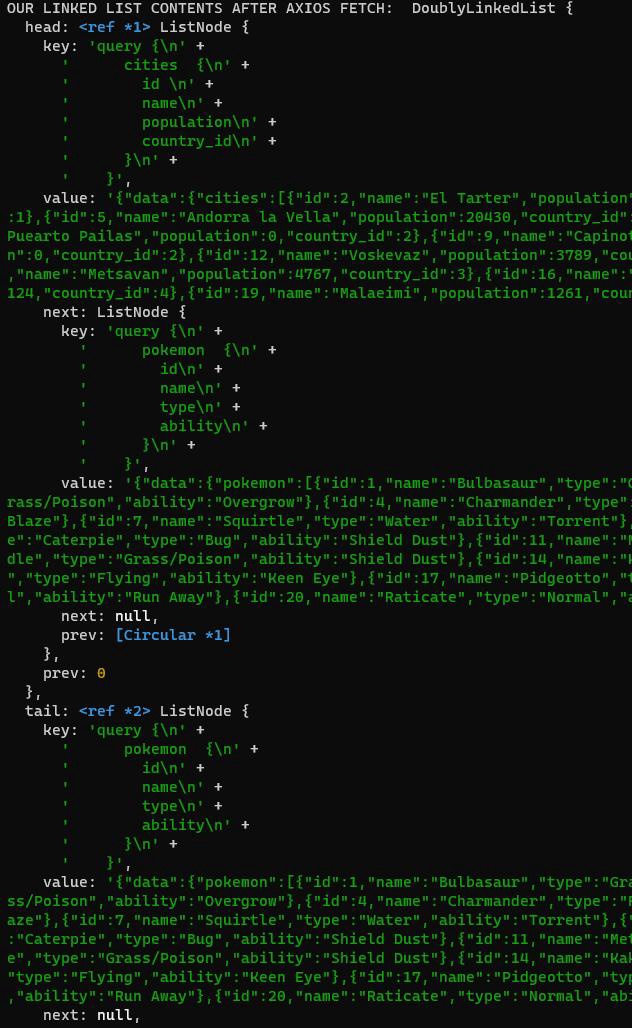
Here you can see those same two queries in the corresponding linkedlist.
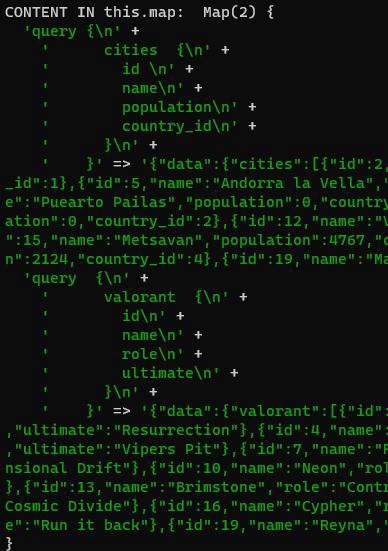
With this photo, you can see we have run a new query for Valorant and its corresponding data is placed in the hashmap. Now since pokemon was the oldest query it has been evicted from the hashmap.
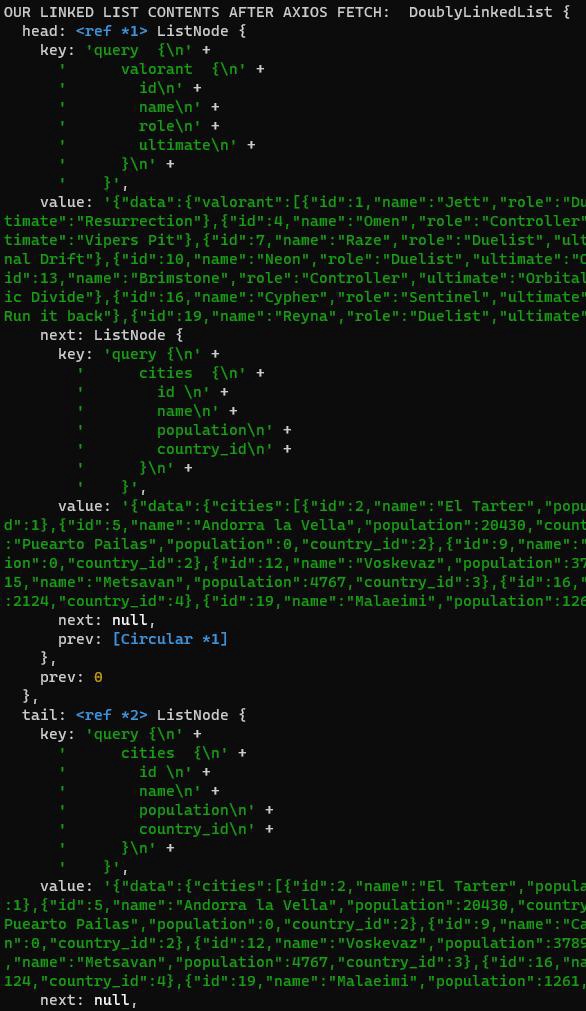
You can also see with this linked list Pokemon has been evicted as well.
- Obviously, this is heavily simplified, but hopefully, this helps clear up the functionality of the LRU algorithm we use if you choose not to use Redis.
Technologies used
- Node
- Express
- React
- Material-UI
- Bootstrap
- ChartJS
- Redis
- GraphQL
- TypeScript
- Jest
- Supertest
- AWS RDS
- Webpack
How to contribute
Here at DacheQL we created our open-source project with the intention to further expand upon and imprve this tool for years to come.
That’s where the community comes in! If your have an idea that might make DacheQL better we always encourage contributions. Simply follow the steps below to submit the changes you would make.
- Fork DacheQL
- Pull down our dev branch with command (
git pull origin dev) - Create your own Feature Branch with the command (
git checkout -b <yourFeatureName>) - Add your changes with the command (
git add .) - Stage and commit your changes with the command (
git commit -m "<your comment>") - Merge your branch with the dev branch locally with the command (
git merge dev) - Resolve any merge conflicts
- Push up your branch with the command (
git push origin <your feature branch name>) - Open a pull request
- Don’t forget to star this repo! We look forward to your contributions!
License
Distributed under the MIT license.
Authors
- Andrew Moy Github | Linkedin
- ChunHao Zheng Github | Linkedin
- Ethan Chuang Github | Linkedin
- Sandy Liu Github | Linkedin