React-Neos
react-neos is a wrapper around the react-render-component library, where instead of a HTML dom it's a neos object!
Try this out on glitch.com
The general idea
This creates objects in Neos using React, this provides versioning, diffing, and many other quality of life features to Neos development.
There are two sections in the system, the Client Side and Server Side. They communicate using a websocket with a horrible text format.
This roughly resembles C#'s server size blazor, where the server tells the client what changes to make and the client sends back events, although events are not currently supported in react-neos.
You can also use react-neos to make objects and then strip off the neos-react boilerplate, this is especially useful for designing UIs and is referred to as printer-mode.
Getting Started
react-neos is a custom renderer for react, and for the most part online tutorials for react apply to react-neos. I suggest doing the Getting Started page for react itself as your first steps with this library.
If you need help, feel free to reach out on Discord.
Past this point it is assumed you have gone through the React tutorial
The main differences with react-neos versus normal react are:
- Component names are different (because it's neos, not HTML)
- Events are not yet supported
- Refs are not yet supported, but when they are they will act slightly different than
reactrefs.
Installing react-neos
react itself is a peer dependency of react-neos, this means libraries that plan to start a react-neos server must also add react as a dependency.
react-neos runs on nodejs, through either npm or yarn.
With yarn:
yarn add react-neos react
With npm:
npm install react-neos react
Common Patterns
Launching a react-neos server
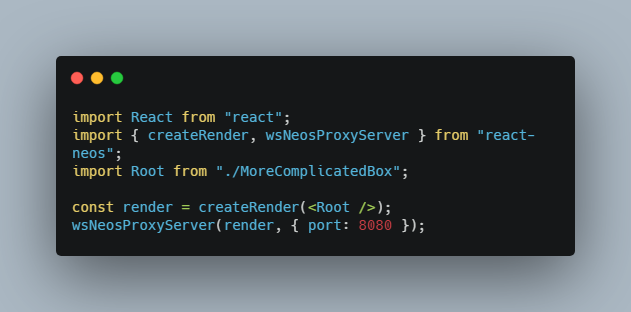
In general it is suggested all react-neos consumers use the same boilerplate as below, this is a launch file that does the server setup part of this process, it looks like this:
>> server.jsx
import React from "react";
import { createRender, wsNeosProxyServer } from "react-neos";
import Root from "./MoreComplicatedBox";

const render = createRender(<Root />);
wsNeosProxyServer(render, { port: 8080 });
This hosts a websocket server on port 8080, and then renders the root component when a client connects. This is the standard way to use react-neos and is recommended for most use cases.
This is the same as ReactDOM.render, which is used with the web version.
createRender sets up the renderer that proxies events to neos, in the future this will get additional arguments. For now use it directly and then call wsNeosProxyServer to start serving the ws server.
In the future different types of services can be provided to renderForEach, for now only the websocket server is provided out of the box.
All of the example code below are as if they were defined in Root.jsx, a file right next to this server.jsx file.
Property types
react-neos uses objects for most props, for instance a float3 value of [1,2,3] is defined as {x: 1, y: 2, z: 3}. This is a bit verbose, and it's suggested you make helpers to create these objects.
In the future helpers may be included by default, for now it is manual.
NOTE: if one of these fields is not defined it is considered 0, with the exception of the a channel for Color, that is defaulted to 1.
For this reason, be careful when defining a scale property as undefined components will currently default to 0. This may change in the future.
NOTE 2: Rotation is currently a float3, this may change in the future.
A small red box
Technical jargon is bland, here's some examples instead.
Here is a piece of JSX code that creates a small red box inside neos.
import React from "react";
import n from "react-neos";

const SmallRedBox = () => {
  return <n.box name="tiny square thing" size={{x: 100, y: 20000, z: 0.01}} albedoColor={{r: 1, g: 0, b: 0}} />;
};

export default SmallRedBox;
This jsx element as the element type of box, and sets the props of name, size, and albedoColor.
The n. part of box is to prevent a name collision with the core React library, where box is used in drawing SVGs. If the prefix wasn't there, intellisense would suggest SVG based props as well as the react-neos props, which while that wouldn't break anything, it would be confusing. It is highly suggested to always use the n. prefix (or whatever prefix you define) for this reason.
This generates the following hierarchy in Neos, which renders as a very small red box.
React-Neos-Root
  tiny square thing - contains a mesh renderer, material, and procedural mesh.
I'm cheating here, there is really more hidden above React-Neos-Root and below the slot tiny square thing, but for now that doesn't matter.
In terms of the above code, the ReactNeosServer
A more complicated example: A complicated red box
This isn't all that interesting, we made a tiny box, something you can do in neos in less than a minute! If you're doing something simple like a single box, React-Neos is likely not worth it for your use case.
Here's an example of where React-Neos is useful.
import React from "react";
import n from "react-neos";

const MoreComplicatedBox = () => {
  const [buttons] = React.useState(() => [{
    text: "Option A",
    color: {r: 1}
  },
  {
    text: "Option B",
    color: {g: 1}
  },
  {
    text: "Option C",
    color: {b: 1}
  }]);

  return <n.transform>
  <n.box name="tiny square thing" size={{x: 1, y:2, z: 0.01}} albedoColor={{r:1}}/>
    <n.canvas name="Box canvas" position={{x: -0.5, y: 0, z: 0}}>
      <n.verticalLayout>
        {buttons.map((button, index) =>
          <n.text key={index} color={button.color}>
          {button.text}
        </n.text>
        )}
      </n.verticalLayout>
    </n.canvas>
  </n.transform>;
}

export default MoreComplicatedBox;
OK, that is way more complicated... Let's walk through what this is doing.
MenuBox
const [buttons] = React.useState(() => [{
    text: "Option A",
    color: {r: 1}
  },
  ...
]);
buttons is a list of buttons we want the box to show, we only encode the data we care about, such as "I want the first button to be Option A and red." you do not need to care about text size or styling.
  return <n.transform>
  <n.box name="tiny square thing" size={{x: 1, y: 2, z: 0.01}} albedoColor={{r: 1}}/>
    <n.canvas name="Box canvas" position={{x: -0.5, y: 0, z: 0}}>
      <n.verticalLayout>
        ...
      </n.verticalLayout>
    </n.canvas>
  </n.transform>;
This creates a box as before, but also adds a canvas inside the box at specific offset, and adds a slot to act as a horizontalLayout.
This is not too different from Neos so far, we're still defining a fixed structure.
{buttons.map((button, index) =>
  <n.text key={index} color={button.color}>
    {button.text}
  </n.text>
)}
This is where things get interesting, we're telling react that for each item in the button array, we want a text UIX element with a different color and text.
key is a react specific thing, in printer-mode it is not really needed, however it is good practice and react will print warning messages into the console if you don't include them. See the react documentation about keys for specifics.
So far we haven't saved that much...
We haven't really defined anything special yet, we've saved needing to duplicate and customize a slot... that is not really saving much effort. Where react-neos improves this is when you need to update the content.
Once we make the above example, we see we're adding red text over a red box, which is not all that legible. Let's update the code for adding a backdrop behind the text so it's more legible.
{buttons.map((button, index) =>
  <n.image key={index} color={{}}>
    <n.text color={button.color}>
      {button.text}
    </n.text>
  </n.image>
)}
And we're done, when the box is rendered now each button has a black backdrop and colored text.
If we were to make these changes inside Neos, we'd need to create an image object, set it to black, then duplicate it for every text element, and then re-parent hoping the order was correct.
Below this point is in progress documentation wise, expect breaking changes and incomplete or incompatible APIs.
Creating a new template
React-Neos
  Templates
    nBox
      ****
        __this
        __proxy
        name
        size
        albedoColor
        ... others ...
  Staging
  Root
    tiny square thing
      1
        __this
        __proxy
        name
        size
        albedoColor
        ... others ...
  Logix
Pretty much all of this can be ignored, but it's good to see how these things map together.
Root is where React-Neos creates objects.
Templates contains nBox, the same name as in the JSX element. This is how templates are found. If you wish to install a new template, simply place it inside Templates and ensure it starts with a lowercase letter.
Staging is a special slot that is used during construction, for now it's not important.
Below each template is a slot dubbed an element proxy (it even must be tagged react-neos-element-proxy), in this case it looks like **** in the template and 1 in the live element. All of the logic for how React-Neos is stored on this element proxy. When in Printer-mode the tool simply deletes all instances of these proxies out of Root, and the printed object is detached from React-Neos
The slots below the element proxy are field proxies. These field proxies don't need to be separate slots, but it makes development much easier. Each field proxy uses the slot name of the slot as the name of the prop the field is bound to. This can show you what fields are available
__this and __proxy (and another field, __children) are special, they're not exposed via props and are used internally by the React-Neos client.
__this points to the root of the element, in this case nBox.
__proxy points to the element proxy.
__children points to where any children should be placed.
Message Format
Due to Neos not having serialization support, the message format between the client and server is custom.
In the future JSON is likely to be used, but for now the format is designed for ease of parsing on the Neos side, not for readability or maintainability.
Signals
A single websocket message may contain multiple signals in sequence, there are four kinds of signals.
The word Signal was used to disambiguate it from websocket messages.
create signals spawn an instance of the element type into a staging location and initialize the instance with the provided element ID. Before this point the element ID should be unused.
create+1+nBox
create+2+nTransform
remove deletes the element from the hierarchy. If root is deleted, the children of root are deleted instead.
remove+root
remove+2
update sends new values to populate the element with, a value of $ means the field was nulled and should return to its default value. Only changed values are sent.
update+4+rotation=floatQ=[0;0;0]+scale=float3=$
update+3+speed=float3=[0;60;0]
setParent moves the target element to be a child of the parent element. If a previous element is specified (the provided ID is not $) the target element will be inserted just after the previous element. If not specified the target element is inserted at the end of the parent element's children.
setParent+4+5+$
setParent+5+root+2
Delimiters
The format is a suffix tagged block of signals, each signal is terminated with a marker symbol.
String property updates are the only dynamic
The values of string property updates are urlencoded (because it's what neos supports escaping wise), all marker symbols are character that are escaped in urlencoded format. This way encoded strings can't break parsing Neos side.
Each signal is separated using the | symbol.
create+1+nBox|create+2+nTransform|update+2+position=float3=[5;0;0]
Each signal field is separated with a + symbol
create+2+nTransform
Each property update of an update signal is separated with a = symbol.
update+4+rotation=floatQ=[0;0;0]+scale=float3=[1;1;1]