Building a Lensa-like app with Blueprint
Background
Blueprint is a fine-tuning and serving infrastructure platform for software developers who are comfortable with backend and frontend engineering but lack expertise in model development and hosting.
Blueprint works great for building user-facing applications with fine-tuned models. One popular type of app using fine-tuning is AI avatar generation apps. This project implements a simple version of an avatar generation app like Lensa using Blueprint.

This repo contains:
- A tutorial on building your own avatar generation application
- Code snippets for a lightweight front-end and back-end application that allows users to authenticate, upload some data, and kick-off a fine-tuning job before allowing them to use their models to generate new photos
Tutorial
Prerequisites
- A Blueprint account For fine-tuning, plus a valid API key. https://docs.blueprint.baseten.co/getting-started
- A Supabase account for storage and user state management
- A Vercel account for deploying your NextJS application
Creating your Next.js App and Setup
We’ll be using Next.js for building the front-end, and Supabase for authentication.
To get set up:
git clone [email protected]:tuhins/fine-tuning-app.git
npm install
npm run dev
Once you clone this repo, you can see the relevant parts of the application:
Follow the instructions here to create a basic Supabase project.
Add your NEXT_PUBLIC_SUPABASE_URL and NEXT_PUBLIC_SUPABASE_ANON_KEY to the .env.local in the project root folder. The file’s contents should look like:
NEXT_PUBLIC_SUPABASE_URL=https://XXXXXXXX.supabase.co
NEXT_PUBLIC_SUPABASE_ANON_KEY=YYYYYYYYY
Collecting user data
We’re using Supabase storage to collect files from users which we zip up, upload to Supabase and then pass that URL to Blueprint.
First set up a Supabase bucket for storing data. You can follow the great guide from Supabase to get started (call it something like fine-tuning-bucket; if you call it something else you’ll have to update the index.tsx. Make sure to set the policy as open for reading, writing, deleting and updating data; here is what your policy should look like. The bulk of the work here is done by the upload handler, which collects images from the user via an input component, zips them up and uploads the blob to Supabase. Supabase provides a publicly accessible URL to pass through to the Blueprint API.
Next, create a new table in Supabase called finetuningruns. We’ll be using this table to link users with fine tuning runs created through Blueprint. For this purpose of this demo, disable Row-Level-Security. This table only needs a few columns:
Fine tuning routes
Blueprint provides a simple SDK — given a set of images, it’s straightforward to programmatically schedule fine-tuning jobs, deploy fine-tuned models, and provides an inference API for the deployed model. It also provides a dataset API for validating uploaded user data, but we won’t be using that in this demo.
Blueprint also provides a serverless backend to be able to build on top of its fine-tuning SDK. Think of these like Flask routes. We’ll set up some serverless routes that interact with the fine-tuning SDK. We’ll write this code in the Blueprint web IDE.
Create a new Blueprint project
First, we’ll get set up on Blueprint.
- Go to https://app.baseten.co/blueprint/projects
- Click New Project
- Copy URL with the project ID
- Back in this repository, go to
index.tsxand update the Blueprint project route

Quick overview of Blueprint endpoints
Blueprint endpoints are like serverless functions. They are defined in the main.py file accessible via the sidebar in your Blueprint project. They run in a fully-managed environment — its requirements can be defined and managed in the requirements.txt file also accessible via the sidebar in your Blueprint project. You can read more about Blueprint endpoints.
All the code referenced below should be used via Blueprint endpoints. The full-code can be found in the main.py, and in the requirements file.
Endpoint for triggering a fine-tuning job
We’ll create a endpoint that takes the url of a fine-tuning job and a user identifier to trigger a fine-tuning job. Names must be unique, and ensure that permissions on the file are set to open or whatever you can configure from the backend. We’ll store a link between the user, the dataset and the fine-tuning run in a Supabase table.
@route(path="/fine_tune_model", allowed_domains=["http://localhost:3000"], allowed_methods=["POST"])
def fine_tune_model(request):
    request_body = request["body"]
    url = request_body.get("url")
    user_id = request_body.get("user_id")
    now = datetime.now() # current date and time
    name_of_model = f'{user_id} training run {now.strftime("%m/%d/%Y, %H:%M:%S")}'
    instance_prompt = request_body.get("prompt")
    dataset = PublicUrl(f'{SUPABASE_PREFIX_URL}{url}')
    config = DreamboothConfig(
        instance_prompt=instance_prompt,
        input_dataset=dataset,
        train_text_encoder=False,
        max_train_steps=20
    )
    run = FinetuningRun.create(
        trained_model_name=name_of_model,
        fine_tuning_config=config,
        auto_deploy=True)
    run_data ={ "run_id": run.id }
    create_or_update_user_data(user_id, url, run.id)
    return run_data


def create_or_update_user_data(user_id, dataset_url, run_id):
    client = get_supabase_client()
    user_data = get_user_data(user_id)
    if user_data:
        data = client.table("finetuningruns").update({
            "run_id": run_id,
            "dataset_url": dataset_url}).eq("user_id", user_id).execute()
    else:
        data = client.table("finetuningruns").insert({
            "user_id": user_id,
            "run_id": run_id,
            "dataset_url": dataset_url
        }).execute()


def get_user_data(user_id):
    client = get_supabase_client()
    data = client.table("finetuningruns").select("*").eq("user_id", user_id).execute()
    if data.data:
        return data.data[0]
    return None
Endpoint for checking the status of the model
Next, we’ll create a route to check the status of the fine-tuning and deployment. We don’t want hit the model if it’s not healthy, and this will allow us to block the user for doing so.
@route(path="/model_status", allowed_domains=["http://localhost:3000"], allowed_methods=["POST"])
def model_status(request):
    user_data = get_user_data(request["query"]["user_id"])
    run_id = user_data.get("run_id")
    if not run_id:
        return { "healthy": False, "model_id": None }
    run = FinetuningRun(id=run_id)
    run.refresh()
    model = run.deployed_model.baseten_model
    return {
        "healthy": model.status == "MODEL_READY" if model else False,
        "model_id": model.id if model else None
    }
Endpoint for calling the model
Lastly, we’ll the inference API to call the deployed model. This is a light wrapper around the SDK to pass the user instance to the model. The Baseten model will call the model and upload the output to a publicly accessible URL.
@route(path="/call_model", allowed_domains=["http://localhost:3000"])
def call_model(request):
    request_body = request["body"]
    instance_prompt = request_body.get("instance_prompt")
    run_id = request_body.get("run_id")
    run = FinetuningRun(run_id)
    model = run.deployed_model
    image, url = model(instance_prompt)
    return {
        "url": url
    }
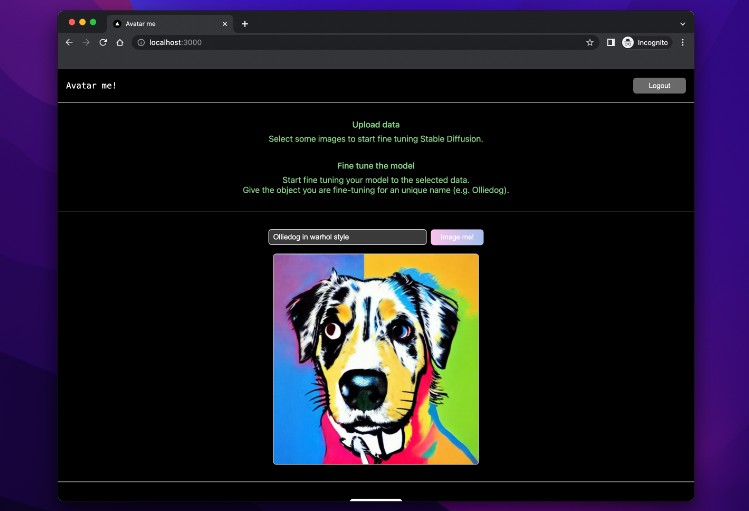
Create inference UI
Lastly, we’ll write some front-end to take some user input, and upon clicking a button hit the call model endpoint, and show the image to the user.
Sign up and/or login at http://localhost:3000/login, and get started!
Hosting the model on Vercel
This was a simple NextJS app that can be hosted on Vercel. Follow Vercel’s NextJS tutorial to get started.
There will be two additional steps to make this all work end-to-end:
- Update the
NEXT_PUBLIC_SUPABASE_URL,NEXT_PUBLIC_SUPABASE_ANON_KEYenvironment variables - Update the allowed-domains in the Blueprint routes to includes the URL of the hosted site
@route(path="/fine_tune_model", allowed_domains=["http://localhost:3000", "your-domain-on-vercel"], allowed_methods=["POST"])
