Codecademy Jammming Project
Project Goals
I. Project Context
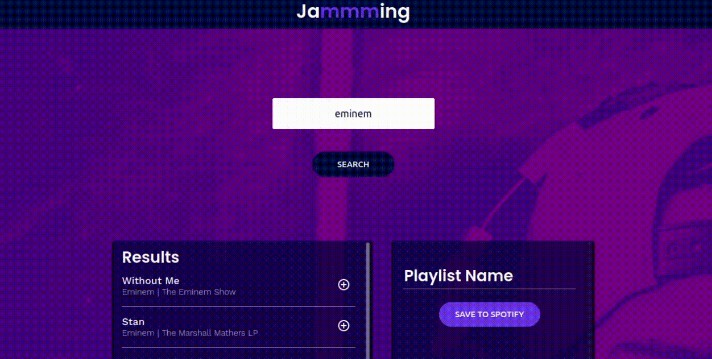
- In this project, you will build a React web application called Jammming. You will use your knowledge of React components, state, and requests with the Spotify API to build a website that allows users to search the Spotify library, create a custom playlist, then save it to their Spotify account.


II. Project Features
- Spotify Login — the first time a user searches for a song, album, or artist, Spotify will ask them to log in or set up a new account.
- Search by Song, Album, or Artist — a user can type the name of a song, artist, or album into the search bar and click the SEARCH button.
- Populate Results List — Jammming displays the list of returned tracks from the user’s query.
- Add Song to a Custom Playlist — users can add a track to their playlist by selecting a + sign on the right side of the track’s display container.
- Remove Song from Custom Playlist — users can remove a track from their playlist by selecting a – sign on the right side of the track’s display container.
- Change Playlist Title — users can change the title of their custom playlist.
- Save Playlist to Account — users can save their custom playlist by clicking a button called SAVE TO SPOTIFY.
III. Resources
-
Because we want you to focus on building the React infrastructure, we have provided links to the HTML/CSS and visual assets below. Notice, we did not break the HTML and CSS into their components. To complete the project you will need to split the HTML/CSS into their components.
index.html — all of the HTML for a static version of the website.
style.css — all of the CSS for a static version of the website.
image assets — all of the image assets used in the website.
Built with
- React
- Dependencies: boxicons, sweetalert2
- Git, GitHub
How to use
I. Application setup
- Create an application in your Spotify developer accout.
- Add your application url
localhost:3000 (for example)to your application Redirect URIs. - Change your
.envfileREACT_APP_API_KEYto your application Client ID andREACT_APP_REDIRECT_URLto your application url.
II. In the project directory, you can run:
npm start
Runs the app in the development mode.
Open http://localhost:3000 to view it in your browser.
The page will reload when you make changes.
You may also see any lint errors in the console.
npm test
Launches the test runner in the interactive watch mode.
See the section about running tests for more information.
npm run build
Builds the app for production to the build folder.
It correctly bundles React in production mode and optimizes the build for the best performance.
The build is minified and the filenames include the hashes.
Your app is ready to be deployed!
See the section about deployment for more information.
npm run eject
Note: this is a one-way operation. Once you eject, you can’t go back!
If you aren’t satisfied with the build tool and configuration choices, you can eject at any time. This command will remove the single build dependency from your project.
Instead, it will copy all the configuration files and the transitive dependencies (webpack, Babel, ESLint, etc) right into your project so you have full control over them. All of the commands except eject will still work, but they will point to the copied scripts so you can tweak them. At this point you’re on your own.
You don’t have to ever use eject. The curated feature set is suitable for small and middle deployments, and you shouldn’t feel obligated to use this feature. However we understand that this tool wouldn’t be useful if you couldn’t customize it when you are ready for it.
Challenges and Credits
This was a practice project from the full stack program at Codeacademy.
This was my first React project ❤️