dApp Development with React Workshop
In this workshop we will be building a DeFi application with a custom ERC20 token and staking vault using vite to bundle a React.js application and ethers library to connect to the blockchain. You can checkout the finished project here. The project is deployed on Avalanche Fuji Testnet, you can receive funds from testnet’s faucet here.
Initialize React Application with vite
vite next generation tooling for building frontend applications. Get started with vite by running following command.
npm create vite@latest
We can run the development server using npm run dev and local server will start will start with automatic reloads!
You can remove unnecessary markup and CSS that
vitecreates
Connecting to MetaMask
MetaMask adds a global object ethereum that can be used to interact with MetaMask. This object can be accessed by window.ethereum.
We can send requests to MetaMask using window.ethereum.request() method, we ask the user to connect their account by sending the eth_requestAccounts request. Details of this request can be found in MetaMask’s documentation.
const [account] = await window.ethereum.request({
    method: "eth_requestAccounts",
});
We can use useEffect and useState hooks to initialize account state when the component mounts.
Providing
[](empty array) to dependency section ofuseEffect(func, [])runsfunconly once when the component mounts!
const requestAccounts = async () => {
  if (!window.ethereum) {
    return null;
  }
  const [account] = await window.ethereum.request({
    method: "eth_requestAccounts",
  });
  return account;
};

function App() {
  const [account, setAccount] = useState(null);

  useEffect(() => {
    requestAccounts().then(setAccount).catch(console.error);
  }, []);

  //...
}
How ever there are two problems here! First the user gets prompted before they can see the app and if they change their account the app doesn’t update!
Listening to Account Changes
ethereum object is an EventEmitter so we can listen to accountsChanged event when we initialize our application.
window.ethereum.on("accountsChanged", accounts => {
  setAccount(accounts[0]); // set new account state
});
Accessing Accounts
There is an alternative method called eth_accounts that query MetaMask if the user has already connected their account to our application. If user has already connected their account MetaMask will simply return the account without prompting.
const [account] = await window.ethereum.request({
  method: "eth_accounts",
});
Interacting with EVM using ethers
We will be using ethers to interact with the blockchain. ethers can be installed with npm simply by running following command in the terminal.
npm i ethers
ethers library includes multiple types of providers for accessing onchain data. These include popular providers like InfuraProvider (a popular JSON-RPC endpoint provider, website), generic providers such as JsonRpcProvider and Web3Provider which connects using MetaMask.
We can initialize our provider with global ethereum object as follows.
import { ethers } from "ethers";

// ...

const provider = new ethers.providers.Web3Provider(window.ethereum);
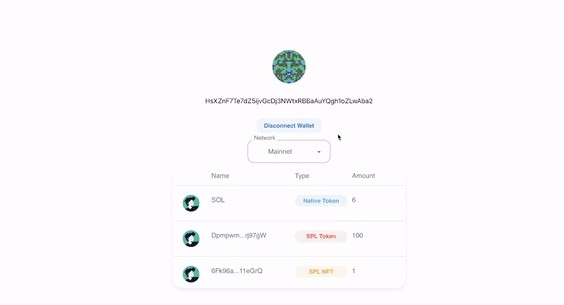
Having initialized our provider we can now access chain data! Let’s start by building a Balance React component that display’s chain’s default coin in this case AVAX. Balance component receives account and provider as props and computes the balance and displays it.
const Balance = ({ provider, account }) => {
  const [balance, setBalance] = useState("");

  useEffect(() => {
    const getBalance = async () => {
      const balance = await provider.getBalance(account);
      return ethers.utils.formatEther(balance);
    };
    getBalance().then(setBalance).catch(console.error);
  }, [account, provider]);

  if (!balance) {
    return <p>Loading...</p>;
  }
  return <p>Balance: {balance} AVAX</p>;
};
We derive our balance state from account and provider using useEffect hook. If the user changes their account their balance is recalculated. We use provider.getBalance(account) function to access user’s AVAX balance and convert it to string using formatEther function.
In EVM balance of a ERC20 token is stored as a unsigned 256-bit integer. However, JavaScript
Numbertype is a double-precision 64-bit binary format IEEE 754 so balance of an account can be larger than JavaScript’s numbers allow.etherslibrary represents these numbers asBigNumbertype andformatEtherutility function can be used to convertBigNumbertoString.
Balance of Custom ERC20 Token
What is web3 without custom tokens? Let’s bring our project’s ERC20 token into our application. To do this, we will be using ethers.Contract. This class can be used to instantiate custom EVM contracts from their address and ABI.
ethers.Contractis a meta class under the hood, meaning it’s a class that creates classes not instances!Contractclass receives ABI and constructs a new class that has ABI’s exported properties.
For our purposes ERC20 token called ‘AtaToken (ATA)’ has deployed to Avalanche Fuji testnet at 0x47741C56064B4c129d585CEe9A9d3A3dB7CDA9ce. We can use SnowTrace block explorer to inspect contract’s methods and ABI, token contract on explorer can be found here. We can import ABI as a regular JSON file and initialize contract!
import AtaTokenABI from "../../abi/ataToken.abi.json"; // Path to ABI's JSON file

const ATA_TOKEN_ADDRESS = "0x47741C56064B4c129d585CEe9A9d3A3dB7CDA9ce";
const ATA_TOKEN = new ethers.Contract(ATA_TOKEN_ADDRESS, AtaTokenABI);
Then, we can read token balance using balanceOf(address) method similar to AVAX balance.
useEffect(() => {
  const getBalance = async () => {
    const ataToken = ATA_TOKEN.connect(provider);
    const balance = await ataToken.balanceOf(account);
    return ethers.utils.formatEther(balance);
  };
  getBalance().then(setBalance).catch(console.error);
}, [provider, account]);
As expected AtaToken balance turns out to be 0. Fortunately, AtaToken contract exports a function to obtain some tokens.
Claiming AtaToken
We can check if an account has claimed using a similar function claimed() function and we can modify useEffect to check when the AtaBalance mounts.
const getBalanceAndClaimed = async () => {
  const ataToken = ATA_TOKEN.connect(provider);
  const [balance, claimed] = await Promise.all([
    ataToken.balanceOf(account),
    ataToken.claimed(),
  ]);
  return [ethers.utils.formatEther(balance), claimed];
};
Promise.all([awaitable1, awaitable2, ...])can be used to await multiple async calls at the same time and receive resolved promises in order awaitables’ order.
If the user hasn’t claimed we can a render a button that when pressed will invoke claim() method on the contract. Since, we are modifying state of blockchain it’s not enough for us to use a Provider as they provide a readonly view of blockchain. We will be using Signer which can used to send transactions.
const claim = async () => {
  const signer = provider.getSigner();
  const ataToken = ATA_TOKEN.connect(signer);

  const tx = await ataToken.claim();
  await tx.wait();
}
If we refresh the page we can see our funds arrive! However, it isn’t such a good user experience if they have to refresh the page every time they make transaction. With some refactoring we can solve this issue.
const getBalanceAndClaimed = async (account, provider) => {
  const ataToken = ATA_TOKEN.connect(provider);
  const [balance, claimed] = await Promise.all([
    ataToken.balanceOf(account),
    ataToken.hasClaimed(account),
  ]);
  return [ethers.utils.formatEther(balance), claimed];
};

const AtaToken = ({ account, provider }) => {
  // `AtaToken` component state

  const claim = async () => {
    // ...
    await tx.wait();

    getBalanceAndClaimed(account, provider)
      .then(/* set balance and claimed */)
      .catch()
  };

  useEffect(() => {
    getBalanceAndClaimed(account, provider)
      .then(/* set balance and claimed */)
      .catch()
  }, [provider, account]);

  // ...
}
Adding AtaToken to MetaMask
Even tough, users can claim their tokens, AtaToken doesn’t show up in MetaMask wallet. We can remedy this situation by sending wallet_watchAsset request through global ethereum object. We provide address of the token, symbol, decimals and lastly image for MetaMask to use.
const addAtaTokenToMetaMask = async () => {
  if (!window.ethereum) {
    return false;
  }
  try {
    const added = await window.ethereum.request({
      method: "wallet_watchAsset",
      params: {
        type: "ERC20",
        options: {
          address: ATA_TOKEN_ADDRESS,
          symbol: "ATA",
          decimals: 18,
          image: "https://ata-token.netlify.app/opn.png",
        },
      },
    });
    return added;
  } catch (error) {
    return false;
  }
};
Integrating Staking Contract
ERC20 allocation staking is one of most common practices in web3 launchpads and DeFi applications. Usually, users lock some amount of funds into smart contract and receive certain amount of rewards funds in return as interest. In case of launchpads like OpenPad in addition to receiving interest users are able to invest in launchpad project.
Lastly, for our application we will integrating a staking contact. AtaToken staking contract is deployed at 0x1710c59920D83c31c1162C5d66730E78cF22b6dD and we can inspect the contract code and ABI here.
Staking contract exports stake and reward token amount for a given address and also total staked token amounts. We can read these values like any other contract value using getStaked(), getReward() and getTotalStaked() respectively.
const getStakingViews = async (account, provider) => {
  const signer = provider.getSigner(account);
  const staking = STAKING_CONTRACT.connect(signer);
  const [staked, reward, totalStaked] = await Promise.all([
    staking.getStaked(),
    staking.getReward(),
    staking.getTotalStaked(),
  ]);
  return {
    staked: ethers.utils.formatEther(staked),
    reward: ethers.utils.formatEther(reward),
    totalStaked: ethers.utils.formatEther(totalStaked),
  };
};
Staking and Withdrawing Funds
Users can stake their tokens using stake(uint256 amount) function and withdraw their locked funds using withdraw(uint256 amount) function. Most important of them all they can claim rewards using claimReward() function. Since these functions modify state of the contract we have to use a Signer.
We can write a simple form for user to fill out while staking and fire off relevant contract function when the form is submitted.
const Staking = ({ account, provider }) => {
  // ...
  const [stake, setStake] = useState("");

  const handleStake = async event => {
    event.preventDefault(); // prevent page refresh when form is submitted
    const signer = provider.getSigner(account);
    const staking = STAKING_CONTRACT.connect(signer);

    const tx = await staking.stake(ethers.utils.parseEther(stake), {
      gasLimit: 1_000_000,
    });
    await tx.wait();
  };
  // ...
  return (
    <div>
        {/* ... */}
        <form>
          <label htmlFor="stake">Stake</label>
          <input
            id="stake"
            placeholder="0.0 ATA"
            value={stake}
            onChange={e => setStake(e.target.value)}
          />
          <button type="submit" onClick={handleStake}>
            Stake ATA
          </button>
        </form>
        {/* ... */}
    </div>
  );
};
Withdrawing funds from contract can be implemented similarly. However, if we try staking our tokens the contract will throw out an error! This is due to fact that we are not transferring native currency of the chain. While transferring ERC20 tokens into a contract we have approve a certain amount of allowance for that contract to use.
Allowance and Approval
We can check if for allowance of a smart contract –spender– from an address –owner– on ERC20 contract using allowance(owner, spender) view function. If allowance is less than amount we want stake, we have to increase the allowance by signing approve(spender, amount) message.
const handleStake = async event => {
  const signer = provider.getSigner(account);
  const amount = ethers.utils.parseEther(stake);

  const ataToken = ATA_TOKEN.connect(signer);
  const allowance = await ataToken.allowance(
    account,
    STAKING_CONTRACT.address
  );
  if (allowance.lt(amount)) {
    const tx = await ataToken.approve(STAKING_CONTRACT.address, amount);
    await tx.wait();
  }
  // ...
};
Voila! With allowance out of our way, we are free to stake and withdraw funds as we like.
Claiming Rewards
What is DeFi without rewards? Let’s finish off our application by allowing users to claim their rewards. This is simple task since we aren’t spending ERC20 tokens we don’t have to deal with the allowance. The user only has to sign claimRewards() function and we are done!
const handleClaimReward = async () => {
  const signer = provider.getSigner(account);
  const staking = STAKING_CONTRACT.connect(signer);

  const tx = await staking.claimReward({
    gasLimit: 1_000_000,
  });
  await tx.wait();
};
Next Steps
- Add TypeScript support for large DeFi applications
- Add
@tanstack/react-queryfor async state management - More smart contracts! Mint NFTs with ERC721?