⚔️ Slshx
Slshx is a slightly wacky, experimental, library for building strongly-typed
Discord commands
that run on Cloudflare Workers, using a
React-inspired syntax. It focuses on providing a great local development
experience, powered by ? Miniflare 2.
import { CommandHandler, Message, createElement, createHandler, useDescription, useNumber } from "slshx";

function add(): CommandHandler {
  useDescription("Adds two numbers together");
  const a = useNumber("a", "1st number", { required: true });
  const b = useNumber("b", "2nd number", { required: true });
  return (interaction, env, ctx) => (
     <Message ephemeral>{a} + {b} = {a + b}</Message>
  );
};

const handler = createHandler({
  applicationId: "...",
  applicationPublicKey: "...",
  commands: { add },
});

export default { fetch: handler };
Features
- ⚔️ Chat Input (Slash) Commands
- ? User Commands
- ✉️ Message Commands
- ? Strongly-Typed Command Options and API Bindings
- ? Auto-Deploy Commands on Change (think live reload, but for commands)
- ? Interactive Message Components (Buttons, Select Menus)
- ⚛️ React-Inspired Syntax
- ? Autocomplete for Command Options
- ? Highly Tree-Shakeable
- ✨ No Runtime Dependencies
Quickish Start
- Clone the
slshx-starter
repository. This includes a Miniflare and
esbuildsetup that removes unneeded local
development code when deploying to Workers. - Copy the
env.example.jsoncfile toenv.jsonc. ⚠️ Do not commit this file. - Create a new application in the
Discord Developer Portal. Copy
the Application ID and Public Key into thedevelopmentsection of
env.jsonc.

You will probably want to create 2 applications: one for development, and
one for production, using your deployed worker’s URL. - Click on OAuth2 in the sidebar, and copy your application’s Client
Secret into thedevelopmentsection ofenv.jsonc. ⚠️ Do not share this
secret with anyone! Keep this tab open, we’ll need to add some more stuff
later.

- Run
npm installin your cloned repository, thennpm run devto start the
local development server. - Setup
Cloudflare Tunnel
so Discord can reach your local development server when invoking your
commands. Follow
these instructions,
then when you’re ready to start the tunnel, run:
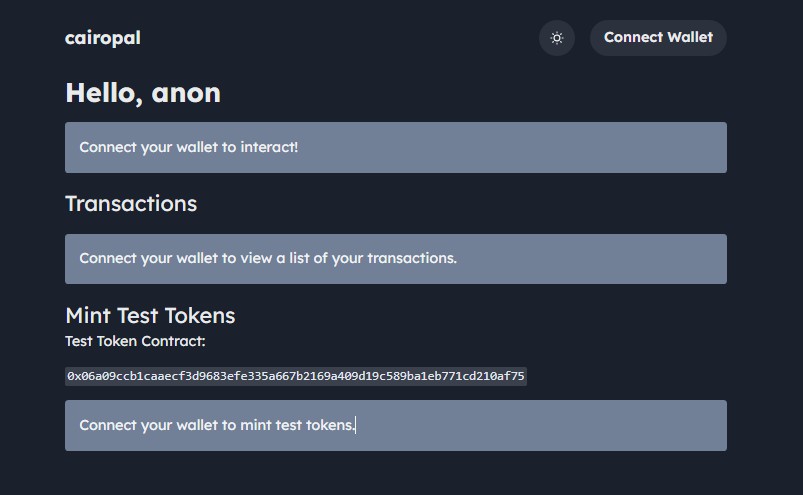
cloudflared tunnel --hostname <hostname> --url localhost:8787 --name slshx - Make sure your tunnel is working by visiting
https://<hostname>/in your
browser. This should show the ⚔️ Slshx landing page. Click the Add to
Server button to connect your application with one of your servers. You may
want to create a new one just for testing your commands.

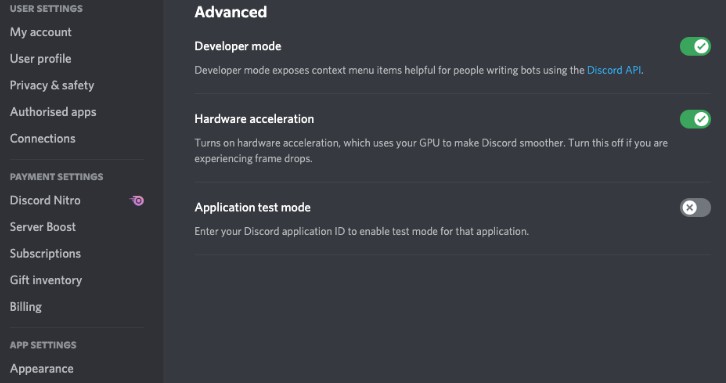
- Copy the ID of the server you just added your application to into
testServerIdinenv.jsonc. You can find this by enabling Developer
Mode in Discord’s Advanced App Settings, then right-clicking on the
server in the sidebar, and clicking Copy ID at the bottom of the menu.
Changes made to commands will appear instantly in this server during
development. ?


- Copy your Cloudflare Tunnel URL into the Interactions Endpoint URL field
under your application’s General Information in the Discord Developer
Portal, and then click Save Changes. You should see some requests from
Discord validating your endpoint in the local server logs.

- That’s it! ? You should now be able to try out the default
addcommand in
your server. Try changing the message insrc/add.tsx. Miniflare will
automatically reload your worker, and future command invocations will show
the new message.


Using in Existing Workers
The core of Slshx is the createHandler function. It takes an options object
and returns a function matching the signature of Cloudflare Workers
module fetch handlers.
If the worker is running in Miniflare, and applicationId, applicationSecret
and testServerId are specified, your commands are automatically deployed to
the test server. The returned handler will treat every incoming POST
request as a
Discord interaction,
unless you’re running in Miniflare and send a GET request, in which case the
landing page will be returned instead.
import { authorizeResponse, createHandler } from "slshx";

const applicationId = "...";
const handler = createHandler({
  applicationId,
  applicationPublicKey: "...",
  applicationSecret: "...", // optional
  testServerId: "...", // optional
  commands: {},
});

export default {
  async fetch(request, env, ctx) {
    const { pathname } = new URL(request.url);
    // Update your Interactions Endpoint URL to "https://<hostname>/interaction".
    if (pathname === "/interaction") {
      return handler(request, env, ctx);
    } else if (pathname === "/authorize") {
      return authorizeResponse(applicationId);
    } else {
      // ...other handlers
    }
  },
};
Defining Slash Commands
All commands in Slshx are defined as synchronous functions that take no
parameters and return another handler function that might be called once. They
must always call useDescription, and any other use* functions (referred to
as hooks) before returning the handler. You must not use the return values
of hooks outside a returned handler. Hooks must always be called in the same
order, and must not be called conditionally.
Once you’ve defined your command, include it in your application by adding it to
the commands option passed to createHandler. The key used in this object
will be the name of the command (what the user types), and must not contain :,
/, $, or # characters.
When deploying commands, Slshx will run your command function up to the first
return, recording which hooks are called.
When handling interactions, Slshx will run your command function with the
options provided by the user, returning these from hooks. The returned function
will then be called with interaction, env, ctx, at which point you are free to
use hook returns and should respond to the interaction.
interaction is the full incoming interaction,
including the invoking user, server (guild_id) and continuation token.
env and ctx are the same
parameters passed to the worker handler.
import { CommandHandler, createElement, createHandler, useDescription, useNumber } from "slshx";
import type { APIChatInputApplicationCommandInteraction } from "discord-api-types/v9";

type Env = { KV_NAMESPACE: KVNamespace; SECRET: string };

function add(): CommandHandler {
  // ✅: must call `useDescription`
  // ✅: must call hooks before returning handler
  useDescription("Adds two numbers together");
  const a = useNumber("a", "1st number", { required: true });
  const b = useNumber("b", "2nd number", { required: true });

  // ❌: must not use hook return values outside handler
  if (a > 5) {
    // ❌: must not call hooks conditionally
    const c = useNumber("c", "3rd number", { required: true });
  }

  // Return a handler function, this will get called at most once
  return (interaction, env, ctx) => {
    //    │            │    └ ExecutionContext
    //    │            └ Env
    //    └ APIChatInputApplicationCommandInteraction
    //
    // ✅: safe to use hook return values inside handler
    return <Message>{a} + {b} = {a + b}</Message>;
  };
}

const handler = createHandler({
  // ...
  commands: { add },
});

export default { fetch: handler };
Options
Slshx includes hooks for
all available option types.
If a user doesn’t provide a value for an option, the hook will return null.
All options take a name and description. They can be marked as required,
in which case Discord will enforce that a value is provided before submitting
the interaction. The return type of the hook excludes null in this case.
Some types have additional optional fields that control acceptable values.
import { ChannelType } from "slshx";
import type { APIUser, APIInteractionDataResolvedChannel, APIRole } from "discord-api-types/v9";

function cmd(): CommandHandler {
  useDescription("Command demonstrating option types");

  const s1 = useString("name", "Description");
  //    └ string | null
  const s2 = useString("name", "Description", { required: true });
  //    └ string

  const i1 = useInteger("name", "Description");
  //    └ number | null
  const i2 = useInteger("name", "Description", { min: 5, max: 100 });

  const b = useBoolean("name", "Description");
  //    └ boolean | null

  const u = useUser("name", "Description");
  //    └ APIUser | null

  const c1 = useChannel("name", "Description");
  //    └ APIInteractionDataResolvedChannel | null
  const c2 = useChannel("name", "Description", {
    // https://discord.com/developers/docs/resources/channel#channel-object-channel-types
    types: [ChannelType.GUILD_TEXT, ChannelType.DM],
  });

  const r = useRole("name", "Description");
  //    └ APIRole | null

  const m = useMentionable("name", "Description");
  //    └ APIUser | APIRole | null

  const n1 = useNumber("name", "Description");
  //    └ number | null
  const n2 = useNumber("name", "Description", { min: 5, max: 100 });

  return () => {}; // ...
};
Choices
String, integer, and number options can be configured with up to 25 choices to
pick from. Like required, Discord will enforce that the value provided is one
of these before submitting the interaction. You can optionally provide a name
for the choice. This will be displayed instead, but the value will still be
returned to you.
function cmd(): CommandHandler {
  useDescription("Command demonstrating choices");

  //    ┌ "foo" | "bar" | "baz"
  const s = useString("str", "Description", {
    choices: ["foo", { value: "bar" }, { name: "Baz", value: "baz" }] as const,
    // The `as const` is important here. Without it, the inferred type of `s`
    // would just be `string`, instead of `"foo" | "bar" | "baz"`.
    required: true, // Mark as `required` to exclude `null` from inferred type
  });

  //    ┌ 1 | 2 | 3 | null
  const n = useNumber("num", "Description", {
    choices: [1, { value: 2 }, { name: "Three", value: 3 }] as const,
  });

  return () => {}; // ...
}

Autocomplete
If you’ve got more than 25 choices, or don’t know them ahead of time, you can
use
Discord’s autocomplete feature.
This is a separate interaction Discord will submit to your application whenever
the user starts typing something for an option. Hooks return the correct values
on autocomplete interactions, so you’re free to use those results when building
suggestions. Similarly to choices, you can optionally provide a name for the
suggestion, which will be displayed instead.
import type { APIApplicationCommandAutocompleteInteraction } from "discord-api-types/payloads/v9/_interactions/autocomplete"; // ?

type Env = { SONG_NAMESPACE: KVNamespace };

function cover(): CommandHandler<Env> {
  useDescription("Get cover art for a song");

  const artist = useString("artist", "Artist of song", { required: true });

  //    ┌ string
  const name = useString<Env>("name", "Name of song", {
    required: true,
    async autocomplete(interaction, env, ctx) {
      //               │            │    └ ExecutionContext
      //               │            └ Env
      //               └ APIApplicationCommandAutocompleteInteraction
      //
      // `artist`, `name`, and `year` will have their current values set.
      // We can use them when building suggestions for the song name.

      // Can use the current option...
      const songs = await env.SONG_NAMESPACE.list({ prefix: name });

      const matching = songs.keys.filter((song) => {
        // ...options defined before
        if (artist && song.metadata.artist !== artist) return false;
        // ...or after
        if (year && song.metadata.year !== year) return false;
        return true;
      });

      return matching.map((song) => song.name);
      // Could also return an array of { name: "...", value: "..." } objects
    },
  });

  const year = useInteger("year", "Year song was released");

  return () => {}; // ...
}
Subcommands
Discord supports grouping chat commands into
subcommands and subcommand-groups.
Commands can only be nested 2 levels deep. Note that using subcommands makes
your base command unusable, so you can’t define a handler for /a if /a e is
a subcommand.
const handler = createHandler({
  // ...
  commands: {
    a: {          // `a` is a command
      b: {        // `b` is a subcommand-group
        c: cmd1,  // `c` is a subcommand
        d: cmd2,  // `d` is a subcommand
      },
      e: cmd3,    // `e` is a subcommand
    },
  },
});

Default Permission
By default,
any server member can use your commands.
If you’d like them to be disabled by default, you can call
useDefaultPermission(false). The same rules for calling hooks apply. Note that
calling useDefaultPermission(false) in a subcommand will make the top-level
base command disabled by default, as permissions can only be applied at the
command level. See the later section on
Calling Discord APIs for instructions on granting
permissions to some users/roles.
function cmd(): CommandHandler {
  useDefaultPermission(false);
  return () => {}; // ...
}
Defining User Commands
Instead of invoking commands via chat, Discord also supports invoking them
via a context menu on users.
User commands are defined like regular slash commands and respond in exactly the
same way. The difference is that you can’t call useDescription or any option
hooks, and there’s an extra
user
parameter passed to the handler function, containing the user the command was
invoked on. They’re still defined as functions returning functions though, so
you can use Message Components in your
responses.
import { Message, UserCommandHandler, createElement, createHandler } from "slshx";
import type { APIUser, APIUserApplicationCommandInteraction } from "discord-api-types/v9";

function greet(): UserCommandHandler {
  return (interaction, env, ctx, user) => {
    //    │                      └ APIUser
    //    └ APIUserApplicationCommandInteraction
    //
    // interaction.data.target_id === user.id
    return <Message>Hello {user.name}!</Message>;
  };
};

const handler = createHandler({
   // ...
   userCommands: { "Greet User": greet }
});


Defining Message Commands
Similarly, commands can also be invoked
via a context menu on messages.
Instead of a user, the extra handler parameter will contain the
message
the command was invoked on.
import { Message, MessageCommand, createElement, createHandler } from "slshx";
import type { APIMessage, APIMessageApplicationCommandInteraction } from "discord-api-types/v9";

type Env = { BOOKMARKS_NAMESPACE: KVNamespace };

function bookmark(): MessageCommandHandler<Env> {
  return async (interaction, env, ctx, message) => {
    //          │                      └ APIMessage
    //          └ APIMessageApplicationCommandInteraction
    //
    // interaction.data.target_id === message.id
    await env.BOOKMARKS_NAMESPACE.put(message.id, message.content);
    return <Message ephemeral>Bookmarked!</Message>;
  }
};

const handler = createHandler({
  // ...
  messageCommands: { "Bookmark Message": bookmark },
});


Responding to Commands
JSX
Slshx allows you to respond using either JSX syntax (e.g. <Message>) or
plain message objects
(e.g. { content: "..." }). These are functionally identical, JSX is just
syntactic sugar that improves code readability. From now on, we’ll show both the
JSX and plain object responses.
import { CommandHandler, Message, createElement } from "slshx";

function add(): CommandHandler {
  // ...
  return (interaction, env, ctx) => {
    return <Message>{a} + {b} = {a + b}</Message>;
    // ...is exactly the same as...
    return { content: `${a} + ${b} = ${a + b}` };
  };
}
If you’re using JSX, you must import createElement and Fragment from
slshx. You’ll also need a build tool configured to process JSX into regular
JavaScript using Slshx’s createElement and Fragment factories. The
slshx-starter repository includes
all this configuration for you.
$ esbuild --jsx-factory=createElement --jsx-fragment=Fragment
// tsconfig.json
{
  "compilerOptions": {
    "jsx": "react",
    "jsxFactory": "createElement",
    "jsxFragmentFactory": "Fragment"
  }
}
Like React, you can define your own reusable components to use in responses.
These may contain fragments. In this example, we’re using
Message Components to add interactivity.
import { Button, Message, Row, createElement, Fragment, CommandHandler, useNumber } from "slshx";

type ConfirmButtonsProps = { yesId: string; noId: string };
function ConfirmButtons({ yesId, noId }: ConfirmButtonsProps) {
  return (
    <> {/* <- Fragment */}
      <Button id={yesId} success>Yes</Button>
      <Button id={noId} danger>No</Button>
    </>
  );
}

type AddMessageProps = { a: number; b: number; yesId: string; noId: string };
function AddMessage({ a, b, yesId, noId }: AddMessageProps) {
  return (
    <Message>
      {a} + {b} = {a + b}?
      <Row><ConfirmButtons yesId={yesId} noId={noId} /></Row>
    </Message>
  );
}

function add(): CommandHandler {
  useDescription("...");
  const a = useNumber(/* ... */);
  const b = useNumber(/* ... */);
  return () => <AddMessage a={a} b={b} yesId={"..."} noId={"..."} />;
}
Deferring
Discord requires you to respond to interactions within 3 seconds. If you need
longer than this, you can defer your response for up to 15 minutes. To defer a
response, return a generator function as your handler instead of a regular
function, then yield.
function deferred(): CommandHandler {
  // ...
  // The `*` marks this as a generator function
  return async function* (interaction, env, ctx) {
    // yield within 3 seconds to defer the response...
    yield; // Discord will show "<app> is thinking..."
    // ...then return within 15 minutes
    return <Message>...</Message>; // Return the response when you're ready
  };
}

Content
Messages can contain the same
Markdown syntax
you’d normally use in Discord. If you’re using JSX and would like to use
newlines or other trailing whitespace, you’ll need to escape them with {" "}
(e.g. {"\n"}).
function code(): CommandHandler {
  // ...
  return () => {
    // With JSX
    return (
      <Message>
        This is how you log to the console in **JavaScript**:{"\n"}
        ```javascript{"\n"}
        console.log("Hello!"){"\n"}
        ```
      </Message>
    );

    // Without JSX
    return {
      content: `This is how you log to the console in **JavaScript**:
\`\`\`javascript
console.log("Hello!")
\`\`\``,
    };
  };
}

Mentions
To mention…
- a User: include
<@userId> - a Role: include
<@&roleId> - a Channel: include
<#channelId> - Everyone: include
@everyone - Here: include
@here
…in the message. You can control which mentions are allowed using the
allowedMentions/allowed_mentions property.
function hello(): CommandHandler {
  // ...
  return (interaction) => {
    // Get the ID of the user who invoked the command
    const userId = interaction.member?.user.id ?? "";

    // With JSX
    return (
      <Message allowedMentions={{ users: [userId] }}>
        Hello {`<@${userId}>`}!
      </Message>
    );

    // Without JSX
    return {
      allowed_mentions: { users: [userId] },
      content: `Hello <@${userId}>!`,
    };
  };
}

Flags
Messages can be marked as
ephemeral,
in which case they’ll only be visible to the user who invoked the command. You
can also mark them as tts, which will cause Discord to speak the content using
text-to-speech.
function add(): CommandHandler {
  // ...
  return () => {
    // With JSX
    return (
      <Message ephemeral tts>
        {a} + {b} = {a + b}
      </Message>
    );

    // Without JSX
    return {
      flags: 64, // ephemeral
      tts: true,
      content: `${a} + ${b} = ${a + b}`,
    };
  };
}

Attachments
Messages can include file and image attachments. Slshx expects these as an array
of File objects.
function file(): CommandHandler {
  // ...
  return () => {
    const file = new File(["Hello!"], "hello.txt", { type: "text/plain" });

    // With JSX
    return <Message attachments={[file]}>Here's a file:</Message>;

    // Without JSX
    return { attachments: [file], content: "Here's a file:" };
  };
}

Embeds
Message can include up to 10
rich-embeds.
Embeds can include all sorts of things, including a title, description, URL,
media or fields. Media can reference attachments using the attachment://
scheme. If you’re using JSX, image, thumbnail, video, footer,
provider, and author properties can be defined as either strings or
full-objects.
import { Message, Embed, Field, createElement } from "slshx";

function embed(): CommandHandler {
  // ...
  return async () => {
    const image = await fetch("https://via.placeholder.com/300");
    const buffer = await image.arrayBuffer();
    const file = new File([buffer], "image.png", { type: "image/png" });

    // With JSX
    return (
      <Message attachments={[file]}>
        Message Content
        <Embed
          // All these properties are optional
          title="Embed Title"
          url="https://miniflare.dev"
          timestamp={new Date()}
          color={0x0094ff}
          image="attachment://image.png" // or image={{ url: "...", width: ..., height: ... }}
          thumbnail="https://via.placeholder.com/100"
          footer="Footer" // or footer={{ text: "Footer", iconUrl: "..." }}
          author="Slshx" // or author={{ name: "Slshx", url: "...", iconUrl: "..." }}
        >
          Embed Description
          <Field name="Field 1">Value 1</Field>
          <Field name="Inline Field 2" inline>Value 2</Field>
          <Field name="Inline Field 3" inline>Value 3</Field>
        </Embed>
        {/* Can include up to 10 embeds here */}
      </Message>
    );

    // Without JSX
    return {
      attachments: [file],
      content: "Message Content",
      embeds: [
        {
          // All these properties are optional
          title: "Embed Title",
          description: "Embed Description",
          url: "https://miniflare.dev",
          timestamp: new Date().toISOString(),
          color: 0x0094ff,
          image: { url: "attachment://image.png" },
          thumbnail: { url: "https://via.placeholder.com/100" },
          footer: { text: "Footer" },
          author: { name: "Slshx" },
          fields: [
            { name: "Field 1", value: "Value 1" },
            { name: "Inline Field 2", value: "Value 2", inline: true },
            { name: "Inline Field 3", value: "Value 3", inline: true },
          ],
        },
      ],
    };
  };
}

Using Message Components
Message Components
allow you to add interactive elements such as buttons and select menus to your
messages. When a user interacts with a component, Discord submits an interaction
to your application including a custom ID. Slshx uses this ID to route the
interaction to the correct handler.
Buttons
To generate a custom ID that includes the required Slshx routing information,
call the useButton hook. This takes a callback function taking an
interaction, env, and ctx that will be called when the button is clicked.
Unlike regular command invocations, component interactions like button clicks
can update the message that triggered them. There are
4 possible responses
to a component interaction:
-
Create a new message: return a message exactly as we’ve been doing so far
import { CommandHandler, useButton, APIMessageComponentInteraction } from "slshx";
import type { APIMessageButtonInteractionData } from "discord-api-types/v9";

function cmd(): CommandHandler {
  const buttonId = useButton((interaction, env, ctx) => {
    //                        └ APIMessageComponentInteraction<APIMessageButtonInteractionData>
    // With JSX
    return <Message>Button clicked, and new message created!</Message>;
    // Without JSX
    return { content: "Button clicked, and new message created!!" };
  });
  return () => {}; // ...
}
-
Update the original message: return a partial
<Message>with the
updateproperty set, or a plain message object with the[$update]
property set totrueimport { $update } from "slshx"; function cmd(): CommandHandler { const buttonId = useButton((interaction, env, ctx) => { // With JSX return ( <Message update>Button clicked, and original message updated!</Message> ); // Without JSX return { [$update]: true, content: "Button clicked, and original message updated!", }; }); return () => {}; // ... }
-
Defer the response, and then create a new message: use a generator for
the callback function,yield, then return a message exactly as we’ve been
doing so farfunction cmd(): CommandHandler { const buttonId = useButton(async function* (interaction, env, ctx) { // yield within 3 seconds to defer the response... yield; // Discord will show "<app> is thinking..." // ...then return within 15 minutes // With JSX return <Message>Button clicked, and new message created!</Message>; // Without JSX return { content: "Button clicked, and new message created!" }; }); return () => {}; // ... }
-
Defer the response, and then update the original message: use a generator
for the callback function,yield $update, then return a partial<Message>
or plain message objectimport { $update } from "slshx"; function cmd(): CommandHandler { const buttonId = useButton(async function* (interaction, env, ctx) { // yield within 3 seconds to defer the response... yield $update; // Discord WON'T show "<app> is thinking..." // ...then return within 15 minutes // With JSX return <Message>Button clicked, and original message updated!</Message>; // Without JSX return { content: "Button clicked, and original message updated!" }; }); return () => {}; // ... }
Once you have a routable custom ID, wire it up to a button in your original
command response. You can add additional data to the end of this ID and
Slshx will include it in the interaction when calling your handler. Use this to
store state you need to persist between interactions. IDs (including routing
information) must be at most 100 characters long.
Buttons must be contained within action rows. An action row can contain up to 5
buttons. If you’re using JSX and don’t wrap your button in an action row, Slshx
will implicitly create one just for that button.
Buttons have
5 styles:
primary, secondary,
success,
danger, and link. By default, the secondary
style is used. Link buttons accept a URL instead of a custom ID, and do not
trigger an interaction with your application.
import { ComponentType, ButtonStyle, createElement, Message, Row, Button, $update, useButton, CommandHandler } from "slshx";

function buttons(): CommandHandler {
  // ...
  const buttonId1 = useButton((interaction, env, ctx) => {
    const extraData = interaction.data.custom_id.substring(buttonId1.length);
    // `extraData` will be "extra" when the "Primary" button is clicked

    // With JSX
    return <Message update>Button clicked: {extraData}</Message>;

    // Without JSX
    return {
      [$update]: true,
      content: `Button clicked: ${extraData}`,
      // Using JSX will implicitly remove all buttons from the message unless
      // they're redefined as children. If you'd like to keep them, you can
      // remove this next line.
      components: [],
    };
  });
  const buttonId2 = useButton(/* ... */);
  // ...
  return () => {
    // With JSX
    return (
      <Message>
        Press some buttons!
        <Row>
          <Button id={buttonId1 + "extra"} primary>Primary</Button>
          <Button id={buttonId2}>Secondary</Button>
          <Button id={buttonId3} success>Success</Button>
          <Button id={buttonId4} danger>Danger</Button>
          <Button url="https://miniflare.dev">Link</Button>
        </Row>
        <Button id={buttonId5}>Implicit Row</Button>
      </Message>
    );

    // Without JSX (this is where it starts to be really useful ?)
    return {
      content: "Press some buttons!",
      components: [
        {
          type: ComponentType.ACTION_ROW,
          components: [
            {
              type: ComponentType.BUTTON,
              custom_id: buttonId1 + "extra",
              style: ButtonStyle.PRIMARY,
              label: "Primary",
            },
            {
              type: ComponentType.BUTTON,
              custom_id: buttonId2,
              style: ButtonStyle.SECONDARY,
              label: "Secondary",
            },
            {
              type: ComponentType.BUTTON,
              custom_id: buttonId3,
              style: ButtonStyle.SUCCESS,
              label: "Success",
            },
            {
              type: ComponentType.BUTTON,
              custom_id: buttonId4,
              style: ButtonStyle.DANGER,
              label: "Danger",
            },
            {
              type: ComponentType.BUTTON,
              url: "https://miniflare.dev",
              style: ButtonStyle.LINK,
              label: "Link",
            },
          ],
        },
        {
          type: ComponentType.ACTION_ROW,
          components: [
            {
              type: ComponentType.BUTTON,
              custom_id: buttonId5,
              style: ButtonStyle.SECONDARY,
              label: "Implicit Row",
            },
          ],
        },
      ],
    };
  };
}

Buttons can also be disabled or include emojis in their labels. Disabled buttons
aren’t clickable, and cannot submit interactions. Emojis can either be strings
or objects
containing the emoji’s id, name, and whether it’s animated.
function buttons(): CommandHandler {
  // ...
  return () => {
    // With JSX
    return (
      <Message>
        Try to press this button!
        <Button
          id={buttonId}
          danger
          disabled
          emoji="☹️" // or emoji={{ id: "...", name: "...", animated: false }}
        >
          Disabled Button
        </Button>
      </Message>
    );

    // Without JSX
    return {
      content: "Try press this button!",
      components: [
        {
          type: ComponentType.ACTION_ROW,
          components: [
            {
              type: ComponentType.BUTTON,
              custom_id: buttonId,
              style: ButtonStyle.DANGER,
              label: "Disabled Button",
              disabled: true,
              emoji: { name: "☹️" },
            },
          ],
        },
      ],
    };
  };
}

Select Menus
Select menus let users select one or multiple options from a dropdown. You’ll
receive an interaction whenever the user clicks outside the menu, after
selecting some options. They can have up to 25 options, optional placeholder
text (for when nothing is selected), and can have their minimum/maximum
selectable items configured.
Like buttons, you first need to get a routable custom ID using the
useSelectMenu hook, and then wire this up to a select menu in your original
command response. They can also be disabled.
Menus need to be included in an action row. However, they take up the full row,
so this can’t be shared with other components. If you’re using JSX and don’t
wrap your menu in an action row, Slshx will implicitly create one for that menu.
Options must include a value and label. The selected values are submitted
with the interaction. They may include a description, emoji or be marked as
the default option.
import { ComponentType, createElement, Message, Select, Option, $update, useSelectMenu, CommandHandler, APIMessageComponentInteraction } from "slshx";
import type { APIMessageSelectMenuInteractionData } from "discord-api-types/v9";

function selects(): CommandHandler {
  // ...
  const selectId = useSelectMenu((interaction, env, ctx) => {
    //                            └ APIMessageComponentInteraction<APIMessageSelectMenuInteractionData>

    // Array of selected values, e.g. ["1", "3"]
    const selected = interaction.data.values;

    // With JSX
    return <Message update>Selected: {selected.join(",")}</Message>;

    // Without JSX
    return {
      [$update]: true,
      content: `Selected: ${selected.join(", ")}`,
      // Using JSX will implicitly remove all components from the message unless
      // they're redefined as children. If you'd like to keep them, you can
      // remove this next line.
      components: [],
    };
  });

  return (interaction, env, ctx) => {
    // With JSX
    return (
      <Message>
        Select some options!
        <Select
          id={selectId}
          placeholder="Select something..."
          min={1} // Minimum number of items to select, defaults to 1
          max={2} // Maximum number of items to select, defaults to 1
        >
          <Option value="1" default>One</Option>
          <Option value="2" description="1st prime number">Two</Option>
          <Option value="3" emoji="?">Three</Option>
        </Select>
      </Message>
    );

    // Without JSX
    return {
      content: "Select some options!",
      components: [
        {
          type: ComponentType.ACTION_ROW,
          components: [
            {
              type: ComponentType.SELECT_MENU,
              custom_id: selectId,
              placeholder: "Select something...",
              min_values: 1,
              max_values: 2,
              options: [
                { value: "1", label: "One", default: true },
                { value: "2", label: "Two", description: "1st prime number" },
                { value: "3", label: "Three", emoji: { name: "?" } },
              ],
            },
          ],
        },
      ],
    };
  };
}

Deploying Commands Globally
Once you’re happy with your commands, you can deploy them globally, making them
accessible to all servers you’ve added your application to, not just
testServerId. Changes may take up to an hour to propagate.
You’ll need to deploy your Worker first with wrangler publish. Once you’ve
done this, you’ll need to update the Interactions Endpoint URL in the
Discord Developer Portal to point
to your deployed URL, instead of your Cloudflare Tunnel. You’ll probably want to
create 2 applications: one for development, using your tunnel URL, and one for
production, using your deployed URL.
If you’re using the slshx-starter
template, run npm run deploy:global to deploy your commands globally.
If not, make sure your applicationId and applicationSecret are set to your
production application’s credentials, and visit your worker in the browser. You
should see the ⚔️ Slshx landing page. Click the Deploy Commands Globally
button.

Calling Discord APIs
⚠️ Slshx aims to abstract away most of the Discord API. You shouldn’t use
these functions unless you really need to.
Sometimes you might need to call Discord APIs to send additional messages, edit
existing ones, or update command permissions. Slshx exports typed functions for
calling APIs associated with interactions.
Authorisation
Some of these APIs require an interaction token, which you can obtain from
interaction.token in any command, component or autocomplete handler.
import { createFollowupMessage } from "slshx";

const applicationId = "...";

function followup(): CommandHandler {
  // ...
  return (interaction, env, ctx) => {
    async function sendFollowup() {
      await scheduler.wait(1000);

      // With JSX
      let msg = <Message>Followup!</Message>;
      // Without JSX
      msg = { content: "Followup!" };

      await createFollowupMessage(applicationId, interaction.token, msg);
    }

    // Remember to `waitUntil` extra promises
    ctx.waitUntil(sendFollowup());

    return <Message>I'll send something in a second!</Message>;
  };
}
Others require a bearer token which can be obtained using the getBearerAuth
function, which takes your applicationId and applicationSecret.
import { getBearerAuth, getGuildApplicationCommandPermissions } from "slshx";

const applicationId = "...";
const applicationSecret = "...";
const serverId = "...";

const auth = await getBearerAuth(applicationId, applicationSecret);

await getGuildApplicationCommandPermissions(applicationId, serverId, auth);
List
Interactions (Require Interaction Token)
getOriginalInteractionResponse(applicationId, interactionToken)editOriginalInteractionResponse(applicationId, interactionToken, message*)deleteOriginalInteractionResponse(applicationId, interactionToken)createFollowupMessage(applicationId, interactionToken, message*)getFollowupMessage(applicationId, interactionToken, messageId)editFollowupMessage(applicationId, interactionToken, messageId, message*)deleteFollowupMessage(applicationId, interactionToken, messageId)
message* arguments accept the same message objects we’ve been returning from
command handlers. This means you can use JSX, and attachments must be an array
of File objects.
Commands (Require Bearer Token)
getGlobalApplicationCommands(applicationId, auth)createGlobalApplicationCommand(applicationId, command, auth)getGlobalApplicationCommand(applicationId, commandId, auth)editGlobalApplicationCommand(applicationId, commandId, command, auth)deleteGlobalApplicationCommand(applicationId, commandId, auth)bulkOverwriteGlobalApplicationCommands(applicationId, commands, auth)getGuildApplicationCommands(applicationId, guildId, auth)createGuildApplicationCommand(applicationId, guildId, command, auth)getGuildApplicationCommand(applicationId, guildId, commandId, auth)editGuildApplicationCommand(applicationId, guildId, commandId, command, auth)deleteGuildApplicationCommand(applicationId, guildId, commandId, auth)bulkOverwriteGuildApplicationCommands(applicationId, guildId, commands, auth)
Permissions (Require Bearer Token)
getGuildApplicationCommandPermissions(applicationId, guildId, auth)getApplicationCommandPermissions(applicationId, guildId, commandId, auth)editApplicationCommandPermissions(applicationId, guildId, commandId, permissions, auth)bulkEditApplicationCommandPermissions(applicationId, guildId, permissions, auth)
Missing APIs
If an API does not have Slshx bindings, you can use the
call(method, path, body?, auth?) function:
methodmust be a standard HTTP methodpathwill be appended tohttps://discord.com/api/v9to form the endpoint
URLbodycan be an instance ofFormData(sent asmultipart/form-data),
URLSearchParams(sent asapplication/x-www-form-urlencoded), or an
arbitrary JSON-serializable object (sent asapplication/json). Ifbodyis
falsy, it’s omitted.authcan be an object of the form{ bearer: string }(whatgetBearerAuth
returns) to useBearertoken authentication, or
{ username: string; password: string }to use HTTPBasicauthentication
This function is generic in Body and Result. You can find types for these in
the discord-api-types package. See src/api/ for examples of
using this function.
Notes
Rate Limits
Most Discord APIs are rate limited to prevent abuse. Notably, the endpoint Slshx
uses to update commands in your test server is limited to 2 requests per minute.
Slshx will only call this API if commands have changed since the last code
reload. If you hit the rate limit, wait the required time, then save your code
again.
Enums
Slshx redefines certain Discord enums instead of using the
definitions in discord-api-types, which are declared as ambient const enums,
and can’t be accessed with the --isolatedModules flag. This flag is required
when using TypeScript with esbuild.
We use consts as opposed to enums as they still type-check with
discord-api-types‘ enums, and they’re easier to tree shake.
History
Slshx originally used generator functions to define commands. The syntax looked
something like this:
const add: Command<Env> = async function* () {
  useDescription("Adds two numbers together");
  const a = useNumber("a", "1st number", { required: true });
  const b = useNumber("b", "2nd number", { required: true });

  // `yield` at least once, once all hooks were called
  const [interaction, env, ctx] = yield;

  // Optionally, `yield` again to defer the response
  yield;

  return <Message>...</Message>;
};
This has the advantage of using one fewer nesting levels when responding to
invocations. However, there were too many foot-guns and issues with this syntax:
- You weren’t meant to
awaitbefore the firstyield, despite it being an
async-generator - The type for
yield-ed results had to be the same, even though the second
yieldshouldn’t return anything - You had to destructure the entire
yield-ed tuple or index it manually,
otherwise TypeScript would complain - Code completion for plain object message fields in
returns was broken
I’ve kept it here though since I think it’s still pretty neat, and I didn’t know
you could resume generators with values (e.g. [interaction, env, ctx]) before
this project.
Acknowledgements
Thanks to the
discord-api-types
maintainers for providing Discord API TypeScript definitions.