
React Form Builder 2
A complete react form builder that interfaces with a json endpoint to load and save generated forms.
- Upgraded to React 16.8.6
- Bootstrap 4.x, Font-Awesome 5.x
- Use react-dnd for Drag & Drop
- Save form data with dummy api server
- Show posted data on readonly form
- Multi column row
- Custom Components
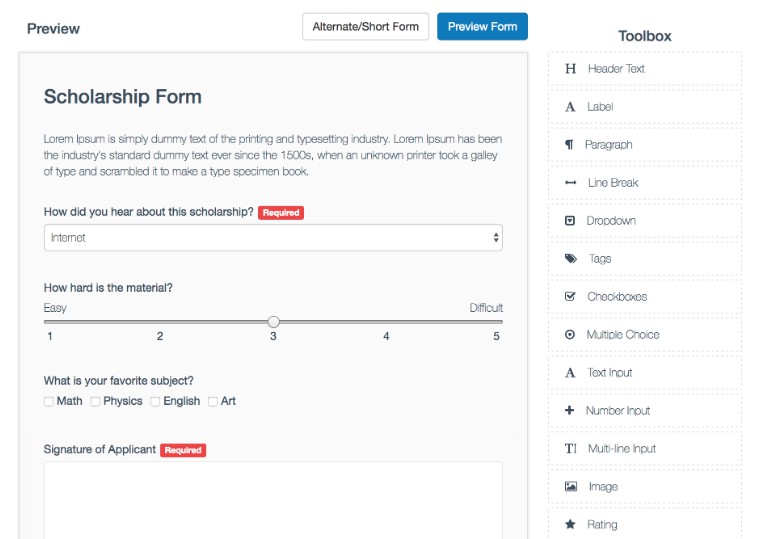
DEMO Slow Loading…. back-end is running at FREE Heroku, hence it may not work if free time runs out for month.

Editing Items

Basic Usage
import React from 'react';
import ReactDOM from 'react-dom';
import { ReactFormBuilder } from 'react-form-builder2';
import 'react-form-builder2/dist/app.css';

ReactDOM.render(
  <ReactFormBuilder />,
  document.body
)
Props
var items = [{
  key: 'Header',
  name: 'Header Text',
  icon: 'fa fa-header',
  static: true,
  content: 'Placeholder Text...'
},
{
  key: 'Paragraph',
  name: 'Paragraph',
  static: true,
  icon: 'fa fa-paragraph',
  content: 'Placeholder Text...'
}];

<ReactFormBuilder
  url='path/to/GET/initial.json'
  toolbarItems={items}
  saveUrl='path/to/POST/built/form.json' />
React Form Generator
Now that a form is built and saved, let’s generate it from the saved json.
import React from 'react';
import ReactDOM from 'react-dom';
import { ReactFormGenerator } from 'react-form-builder2';
import 'react-form-builder2/dist/app.css';

ReactDOM.render(
  <ReactFormGenerator
    form_action="/path/to/form/submit"
    form_method="POST"
    task_id={12} // Used to submit a hidden variable with the id to the form from the database.
    answer_data={JSON_ANSWERS} // Answer data, only used if loading a pre-existing form with values.
    authenticity_token={AUTH_TOKEN} // If using Rails and need an auth token to submit form.
    data={JSON_QUESTION_DATA} // Question data
  />,
  document.body
)
Form Params
| Name | Type | Required? | Description |
|---|---|---|---|
| form_action | string | Required | URL path to submit the form |
| form_method | string | Required | Verb used in the form submission. |
| action_name | string | Optional | Defines form submit button text. Defaults to “Submit” |
| onSubmit | function | optional | Invoke when submit data, if exists will override form post. |
| data | array | Required | Question data retrieved from the database |
| back_action | string | Optional | URL path to go back if needed. |
| back_name | string | Optional | Button text for back action. Defaults to “Cancel”. |
| task_id | integer | Optional | User to submit a hidden variable with id to the form on the backend database. |
| answer_data | array | Optional | Answer data, only used if loading a pre-existing form with values. |
| authenticity_token | string | Optional | If using Rails and need an auth token to submit form. |
| hide_actions | boolean | Optional | If you would like to hide the submit / cancel buttons set to true. |
| skip_validations | boolean | Optional | Suppress form validations on submit, if set to true. |
| display_short | boolean | Optional | Display an optional “shorter page/form” which is common for legal documents or situations where the user will just have to sign or fill out a shorter form with only the critical elements. |
| read_only | boolean | Optional | Shows a read only version which has fields disabled and removes “required” labels. |
| variables | object | Optional | Key/value object that can be used for Signature variable replacement. |
Read only Signatures
Read only signatures allow you to use a saved/canned signature to be placed into the form. The signature will be passed in through the variables property to ReactFormGenerator and ReactFormBuilder.
To use a read only signature, choose the “Read only” option and enter the key value of the variable that will be used to pass in the signature.

The signature data should be in base 64 format.
There is a variables.js file that contains a sample base 64 signature. This variable is passed into the demo builder and generator for testing. Use the variable key “JOHN” to test the variable replacement.
Vendor Dependencies
In order to make the form builder look pretty, there are a few dependencies other than React. Style sheets from Bootstrap and FontAwesome must be added to index.html. See the example code in index.html for more details.
- Bootstrap
- FontAwesome
SASS
All relevant styles located in css/application.css.scss.
Develop
$ yarn install
$ yarn run build:dist
$ yarn run serve:api
$ yarn start
Then navigate to http://localhost:8080/ in your browser and you should be able to see the form builder in action.
Customizations
- to customize the field edit form copy “src/form-elements-edit.jsx” to your project and pass it to the ReactFormBuilder as a prop. Here is an example
<ReactFormBuilder
    edit
    data={form}
    //toolbarItems={items}
    customToolbarItems={items}
    onChange={handleUpdate}
    onSubmit={handleSubmit}

    renderEditForm={props => <FormElementsEdit {...props}/>}
/>
- to customize the ReactFormGenerator submit button use it like this
<ReactFormGenerator
    data={form}
    toolbarItems={items}
    onChange={handleUpdate}
    onSubmit={handleSubmit}
    actionName="Set this to change the default submit button text"
    submitButton={<button type="submit" className="btn btn-primary">Submit</button>}
    backButton={<a href="/" className="btn btn-default btn-cancel btn-big">Back</a>}
/>
Custom Components
- Import component registry from react-form-builder2
import { ReactFormBuilder, ElementStore, Registry } from 'react-form-builder2';
- Simple Custom Component
const TestComponent = () => <h2>Hello</h2>;
- Custom Component with input element
const MyInput = React.forwardRef((props, ref) => {
  const { name, defaultValue, disabled } = props;
  return <input ref={ref} name={name} defaultValue={defaultValue} disabled={disabled} />;
});
- Register custom components to be used in form builder
Registry.register('MyInput', MyInput);
Registry.register('TestComponent', TestComponent);
- Define Custom Components in Toolbar
const items = [{
  key: 'TestComponent',
  element: 'CustomElement',
  component: TestComponent,
  type: 'custom',
  field_name: 'test_component',
  name: 'Something You Want',
  icon: 'fa fa-cog',
  static: true,
  props: { test: 'test_comp' },
  label: 'Label Test',
}, {
  key: 'MyInput',
  element: 'CustomElement',
  component: MyInput,
  type: 'custom',
  forwardRef: true,
  field_name: 'my_input_',
  name: 'My Input',
  icon: 'fa fa-cog',
  props: { test: 'test_input' },
  label: 'Label Input',
},
// Additional standard components, you don't need full definition if no modification is required.
{
  key: 'Header',
}, {
  key: 'TextInput',
}, {
  key: 'TextArea',
}, {
  key: 'RadioButtons',
}, {
  key: 'Checkboxes',
}, {
  key: 'Image',
}];
- Use defined Toolbar in ReactFormBuilder
  <ReactFormBuilder
    ...
    toolbarItems={items}
  />
- Find working example here
Examples
Tests
$ npm test
Test is not working at this moment.