? react-thumbnail-generator

Simply create a thumbnail generator for your project?
Storybook Github Page

Features ?
- Download Thumbnail Image
- Resize Canvas
- Limited Width Size (window.innerWidth – 70)
- Choose Background Color
- Choose Background Picture
- Choose Font Family
- Choose Font Size
- Choose Font Stroke & color
- Choose Font Color
- Choose Image Type (
png,jpg,webp) - Add Custom Web Font Family
How to use ?
STEP 1️⃣
- Install library
yarn add react-thumbnail-generator
or
npm install react-thumbnail-generator
STEP 2️⃣
- Add the div box with the desired ID to
public/index.html <ThumbnailGenerator>is applied with aPortalto avoid being affected by CSS inheritance.
<!DOCTYPE html>
<html lang="en">
  <head>
  <!-- ... -->
  </head>
  <body>
    <div id="root"></div>
    <!-- Enter the ID you want. -->
    <div id="thumbnail-generator"></div>
  </body>
</html>
STEP 3️⃣
- Add <ThumbnailGenerator> component.
import ThumbnailGenerator from 'react-thumbnail-generator';
import iconImage from '../assets/colorImage.png';

const App = () => {
  return (
    <div>
      <ThumbnailGenerator
        id="thumbnail-generator"
        // Enter the ID of the div you added in public/index.html.
        // If you do not enter this option, it will be rendered in the "root" div
        // However, there is a possibility that the UI will change due to CSS inheritance

        iconSrc={iconImage}
        // You can select the icon of the modal open button that you want.
        // If you do not enter this option, the default icon takes effect.

        position="bottom-right"
        // You can select the location of the button that opens the modal.
        // If you do not enter this option, the default position(bottom-right) is applied

        iconSize="medium"
        // You can select the size of the button that opens the modal.
        // If you do not enter this option, the default size(medium) applies

        additionalFontFamily={['Noto Sans', ...]}
        // You can add the font you want. But those fonts should already be applied to your project.
      />
    </div>
  )
}
How do I apply Web Fonts? ?
STEP 1️⃣
- Add a web font.
public/index.html - or CSS fontFamily
<!DOCTYPE html>
<html lang="en">
  <head>
    <!-- ... -->

    <!-- Add a web font -->
    <link rel="preconnect" href="https://fonts.googleapis.com" />
    <link rel="preconnect" href="https://fonts.gstatic.com" crossorigin />
    <link
      href="https://fonts.googleapis.com/css2?family=Zeyada&display=swap"
      rel="stylesheet"
    />
  </head>
  <body>
    <div id="root"></div>
    <div id="thumbnail-generator"></div>
  </body>
</html>
STEP 2️⃣
- Enter font names in array form in the AdditionalFontFamily option
import ThumbnailGenerator from 'react-thumbnail-generator';
import iconImage from '../assets/colorImage.png';

const App = () => {
  return (
    <div>
      <ThumbnailGenerator
        id="thumbnail-generator"
        additionalFontFamily={["Zeyada"]} // (*)
      />
    </div>
  )
}
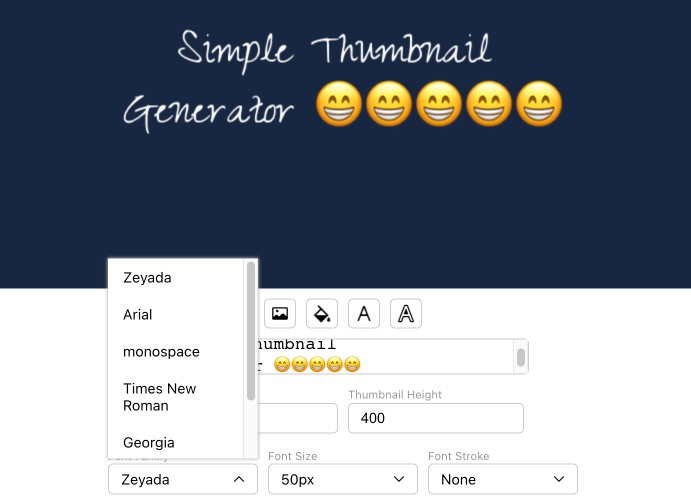
Result Screen ?️

Video ?
Background Color

Picture

? The text displayed on the screen will be line-wrapped.
API ?
-
id
- Optional
- Type:
string
-
iconSrc
- Optional
- Default

- Type:
string
-
position
- Optional
- Default:
bottom-right - Type:
bottom-right | bottom-left | top-right | top-left
-
iconSize
- Optional
- Default:
medium - Type:
small | medium | large
-
additionalFontFamily
- Optional
- Type:
string[]